Preventing unintended operation (panel lock), O “assigning the functions of, The user [1] [2] buttons” (p. 63) – Roland V-8HD HDMI Video Switcher and UVC-01 USB Capture Device Kit User Manual
Page 63: Other features
63
Other Features
Assigning the Functions of the USER [1]
[2] Buttons
* With the factory settings, the freeze function is assigned to the
USER [1] button and the auto switching function is assigned to the
USER [2] button.
1 .
Press the [MENU] button
0
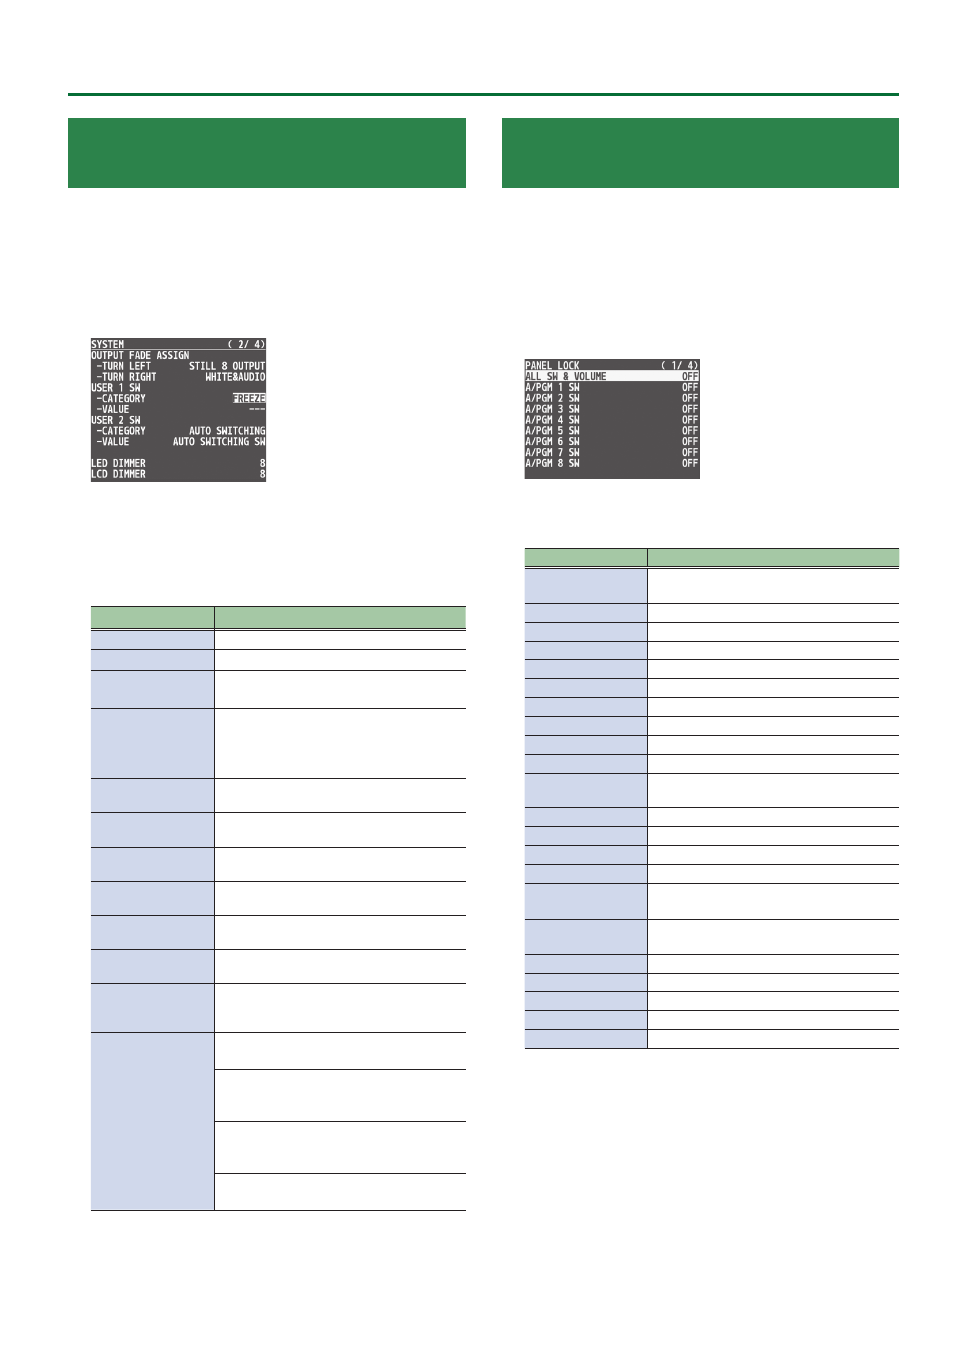
“SYSTEM”
0
select
USER 1 SW or USER 2 SW “CATEGORY” and “VALUE”,
and press the [VALUE] knob.
2 .
Use the [VALUE] knob to select the function that
you want to assign to the USER [1] or [2] button,
and then press the [VALUE] knob.
CATEGORY
Value
Explanation
N/A
No function is assigned.
FREEZE
Turns the freeze function on/off.
AUTO SWITCHING
AUTO SWITCHING SW:
Turns the auto switching function on/off.
BPM TAP
BPM TAP:
If AUTO SWITCHING is “BPM SYNC”, you can
set the BPM according to the tempo at which
you press the button.
INPUT ASSIGN
Each time you press a button, the video source
of the specified input channel switches.
STILL OUTPUT
Pauses the normal output, and preview/final
outputs a cut of the still image.
AUDIO INPUT MUTE
Turns the mute function on/off for the input
audio.
AUDIO OUTPUT MUTE
Turns the mute function on/off for the output
audio.
INPUT SCAN
Each time you press a button, the INPUT 1–8
video changes in order.
MEMORY SCAN
Each time you press a button, preset
memories 1–24 are recalled in order.
REC CONTROL
Controls the recorder’s video record start/
stop if a recorder that supports HDMI REC
TRIGGER functionality is connected.
SEQUENCER
MODE ON/OFF:
Turns sequencer function on/off.
NEXT:
When the sequencer function is on, the same
operation as when you press the [AUTO] button.
PREVIOUS:
When the sequencer function is on, the same
operation as when you press the [CUT] button.
AUTO SEQUENCE:
Turns the auto sequence function on/off.
VALUE
Configures the detailed settings related to “CATEGORY”.
3 .
Press the [MENU] button to quit the menu.
Preventing Unintended Operation
(Panel Lock)
Here’s how you can lock the V-8HD’s buttons and knobs to prevent
unintended operation.
* The [MENU] button blinks when you try to operate a locked button,
knob or other control.
1 .
Press the [MENU] button
0
“SYSTEM”
0
select
“PANEL LOCK”, and press the [VALUE] knob.
The PANEL LOCK menu appears.
2 .
Use the [VALUE] knob to select a target for panel
lock, and press the [VALUE] knob.
Menu item
Explanation
ALL SW & VOLUME
Turns on/off the settings of the following
buttons and knobs in a single action.
A/PGM 1–8 SW
Cross-point A [1]–[8] buttons
B/PST 1–8 SW
Cross-point B [1]–[8] buttons
CUT SW
[CUT] button
AUTO SW
[AUTO] button
MODE SW
[MODE] button
AUX SW
AUX [1]–[8] buttons
PinP 1 SOURCE SW
PinP 1 [1]–[8] buttons
PinP 2 SOURCE SW
PinP 2 [1]–[8] buttons
MEMORY SW
MEMORY [1]–[8] buttons
MACRO SW
AUX / PinP SOURCE / MEMORY [1]–[8]
buttons
TRANSITION SW
[TRANSITION] button
VIDEO FADER
Video fader
SPLIT/VFX A BLOCK
SPLIT/VFX [A] knob/button
SPLIT/VFX B BLOCK
SPLIT/VFX [B] knob/button
PinP 1 BLOCK
PinP 1 [POSITION H] [POSITION V] knobs,
[PVW] [ON] buttons
PinP 2 BLOCK
PinP 2 [POSITION H] [POSITION V] knobs,
[PVW] [ON] buttons
DSK BLOCK
DSK [LEVEL] [GAIN] knobs, [PVW] [ON] buttons
USER 1 SW
USER [1] button
USER 2 SW
USER [2] button
CAPTURE IMAGE SW
[CAPTURE IMAGE] button
OUTPUT FADE
[OUTPUT FADE] knob
3 .
Use the [VALUE] knob to specify whether panel lock
is applied (ON) or not applied (OFF), and press the
[VALUE] knob.
4 .
Repeat steps 2–3 as necessary.
5 .
Press the [MENU] button to quit the menu.