Paxton Superchargers Ford Mustang GT User Manual
Page 22
P/N: 4809654 v5.0
©2010 Paxton Automotive
All Rights Reserved, Intl. Copr. Secured
2
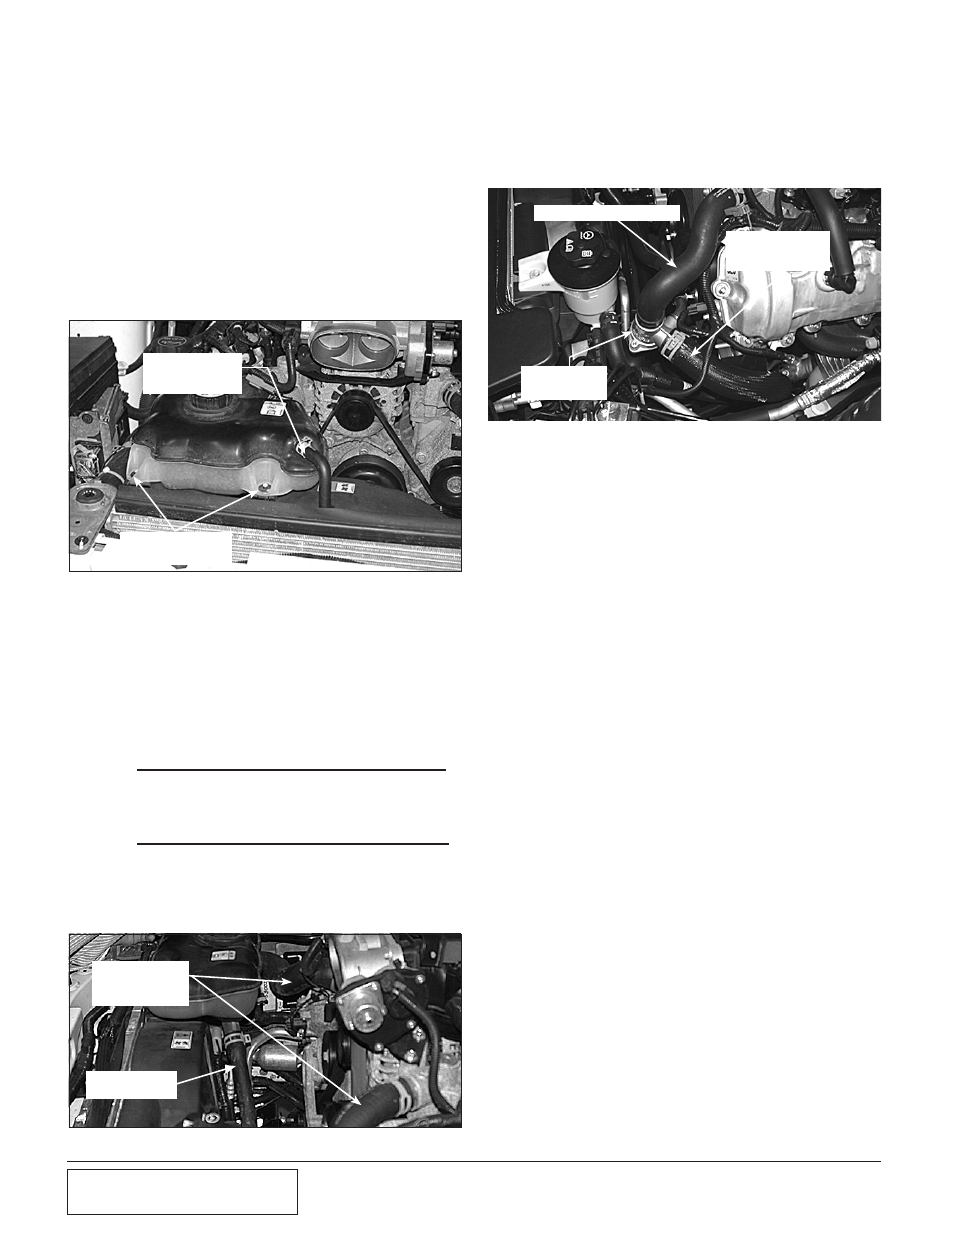
Fig. 1-h
LARGE FORMED
HOSE TO
ENGINE BLOCK
E. Locate the coolant drain plug on the passenger
side of the radiator. Next drain the coolant into
a clean container. This coolant will be reused in
a later step.
F. Remove the two 8mm headed bolts securing the
coolant overflow reservoir to the plastic fan
shroud. (See Fig. 1-f.)
G. Disconnect the small overflow hose (running
across the top of the radiator) from the overflow
reservoir. (See Fig. 1-f.)
H. (2005-2006 Only) Remove the large hose
connecting the thermostat housing to the bot-
tom of the overflow reservoir. Set the hose and
reservoir aside to be reinstalled in a later step.
(See Fig. 1-g.)
(2007-2010 Only) Remove the large hose
connected to the bottom of the coolant overflow
reservoir. (See Fig. 1-g.)
*** NOTE ***
If you are installing H.O. (charge cooled) kit, the cool-
ant reservoir will not be reused. Retain only the filler
cap for reuse.
I. (2005-2006 Only) Remove the two upper radia-
tor hoses from the engine coolant crossover tube
and set aside. The radiator hose located on the
driver’s side will not be reused. (See Fig. 1-g.)
Fig. 1-f
Fig. 1-g
8mm HEADED
BOLTS
COOLANT
OVERFLOW
HOSE
REMOVED IN STEP “I”
TWO UPPER
RADIATOR
HOSES
HOSE TO
THERMOSTAT
1. PREPARATioN/REMovAL,
cont’d
THERMOSTAT
HOUSING
J. (2005-2006 Only) Remove the thermostat
housing from the large formed hose leading to
the engine block and the lower outlet of the
radiator. (See Fig. 1-h.) Set the thermostat
housing aside to be reinstalled in a later step.
K. (2005-2006 Only) Remove the lower hose on
the radiator and set the hose aside, as it will not
be reused.
L. Drain and remove the power steering reservoir.
This reservoir will be relocated in a later step.
M. Disconnect and remove the factory 5/8" plastic
breather hose assembly attached to the driver’s
side valve cover and intake manifold. Remove
the fittings from the ends of the plastic tube for
re-use. Discard the stripped plastic tube. (See
Fig. 1-c.)
O. The installation of this supercharger system
requires the removal, in part or whole, of the
intake manifold so that modifications can be
made to the coolant crossover tube or thermo-
stat housing depending on year of application:
1.
(2005-2006 Only) Unplug the wire con-
nectors from each of the eight injectors.
Remove all of the vacuum hoses and con-
nectors located at the front and rear of the
intake manifold. Remove the connector
attached to the intake manifold runner
control (IMRC) unit located at the rear of
the manifold on the passeger’s side.
2. (2007-2010 Only): Unplug the wire
connectors from each of the eight injec-
tors.
3. Remove the four 8mm headed bolts secur-
ing the injector rails to the intake mani-
fold. Do not remove the small clips that
retain the injectors to the fuel rails. Using
a 5/8" spring lock tool, disconnect the fuel
feed line from the fuel rail. Remove the