Ready to job build, Metric specifications – TA Triumph-Adler DC 2045 User Manual
Page 103
Section 5 OTHER CONVENIENT FUNCTIONS
5-61
●
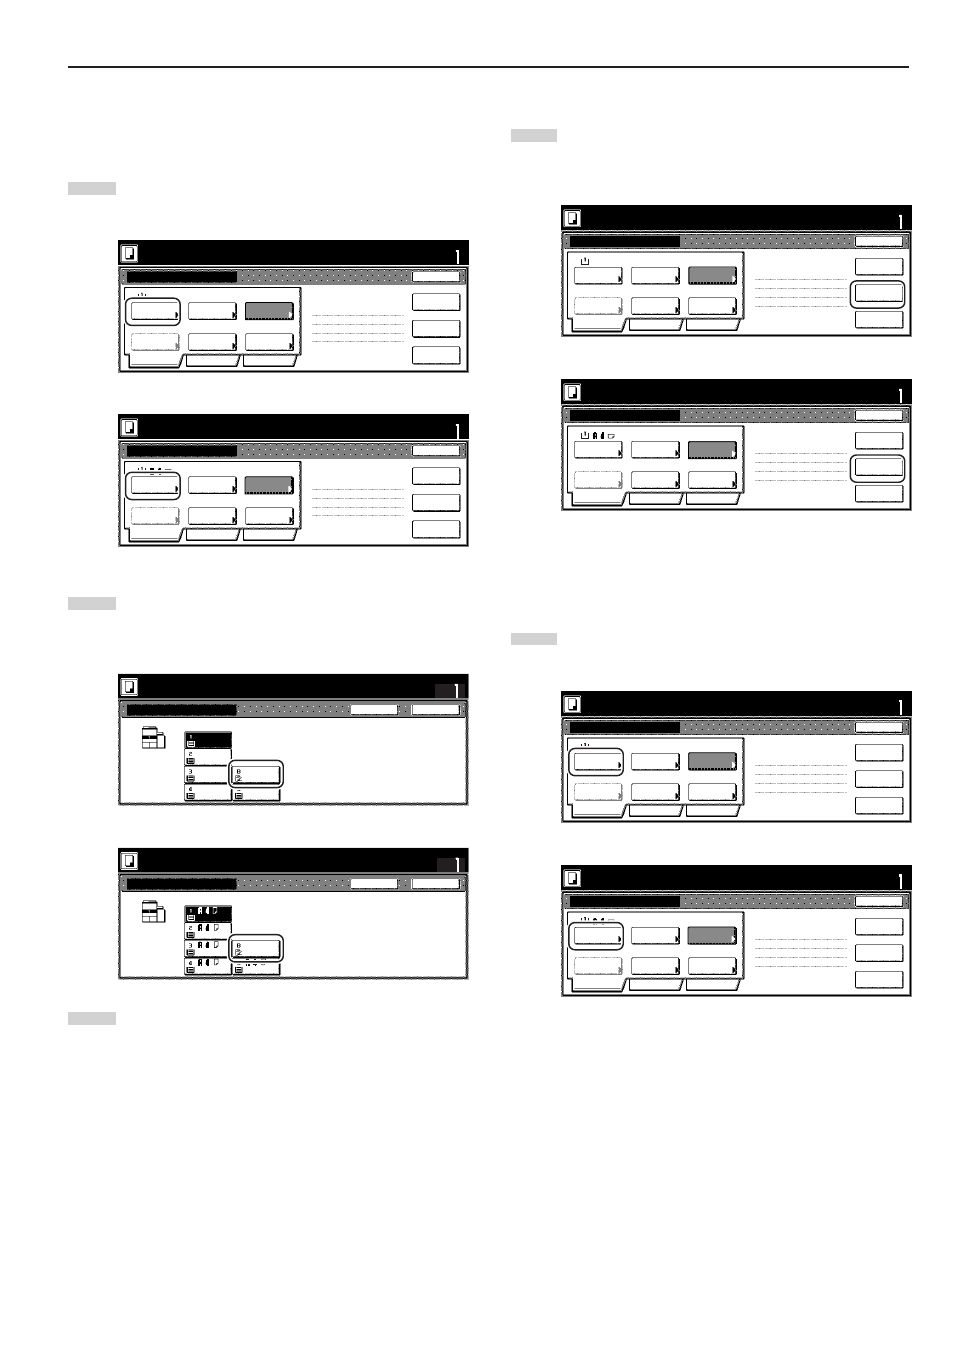
Step 4: Making the settings for the third original (“C” in the
illustration on page 5-58.)
The multi-bypass is to be selected for color paper feed under the
“Select paper” screen.
13
Touch the “Select paper” key. The “Select paper” screen will
be displayed.
Inch specifications
Scan next original(s).
Place the originals and press start key.
Press "Scanning finished" key when starting copy.
Select
paper
1-sided
2 sided copy
Back Edge
1 sided/
2 sided
2 sided copy-Left
Finished page #:4
Next copy page: Front
Orig. set
direction
Original
type
AMS
Reduce
/Enlarge
Finished
Basic
Quality
Edit
None
Job Build - Step4
Cancel
Insert
page
Scanning
finished
Set
Print from
Rear page
11x8
1
/
2
”
Metric specifications
Select paper
1-sided
2-sided Copy
Back Edge
1-sided/
2-sided
2-sided Copy-Left
Finished page #: 4
Next copy page: Front
Orig. set
direction
Original type
AMS
None
Reduce/
Enlarge
Finished
Basic
Quality
Edit
Job Build- Step4
Cancel
Set
Scan next original(s).
Place the originals and press start key.
Press "Scanning finished" key when starting copy.
Insert
blank page
Print from
rear page
Scanning
finished
14
Touch the “Bypass” key.
Touch the “Close” key. The touch panel will return to the
screen in step 13.
Inch specifications
Select paper
Close
Back
Set
Plain
Color
11x8
1
/
2
”
11x8
1
/
2
”
11x8
1
/
2
”
Plain
11x8
1
/
2
”
Plain
11x8
1
/
2
”
Plain
Bypass
Place originals then press Start key.
Ready to Job build.
Metric specifications
Select paper
Close
Back
Set
Bypass
Colour
Plain
Plain
Plain
Plain
Ready to Job build.
Set original. Press Start key.
15
Set the third original (“C”) to be copied. Press the [Start] key.
Scanning of the original will start.
●
Step 5: Leaving the back side of the third original (“C”) blank
16
Touch the “Print from Front page” key.
Leaving the back side of the original blank will allow the next
copy to start on the front side of the next page.
Inch specifications
Select
paper
1-sided
2 sided copy
Back Edge
1 sided/
2 sided
2 sided copy-Left
Finished page #:5
Next copy page: Rear
Orig. set
direction
Original
type
AMS
Reduce
/Enlarge
Finished
Basic
Quality
Edit
None
Job Build - Step5
Cancel
Scanning
finished
Set
Insert
page
Scan next original(s).
Place the originals and press start key.
Press "Scanning finished" key when starting copy.
Print from
Front page
11x8
1
/
2
”
Metric specifications
Select
paper
1-sided
2-sided Copy
Back Edge
1-sided/
2-sided
2-sided Copy-Left
Finished page #: 5
Next copy page: Rear
Orig. set
direction
Original
type
AMS
None
Reduce/
Enlarge
Finished
Basic
Quality
Edit
Job Build - Step5
Cancel
Set
Scan next original(s).
Place the originals and press start key.
Press "Scanning finished" key when starting copy.
Insert
blank page
Print from
front page
Scanning
finished
●
Step 6: Making the settings for the fourth originals (“D” in the
illustration on page 5-58.)
Drawer[Cassette] No.1 is to be selected for plain paper feed under
the “Select paper” screen.
17
Touch the “Select paper” key. The “Select paper” screen will
be displayed.
Inch specifications
Select
paper
1-sided
2 sided copy
Back Edge
1 sided/
2 sided
2 sided copy-Left
Finished page #:6
Next copy page: Front
Orig. set
direction
Original
type
AMS
Reduce
/Enlarge
Finished
Basic
Quality
Edit
None
Job Build - Step6
Cancel
Scanning
finished
Set
Insert
page
Scan next original(s).
Place the originals and press start key.
Press "Scanning finished" key when starting copy.
Print from
Rear page
11x8
1
/
2
”
Metric specifications
Select
paper
1-sided
2-sided Copy
Back Edge
1-sided/
2-sided
2-sided Copy-Left
Finished page #: 6
Next copy page: Front
Orig. set
direction
Original
type
AMS
None
Reduce/
Enlarge
Finished
Basic
Quality
Edit
Job Build - Step6
Cancel
Set
Scan next original(s).
Place the originals and press start key.
Press "Scanning finished" key when starting copy.
Insert
blank page
Print from
rear page
Scanning
finished