Panasonic TH-55VF2HW 54.6" Full HD Video Wall Display User Manual
Page 27
27
English
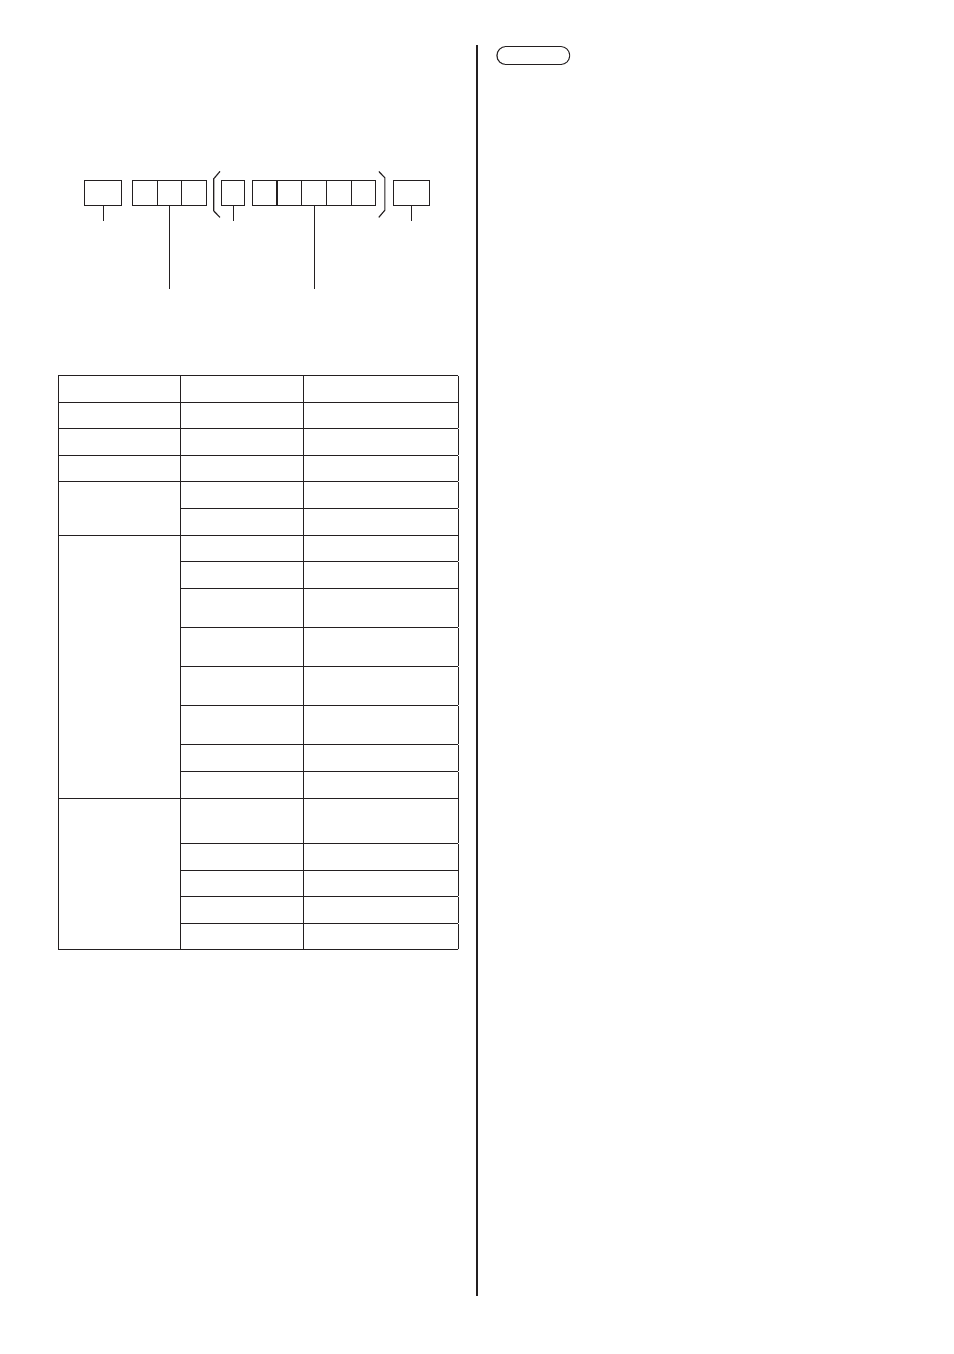
Basic format for control data
The transmission of control data from the computer
starts with a STX signal, followed by the command,
the parameters, and lastly an ETX signal in that order.
Add the parameter as required, in accordance with the
control detail.
STX C1 C2 C3
P1 P2 P3 P4
:
P5
ETX
Start
(02h)
3-character command
(3 bytes)
Colon
Parameter(s)
End
(03h)
Command
Command
Parameter
Control details
PON
None
Power ON
POF
None
Power OFF
AVL
***
Volume 000 - 100
AMT
0
Audio MUTE OFF
1
Audio MUTE ON
IMS
None
Input select (toggle)
HM1
HDMI input (HDMI)
DP1
DisplayPort input
(DisplayPort)
DL1
DIGITAL LINK input
(DIGITAL LINK)
DV1
DVI-D IN 1 input
(DVI-D1)
DV2
DVI-D IN 2 input
(DVI-D2)
PC1
PC IN input (PC)
UD1
USB input (USB)
DAM
None
Screen mode select
(toggle)
ZOOM
Zoom1
FULL
16:9
NORM
4:3
ZOM2
Zoom2
Note
●
If multiple commands are transmitted, be sure to wait
for the response for the first command to come from
this unit before sending the next command.
●
If an incorrect command is sent by mistake, this
unit will send an “ER401” command back to the
computer.
●
When sending a command which does not require
parameter, a colon (:) is not needed.
●
In Standby condition (power OFF with remote control
or <Power button (Unit)>), the unit responds to PON
command only.
●
When [Serial ID function] (see page 54) is set to
[On], only the command that matches the display ID
can be operated.
As the format, add the following header.
AD94;RAD=<XXX>;
For display ID, insert 001 to 100 or 000 for <XXX>.
For group ID, insert AAA (for A) to GGG (for G) for
<XXX>.
●
Consult your local Panasonic dealer for detail
instructions on command usage.
For more details, visit the following web site.
https://panasonic.net/cns/prodisplays/