Notifications – Exacq exacqVision Pro User Manual User Manual
Page 59
59
Notifications
NOTE: The Notifications page is not available in exacqVision Start.
The Notifications page allows you to configure an e-mail server and message profile that will send an email message
when an event occurs. To configure events that cause an email notification to be sent using these email settings, see the
“Event Linking” section of this manual.
The Notifications page is separated into three tabs: E-mail Message Profiles, E-mail Servers, and Web Server.
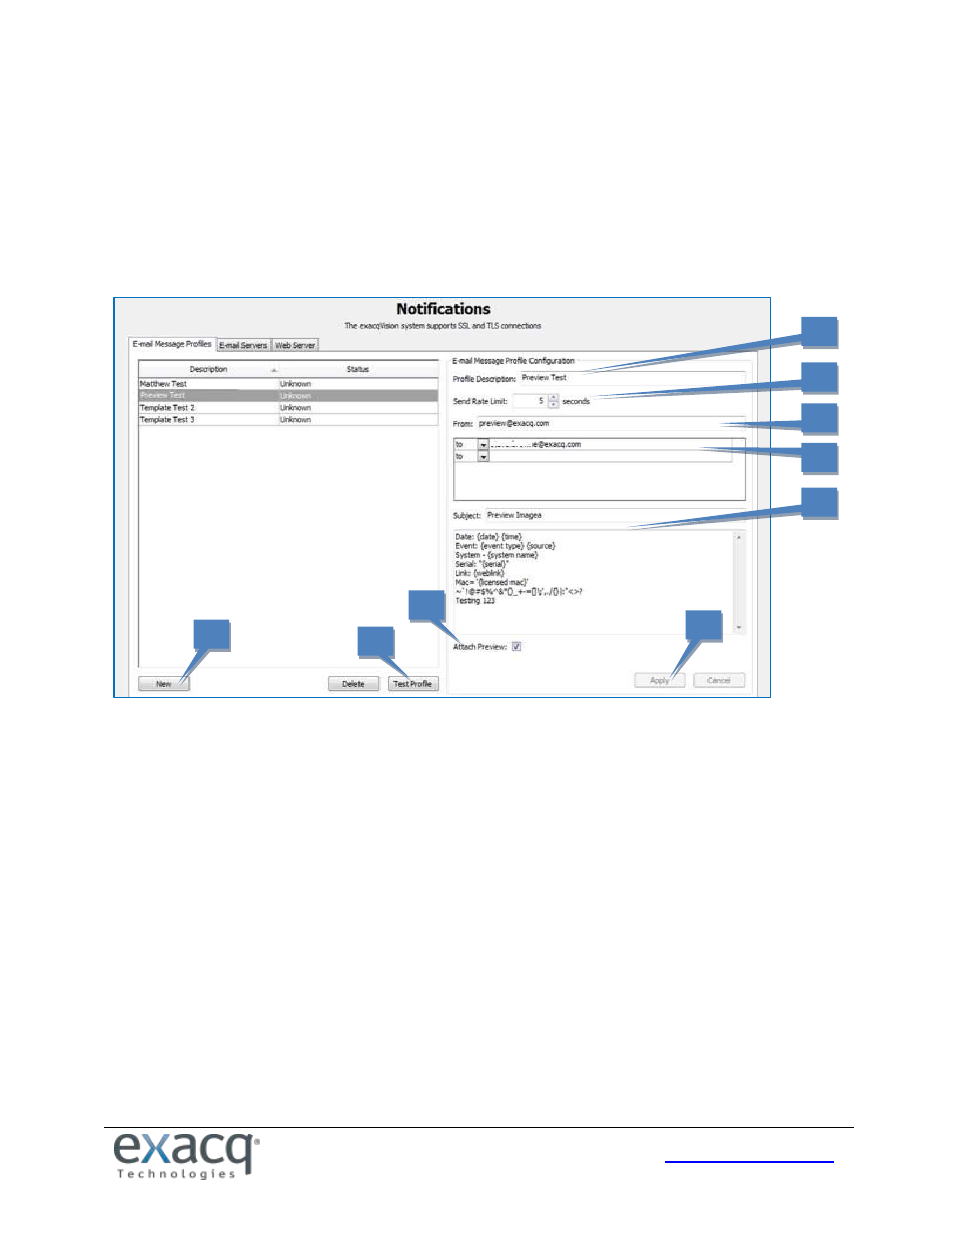
The E-mail Message Profiles tab allows you to configure email notification content and recipients.
1. Click New.
2. Enter a brief description in the Profile Description field. This description will also appear in the Action Target
field on the Event Linking page.
3. To reduce the number of email notifications sent, select the minimum number of seconds between notifications
from the Send Rate Limit box. This is useful if you receive a large number of repeated messages about certain
events. For example, if you configure a notification every time a motion event occurs, a thunderstorm at night
could trigger thousands of emails over a short period of time. Limiting notifications about the motion events to a
maximum of one every 15 or 30 minutes (900 or 1800 seconds) could drastically reduce unnecessary emails.
4. Enter the e-mail address of the person the email is coming from.
5. Enter the e-mail addresses of the recipients.
6. Enter a Subject and Message information that should appear in the email notification. You can automatically
insert camera names using the bracketed tag {source} and the date and time using {date format=%H:%M:%S}.
You can also include a link to the video {weblink}, serial information {serial}, the MAC address {licensed mac},
and more (see the image above for a syntax sample). Only the first instance of each tag is replaced; additional
usage of the same tag in the same profile will cause the tag itself to appear in the message.
7. Select Attach Preview to attach a brief video clip (in .MOV format) or image of the notified event. The preview
will be a video clip instead of a single image only if the camera is streaming in H.264 or MPEG-4 format.
8. Click Apply to add the message profile to the list of profiles.
9. You can test the profile by selecting it from the list and clicking the Test Profile button.
1
2
3
4
5
6
8
7
9