Chapter 5 mmp-16 setup menus, The setup state & the setup menus – Teac MMR-16 v4.0 User Manual
Page 84
TASCAM MMP-16 Owner’s Manual • Chapter 5 • MMP-16 Setup Menus
MMP-16
86
Chapter 5 MMP-16 Setup Menus
The Setup State & the Setup Menus
Setup menus allows individual MMP-16 parameters to be changed, and if desired, saved to one of the ten
User settings files. Parameters can also be changed within the current session without saving them to a
specific User settings file. Changes made in this way are automatically stored in a system init file and will
still be remembered even if the MMP-16 is powered down and restarted.
To enter the Setup state, press SETUP. To exit the Setup state and return to the Normal state, press the
SETUP key again, or press CLR. While in the Setup state, a display of various Setup menus and their
parameters takes the place of the time code display shown in the LCD in the Normal state.
When the Setup state is activated for the first time after power-up, Setup menu 000 (the Control Mode
selection menu) is displayed in the LCD. The Setup menus are divided into ten banks, grouped according
to their common functions (see Table 4-1). Scroll through the various Setup menus by rotating the Wheel
or using the Up/Down arrow keys. Clockwise (CW) rotation or up-arrow incrementally scrolls upward
through the menus, while counterclockwise (CCW) rotation or down-arrow scrolls downward through the
menus. The scrolling wraps around at the end of the list (thus menu 990, the highest menu in the 900
bank, is displayed when the wheel is rotated CCW from menu 000, and vice versa). Jump directly to any
menu bank by pressing a numeric key while in Setup. For example, pressing 3 will jump the display to
menu 300 (Biphase Frame Rate), which is the first menu in the 300 bank.
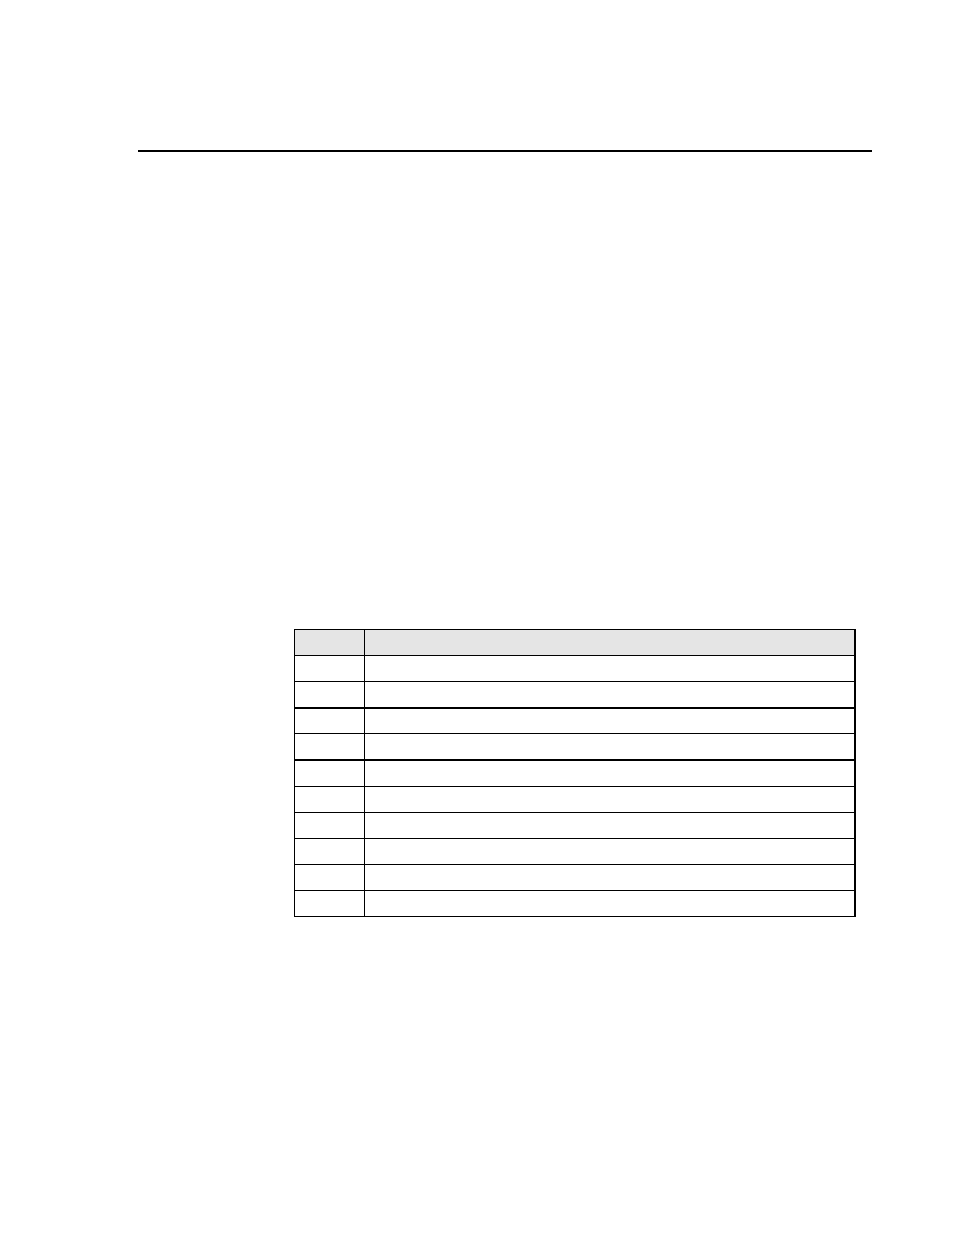
BANK #
BANK DESCRIPTION
000
Basic Setup (Control Mode, frame/sample reference, etc.)
100
Bus Control (sync group, MMR/Lynx bus, interlock)
200
Transport Control (Record modes, Loop modes, pre/post roll, etc.)
300
Biphase (pulse rate, motion limits, start/end limits)
400
Remote Control (parallel remote)
500
Audio parameters (input source, calibration, reference level & tone)
600
Digital I/O (format, delays, sample rate conversion & reference tracks)
700
Disk (formatting, cleanup, archive)
800
Tracks & Projects (project name, track prefix)
900
System (store/recall settings, date & time, LED brightness, serial #)
The Ten Setup Menu Banks
The JOG and SHTL (Shuttle) keys above the Wheel take on their alternate reversed text-labeled functions
(left and right arrows) when pressed during Setup. Note that these are not shifted functions, but alternate
functions that occur in the Setup or Track states. These keys typically affect window scrolling, but in
some cases move a cursor to different points in displayed information.