Verilink 8100A (34-00237) Product Manual User Manual
Page 41
Q u i c k S t a r t G u i d e
2-5
2
Select the COM port to which the IAD is connected.
3
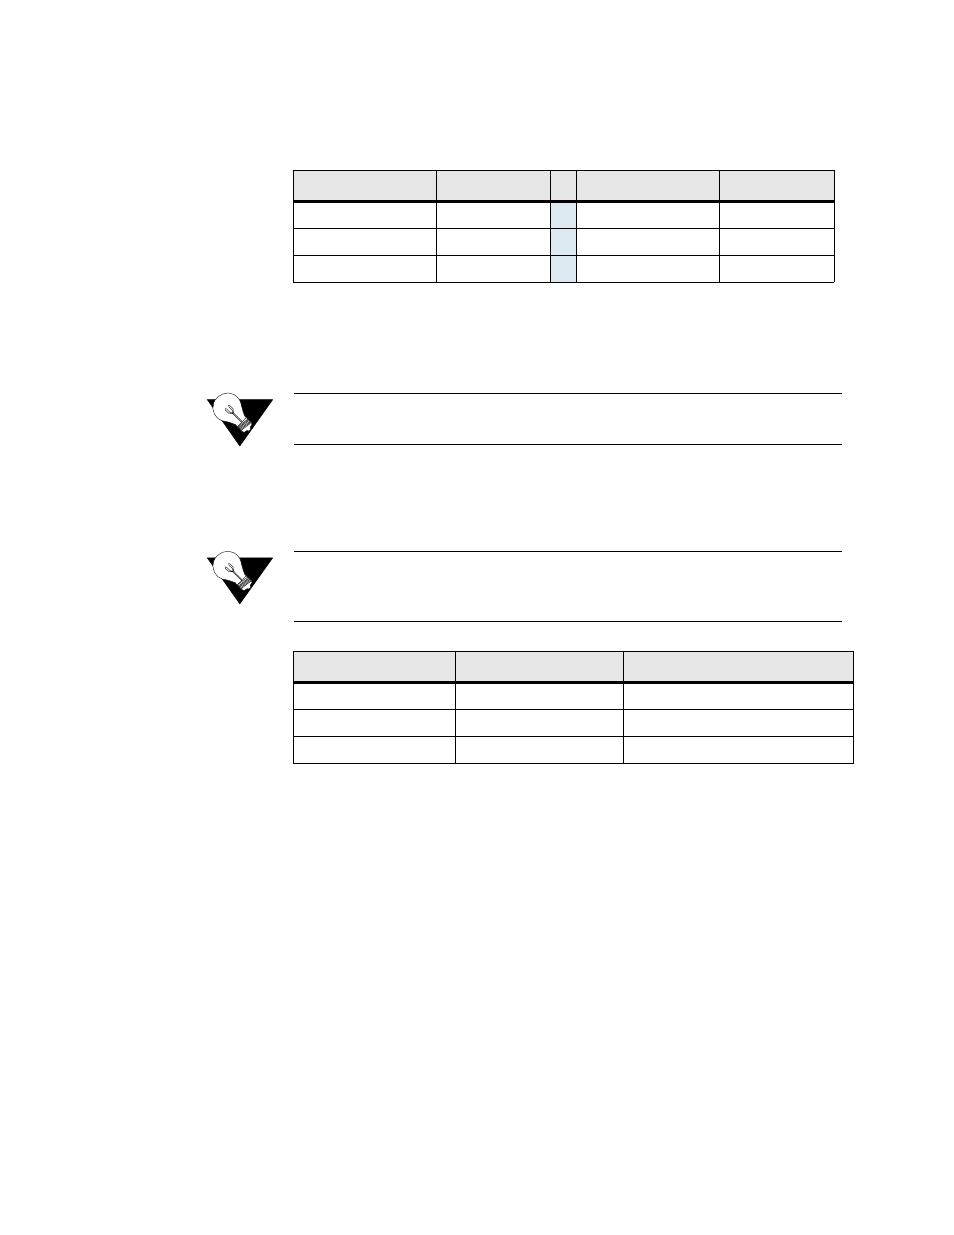
Type or select the settings described in the table below and save your
changes.
4
Press Enter. The IAD displays the login message:
Enter Login ID
>
NOTICE:
If the IAD does not respond, make sure the IAD is powered up, check
the cable and connections, and review the settings.
5
Type the default supervisor level user ID (Supervisor) (or your user ID,
if changed) and press Enter. Note that both the user ID and password are
case-sensitive. The table below lists the default user IDs and passwords.
NOTICE:
Refer to Chapter 3, “Administration”, for detailed procedures regarding
all IAD administrative tasks. Follow these procedures after performing
the basic set-up functions described in this “Quick-Start Guide”.
6
The IAD displays the password message:
Enter Password >
7
Type the default password (supervisor, or your password if different)
and press Enter. If login is not successful, the IAD displays the following
message:
Invalid UserID or Password - Try again
Press any key to continue...
8
Press any key, and repeat the login sequence. If you cannot log in, call your
support provider for assistance.
When you first log in, the IAD displays the Main menu (Figure 2.2). The
menu may vary, depending on the IAD.
Setting
Value
Setting
Value
Bits per second
19,200
Stop bits
1
Data bits
8
Flow control
None
Parity
None
Emulation
ANSI or VT100
Security Level
User ID
Password
User
<Enter>
<Enter>
Network Administrator
NetMan
<Enter>
Supervisor
Supervisor
supervisor
- 8108 Series IAD (34-00339.B) Product Manual 8508 Series IAD (34-00339.B) Product Manual 8208 Series IAD (34-00339.B) Product Manual 8308 Series IAD (34-00339.B) Product Manual 7500p Series IAD (34-00334.B) Product Manual 7200p Series IAD (34-00334.B) Product Manual 7000 Series (34-00334) Product Manual