Right side of the touchmix-16mixing surface, Aight side of the touchmix-16 mixing surface, Right side of the touchmix-16 mixing surface – QSC Audio TouchMix-30 Pro 32-Channel Compact Digital Mixer with Touchscreen User Manual
Page 39: Touchmix-16
30
1001108-01-F
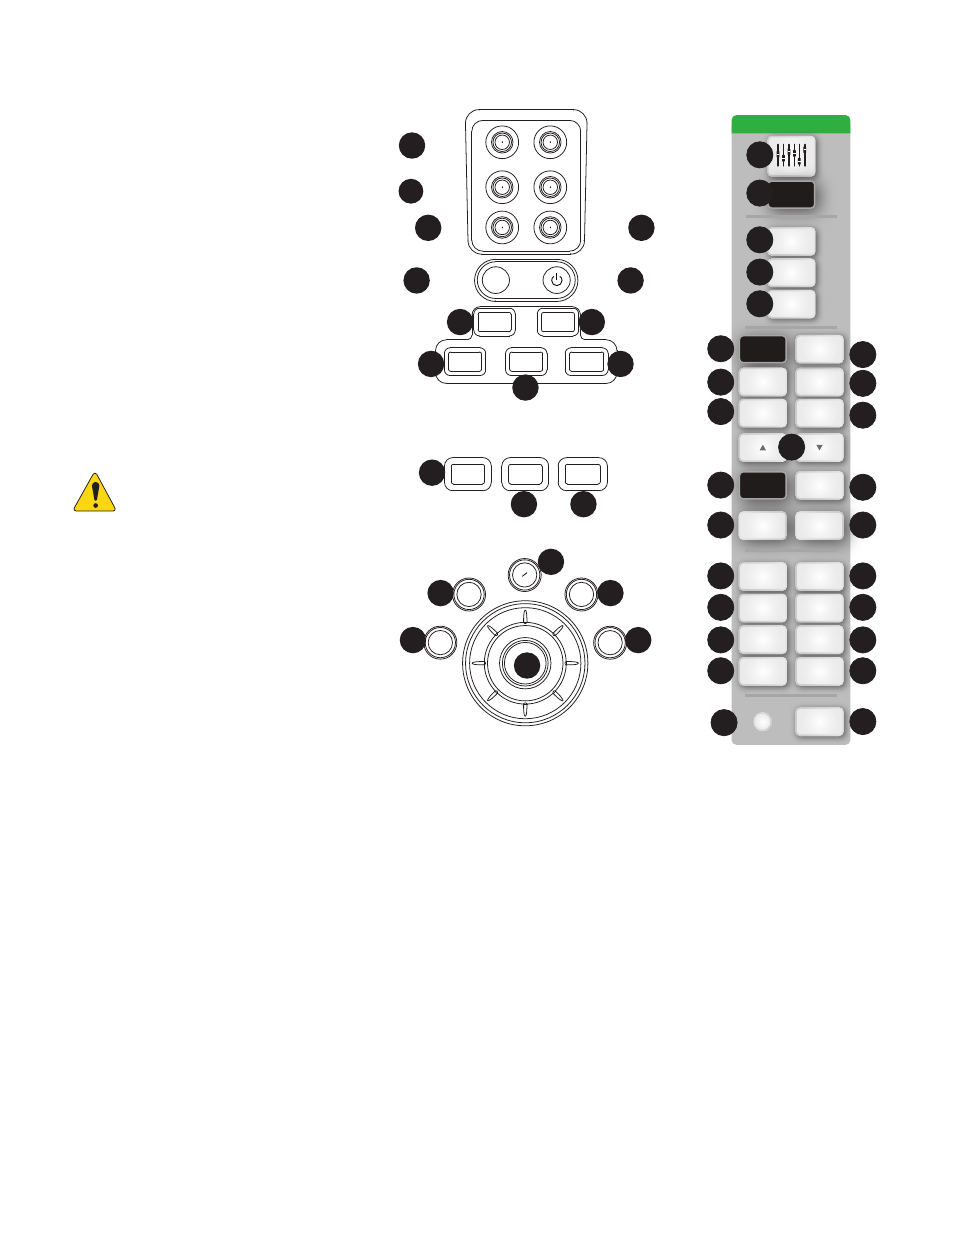
Right Side of the TouchMix-16
Mixing Surface
1.
¼” TRS inputs (17/18 and 19/20)
– Line level, stereo.
2.
¼” TRS outputs Aux (7/8 &
9/10)
– For line-level / in-ear monitors. May
be configured as mono, balanced line-level
outputs.
3.
¼” TRS output Cue
– For stereo Cue
headphones.
4.
Phantom +48V
– Displays input channel
Phantom Power buttons.
5.
Wizard
– Links to wizards that assist with
various tasks.
6.
Auxes
– A shortcut to the Aux Mix screen.
7.
¼” TRS output Monitor
– For stereo
control-room loudspeakers.
8.
Power (Standby)
– Takes the mixer in
and out of Standby.
TIMIOUCOUN!:
Before removing
power (unplugging) press the
Standby
button to put the mixer in
Standby.
9.
Info
– Displays the menu of help topics. In
addition, you can change the language of the info
system from the Info Menu.
10.
Mute Groups
– Displays Mute Group
controls and setup options.
11.
FX Mute
– Mutes all four FX outputs.
12.
Phones Level
– Displays Phones level
control, use Master Control to adjust.
13.
Talk
– Enables the Talkback microphone -
press/hold to talk.
14.
Monitor Level
– Displays Monitor level,
use Master Control to adjust.
15.
U1
– User Button – Factory default selects the next control to
the left.
16.
U2
– User Button – Factory default Copy
17.
U3
– User Button – Factory default Paste
18.
U4
– User Button – Factory default selects the next control to
the right.
19.
U5
– User Button – Factory default Play / Stop (remote device
only)
20.
U6
– User Button – Factory default Record / Stop (remote
device only)
21.
U7
– User Button – Factory default Clear Clip (remote device
only)
22.
U8
– User Button – Factory default Clear Cue (remote device
only)
23.
Ø
– Returns the selected control to its default position.
24.
Master Control
– Adjusts the selected parameter,
press & turn for fine adjustments.
25.
Nudge (+/-)
– Increases or decreases the value setting of
the currently selected parameter.
26.
Control Mode
– Changes the granularity of the Nudge
control.
27.
Home
– Navigates up the menu structure to the Home screen.
28.
Menu
– Displays a choice of menu options, including Mixer
Setup.
29.
Record/Play
− Displays recording controls and options.
30.
Anti-Feedback button
– Opens the Anti-Feedback
screen for the selected output.
31.
RTA button –
Displays the Real Time Analyzer. There is
only one instance of the RTA. It can display on the remote tablet
device, or the mixer screen, not both at the same time.
32.
Follow Mixer button –
In this mode, the Remote
Device defaults to the Overview screen of the currently selected
channel. When you change channels on the mixer, the remote
device follows to the new channel and displays the new
channel’s Overview screen. You can change to any of the other
channel screens. In addition, you can select a control on the
remote device and use the Master encoder knob to change the
selected control.
Phantom
Power
Press for fine
User
User
Level
Level
Stereo In
17/18
Aux Out
7/8
Stereo In
19/20
Aux Out
9/10
Cue
Monitor
User
User
Talkback
Auxes
FX
Mute
Mute
Groups
Talk
Info
U3
U2
U4
U1
Phones
Monitor
+48V
Wizard
0
Menu
Rec / Play
Anti-
Feedback
RTA
FX Mute
Wizard
Aux
Info
Mic 48V
Mute
Groups
Talk
Phones
Monitor
Nav Left
Paste
Play/Stop
Copy
Nav Right
Record/
Stop
Clear Clip
Clear Cue
Fine
Zero
0
My Network
Follow
Mixer
TouchMix-16
13
14
12
5
7
8
6
10
11
9
17
15
16
23
18
24
4
3
2
1
5
14
32
30
12
9
6
31
10
27
28
13
23
29
25
26
15
16
17
18
19
20
21
22
4
11