Timer event setup screen, 10 – internal settings – Teac HS-20 User Manual
Page 101
TASCAM HS-20
101
10 – Internal settings
uninterrupted and the download will be executed, but
deletion will not be executed.
• During downloading, the SD/CF card indicator blinks.
• The timer event information file will be read automatically
when a folder is loaded.
• If the timer event information file (HS_EventList.tlist) is
overwritten an FTP or Browse function, the timer event
information file will automatically be read again.
CAUTION
If you do not save, all timer event changes will be lost when
a folder is loaded, the card is removed or the unit is turned
off.
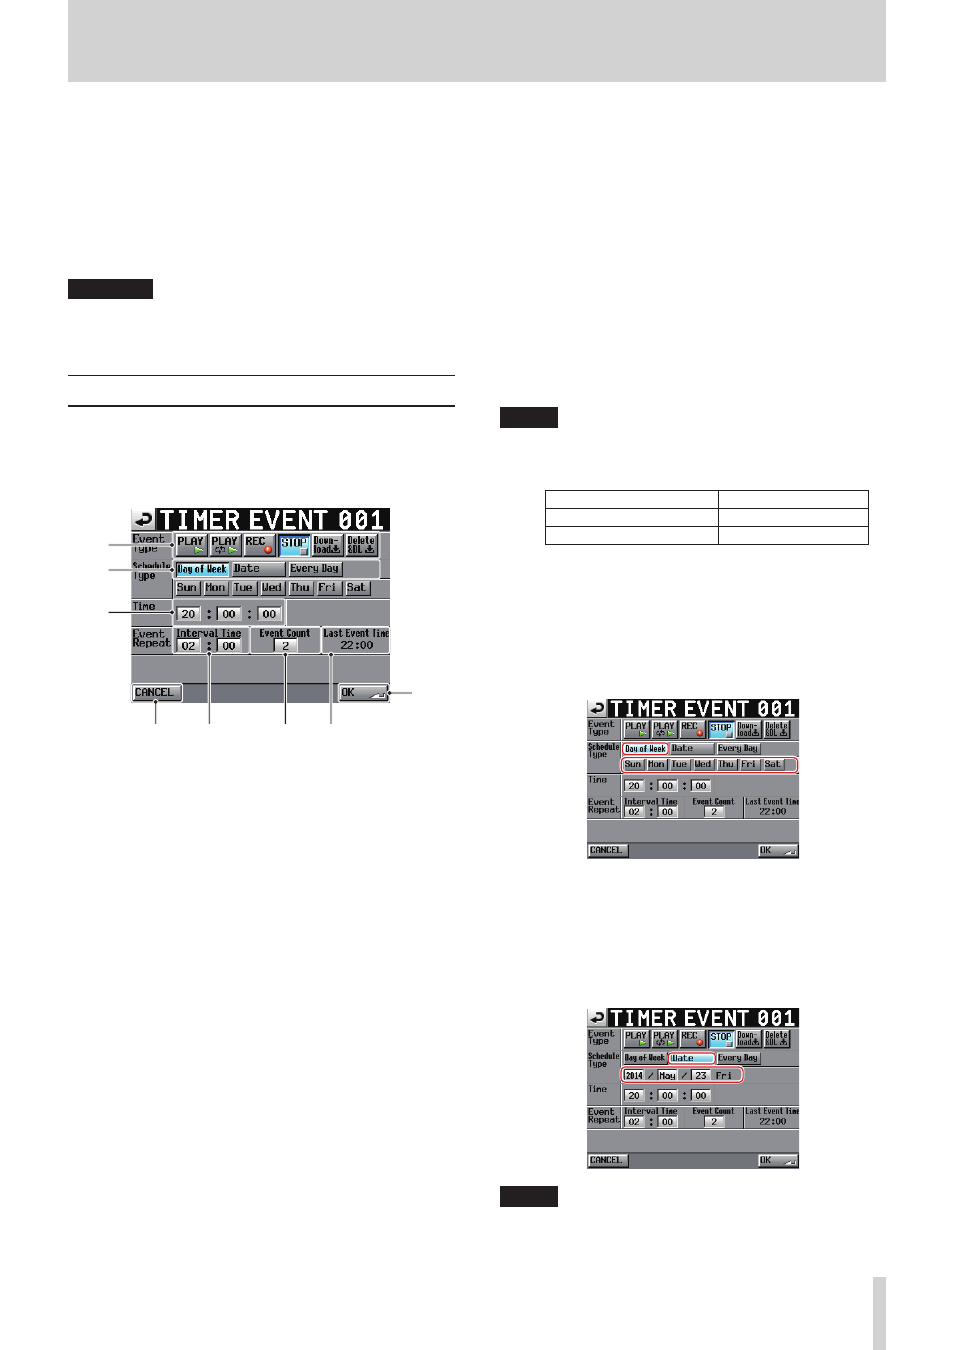
TIMER EVENT SETUP screen
Use this screen to edit the settings of a specific event.
Common settings
For recording and stop events, only the common settings
are shown and can be set.
7
8
2
3
4
5
6
1
1
Event Type buttons
Use these buttons to set the event type.
o
Playback:
PLAY (y)
o
Repeat playback:
PLAY (y·)
o
Record:
REC (p)
o
Stop: STOP (8)
o
Download:
Down-load (È)
(Download from the FTP server)
o
Download after deleting:
Delete&DL (È)
(After all audio files in the current folder are deleted, the
unit will download from the FTP server.)
2
Schedule Type buttons
Use these buttons to set the schedule type of the event.
3
Time fields
Use these to set the event execution time (hour, minute and
second).
Touch these to highlight them yellow. When highlighted,
you can use the DATA dial to adjust them.
4
CANCEL button
Touch this to discard all changes and return to the TIMER
EVENT LIST screen.
5
Event Repeat (Interval Time) fields
Use these to set the the interval between repeat event
execution (hours and minutes).
Touch these to highlight them yellow. When highlighted,
you can use the DATA dial to adjust them.
6
Event Repeat (Event Count) field
Use this to set the the number of times the event is repeated
(1–100).
(If set to “1” the event will not repeat.)
Touch these to highlight them yellow. When highlighted,
you can use the DATA dial to adjust them.
7
Event Repeat (Last Event Time) display.
This shows the last time that the repeated event will be
executed.
8
OK button
Touch this to confirm all changes and return to the TIMER
EVENT LIST screen.
NOTE
Repeat event setting example
To make an event repeat on the hour from 10:00 to 19:00,
make the following settings.
Time
10:00
Event Repeat: Interval Time
01:00
Event Repeat: Event Count
10
Schedule type screen
o
Day
On the TIMER EVENT SETUP screen, select the Day of
Week button to enable setting specific days of the week
(for weekly repetition).
The day of week buttons allow each day to be turned
ON/OFF separately.
o
Date
On the TIMER EVENT SETUP screen, select the Date
button to enable setting a specific date for event
execution.
Touch the event date areas to highlight them yellow.
When highlighted, you can use the DATA dial to adjust
them.
NOTE
The month area can also be set to all months by selecting
"***" which appears between "Dec" and "Jan" in order.