2 – names and functions of parts – Teac HS-20 User Manual
Page 19
TASCAM HS-20
19
2 – Names and functions of parts
Press this button to open the TIMER EVENT LIST screen. (See
“TIMER EVENT LIST screen” on page 99.)
h
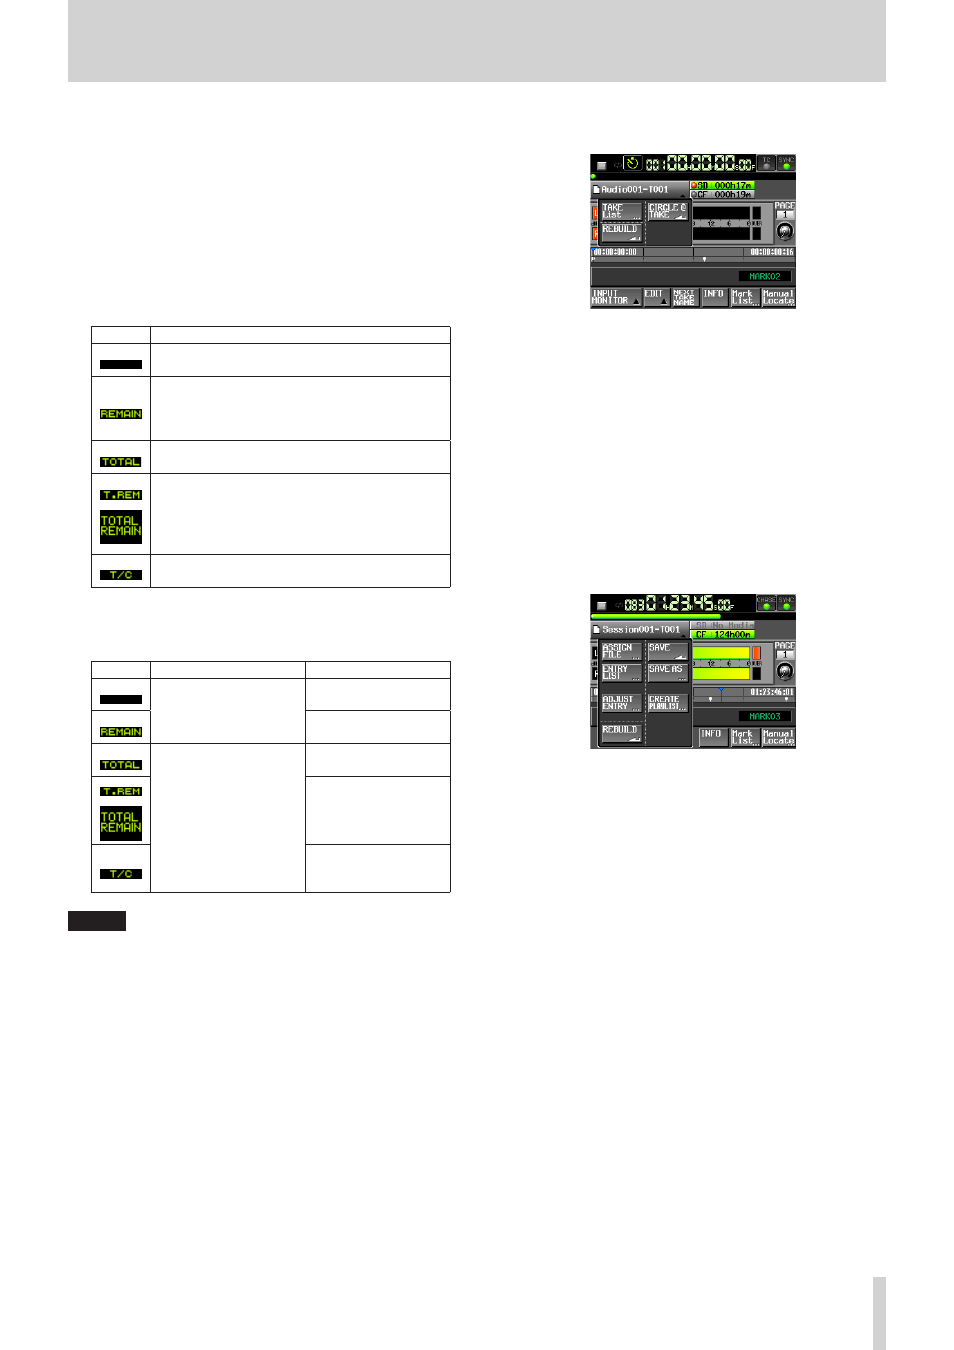
Take/entry number
The number of the currently selected take or entry is shown.
In recording standby, the file name of the take to be
recorded next will be shown. Take numbers are assigned in
the order that they are recorded within a folder.
j
Time mode button
This icon shows the current time display mode.
Touch this area to change the time display mode.
Mode
Details
The elapsed time from the beginning of the take
is shown.
Unless recording, the time remaining until the
end of the take is shown. When recording, the
time remaining until the maximum file size is
shown.
The elapsed time from the beginning of the
folder is shown.
Unless recording, the time remaining until the
end of the folder is shown. When recording,
the remaining recordable time on the currently
selected card using the current recording
settings is shown.
The timecode time of the file being recorded or
played is shown.
k
Time bar
This shows the current playback position. The appearance
depends on the time display mode.
Mode
Details
Bar display
The current playback
position relative to the
length of the take or
entry is shown.
Elongates from left end
to right end
Shortens from left end
to right end
The current playback
position relative to the
length of all the takes in
the folder or the entire
playlist is shown.
(White vertical lines
show the boundaries
between takes and
entries.)
Elongates from left end
to right end
Shortens from left end
to right end
Elongates from left end
to right end
NOTE
A red progress bar that extends from the left end to the
right end with a frequency of approximately five seconds is
shown during recording.
l
Take/entry name button
This shows the name and icon of the currently active take or
entry.
In recording standby, the file name of the take to be
recorded next will be shown.
When in playlist mode, a “*” appears in the icon if the playlist
has not been saved after editing (including the addition and
removal of entries).
Touch this area to open a pull-down menu.
In take mode
TAKE List button
This opens the take selection screen (TAKE screen). On
the take selection screen displayed by using this button,
the folder selection screen will not open even if you
press the folder name display area.
(See “FILE LIST screen overview” on page 30.)
CIRCLE @ TAKE button
Touch this to add or remove “@” at the beginning of the
current take name.
(See “Deleting a take” on page 60.)
REBUILD button
This rebuilds if files have been deleted or modified using
FTP.
In playlist mode
ASSIGN FILE button
This shows the ASSIGN screen where you can assign files.
(See “ASSIGN File screen” on page 69.)
ENTRY LIST button
This shows the entry list (ENTRY) screen. (See “ENTRY list
ADJUST ENTRY button
This opens the ADJUST ENTRY *** screen where you can
edit an entry.
(See “Editing entry titles” on page 71, “Editing the
playback starting and ending points” on page 72,
“Editing the playback starting time” on page 73 and
“Editing fade-in/fade-out length and level” on page
74.)
REBUILD button
This rebuilds if files have been deleted or modified using
FTP.
SAVE button
This saves the current playlist. This can only be selected
when stopped.
(See “Saving playlists” on page 75.)
SAVE AS button
This adds a name to the current playlist and saves it. This
can only be selected when stopped.
(See “Saving playlists” on page 75.)