Sync and timecode settings (sync t/c), Ee “sync and, 10 – internal settings – Teac HS-20 User Manual
Page 81: Control page, Clock page
TASCAM HS-20
81
10 – Internal settings
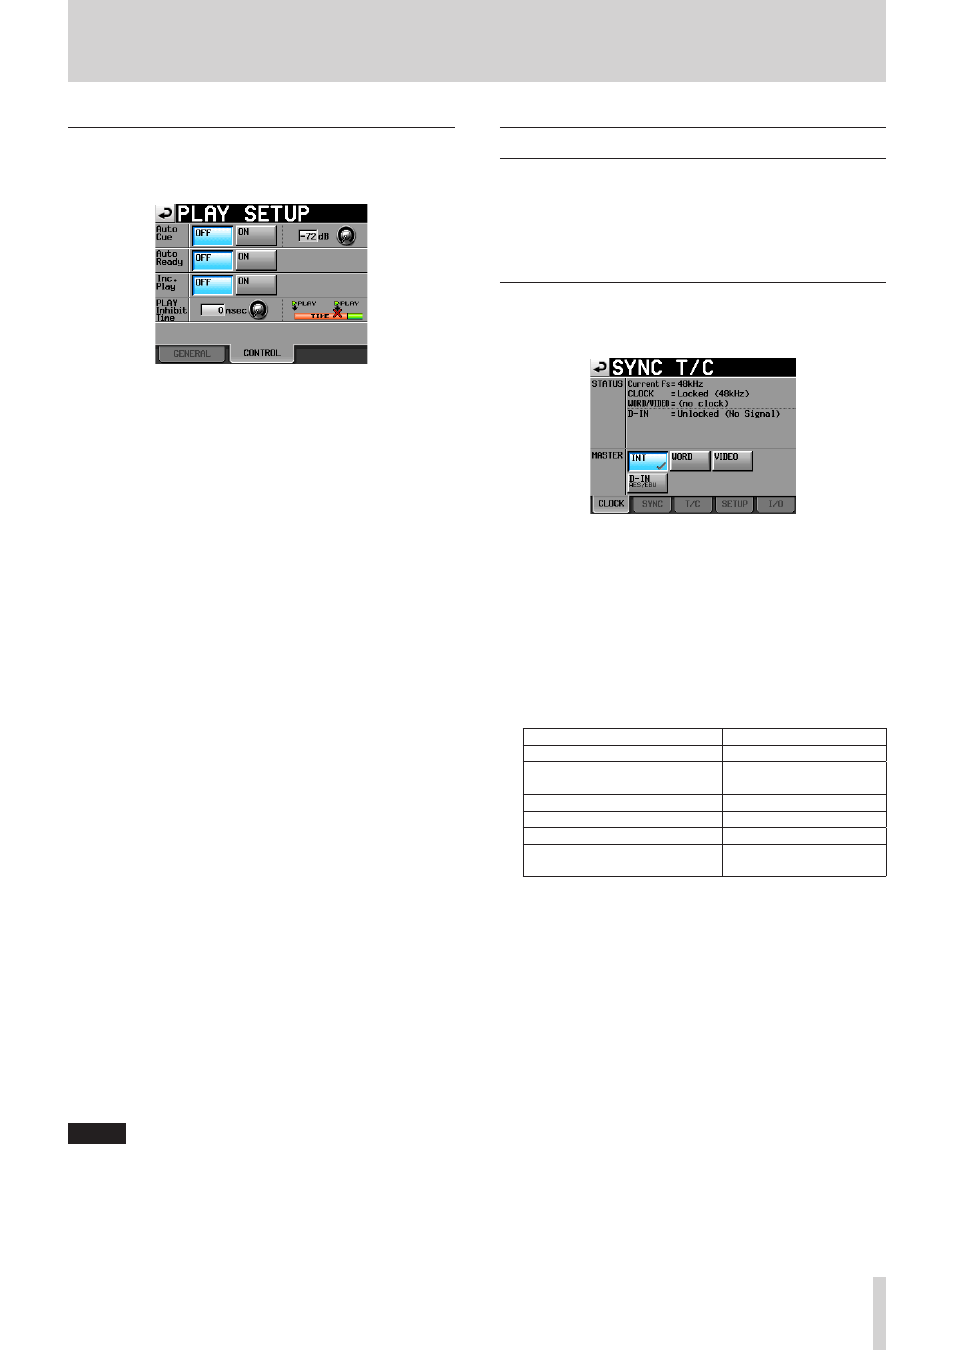
CONTROL page
Make various settings related to the playback functions on this
page.
Auto Cue
Turn the auto cue function ON or OFF (default).
If auto cue is ON, whenever a take is changed or loaded, the
unit will enter playback standby at the point where sound
first starts in the take. When Play Mode is set to One Take
and no sound is detected before the end of the take, the
unit stops at the start of the take. When Play Mode is set to
All Take and no sound is detected before the end of the take,
the unit tries to detect audio in the next take.
This setting affects all modes except timeline mode.
To set the auto cue start point detection level, touch the
knob area and use the DATA dial to change the value.
Setting values: –72dB, –66dB, –60dB, –54dB (default),
–48dB, –42dB, –36dB, –30dB, –24dB
LEVEL: −6dB, −12dB, −24dB, −48dB
Auto Ready
Turn the auto ready function ON or OFF (default).
If auto ready is ON, when playback of a take completes the
unit automatically pauses at the beginning of the next take.
This setting affects all modes except timeline mode.
Inc. Play
Turn the incremental play function ON or OFF (default).
When incremental play is ON, press the PLAY key during
playback to move to the beginning of the next take and
continue playing.
Press the STOP key during playback to put the unit in
playback standby at the beginning of the next take.
This setting affects all modes except timeline mode.
PLAY Inhibit Time
This sets a time interval during which playback of the same
take (entry) cannot be restarted.
The following keys and commands are disabled (excluding
flash start keys/commands for other takes/entries) for the
duration of this setting: PLAY key on the front of the unit,
the PLAY key, flash start keys and fader start function of
the TASCAM RC-HS20PD remote control (sold separately),
and play and flash start commands from external control
(RS-232C, RS-422, parallel, keyboard).
Setting range: 0 (default) – 1000 msec (100 msec intervals),
Inf (during playback the affected keys are disabled)
NOTE
When the PLAY Inhibit Time item is set to Inf, the incre-
mental play function is automatically set to OFF and cannot
be switched to ON.
Sync and timecode settings (SYNC T/C)
Make various settings related to audio synchronization and
timecode on this page.
This screen has five pages: CLOCK, SYNC, T/C, SETUP and I/O.
Touch the tabs at the bottom of the screen to open the corre-
sponding page.
CLOCK page
View various clock status information and select the clock used
for synchronization on this page.
STATUS
Current Fs
This shows the current sampling frequency.
CLOCK
This shows the clock synchronization status.
WORD/VIDEO
This shows WORD, VIDEO or TriLevel if a synchronization
signal is detected at the input.
D-IN
This shows the digital input signal status as follows.
Digital input signal status
Indicator
Locked
Locked (xx.xxx kHz)
When sampling rate conversion
is on
Locked (xx.xxx kHz FsCnv)
Unlocked
Unlocked (xx.xxx kHz)
No signal
Unlocked (no signal)
No audio signal present
Not Audio
Other Cbit information differs
from the actual operation mode Unmatched Cbit
MASTER
Use the buttons to select the master clock to use.
INT button (default):
Use this unit’s internal clock.
WORD button:
Synchronize with the word clock input through the
WORD/VIDEO IN connector.
VIDEO button:
Synchronize with the video clock input through the
WORD/VIDEO IN connector.
D-IN button:
Synchronize with the clock of the digital signal selected
as the input for DIGITAL IN.
You cannot select an input as the master clock if the
sampling rate converter is ON for that input.
On the second line of the button, the digital input signal
selected is shown.