Cloud Electronics DCM1 User Manual
Page 59
DCM1 & DCM1e Installation and User Guide V1.0
59
Using the Utility Tool
The Utility Tool window is arranged in four tabs – INPUTS,
OUTPUTS, INSTALLER KEY and SYSTEM. Additional
functions are available from the Menu bar options and from
the five buttons in the lower pane, which remain visible
whichever tab is active.
The various controls on the four tabs replicate most of the
DCM1’s internal menu functions; this manual section cross-
references each control to a menu function, please see the
manual section on Configuration for full details of each
function. Tool tip text is provided when the cursor is hovered
over each control.
When a control or setting has been altered, the change must
be transmitted to the DCM1 by selecting a Send button. The
INPUTS and OUTPUTS tabs have two Send buttons; Send
Input
(or Send Output), which transmits the settings
for the currently selected input (or output), and Send All
Inputs
(or Send All Outputs), which transmits the
settings for all inputs (or outputs).
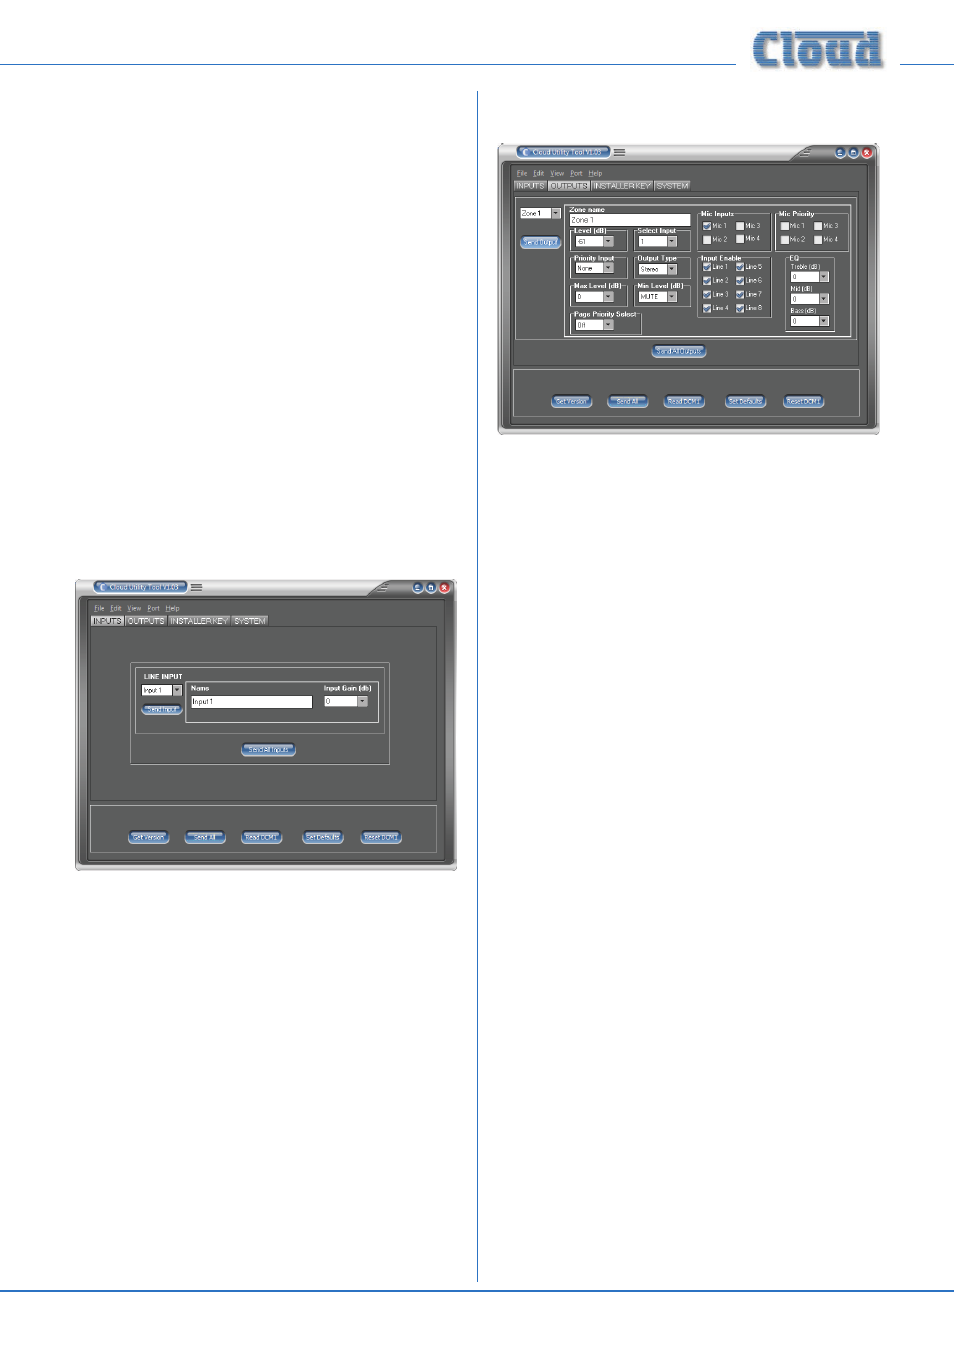
Inputs Tab
This page lets you rename line inputs and set the input gain
of each.
•
LINE INPUT
– select a line input from the drop-down
list.
•
NAME
– enter a name for the selected input; this
corresponds to the Rename Inputs function in
Installer Mode, System menu; see page 36.
•
Input Gain (dB)
– adjust the input gain for the
selected input; this corresponds to the Input Gain
function in Installer Mode, Music menu; see page 31.
•
Send Input
– transmits all INPUTS tab settings for
the currently selected line input.
•
Send All Inputs
– transmits all INPUTS tab
settings for all eight line inputs.
Outputs Tab
•
Zone/Group drop-down list – select a Zone or a Group
from the drop-down list (scroll down for Groups).
•
Zone Name
– enter a name for the selected Zone or
Group; this corresponds to the Rename Zones and
Rename Groups functions in Installer Mode, System
menu; see page 37.
•
Level (dB)
– set the volume in the selected Zone/
Group; this corresponds to the Level function in User
Mode, Music menu; see page 29.
•
Select Input
– select the music source to be
routed to the selected Zone/Group; this corresponds to
the Select Input function in User Mode, Music menu;
see page 28.
•
Priority Input
– assign a line input as the priority
input for the selected Zone/Group; this corresponds to
the Select Priority Line Input function in Installer
Mode, Priorities menu; see page 40.
•
Output Type
– Zones 1 and 2 may operate in mono
or stereo modes; this corresponds to the Stereo/
Mono Zone selection function in Installer Mode,
System menu; see page 36. If any of Zones 3 to 8, or a
Group is selected, this field is greyed-out.
•
Max Level (dB)
– sets the maximum level for the
volume in the selected Zone or Group; this corresponds
to the Maximum Music Level function in Installer
Mode, Music menu; see page 31.
•
Min Level (dB)
– sets the minimum level for the
volume in the selected Zone or Group; this corresponds
to the Minimum Music Level function in Installer
Mode, Music menu; see page 32.
•
Page Priority Select
– sets the method of
selection for paging for the selected Zone or Group –
Access
or Vox (default is Off); this corresponds to
the Page Priority Select function in Installer Mode,
Priorities menu; see page 43.
•
Mic Inputs
– enables any or all of the four
MICROPHONE INPUTS for the currently-selected
Zone or Group; this corresponds to the Enable Mic
Inputs function in Installer Mode, Routing menu; see
page 32.