Selecting drop or non-drop frame, Setting the user bit, Setting the u s er bit – Canon EOS R5 C VR Creator Kit with RF 5.2mm f/2.8 Dual Fisheye Lens User Manual
Page 99
99
S
etting the Time Code
Selecting Drop or Non-Drop Frame
When the frame rate is set to 59.94P, 59.94i or 29.97P, you can select between a drop frame (DF) or non-drop
frame (NDF) time code, depending on how you plan to use your recordings.
With all other frame rates, the time code is set to non-drop frame (NDF) and cannot be changed.
S
elect
> [
B
S
y
s
tem
S
etup] > [Time Code DF/NDF] > De
s
ired option.
• The time code display will change depending on the setting. When you select [DF], the time code will appear
as [00:00:00.00]; when you select [NDF], it will appear as [00:00:00:00].
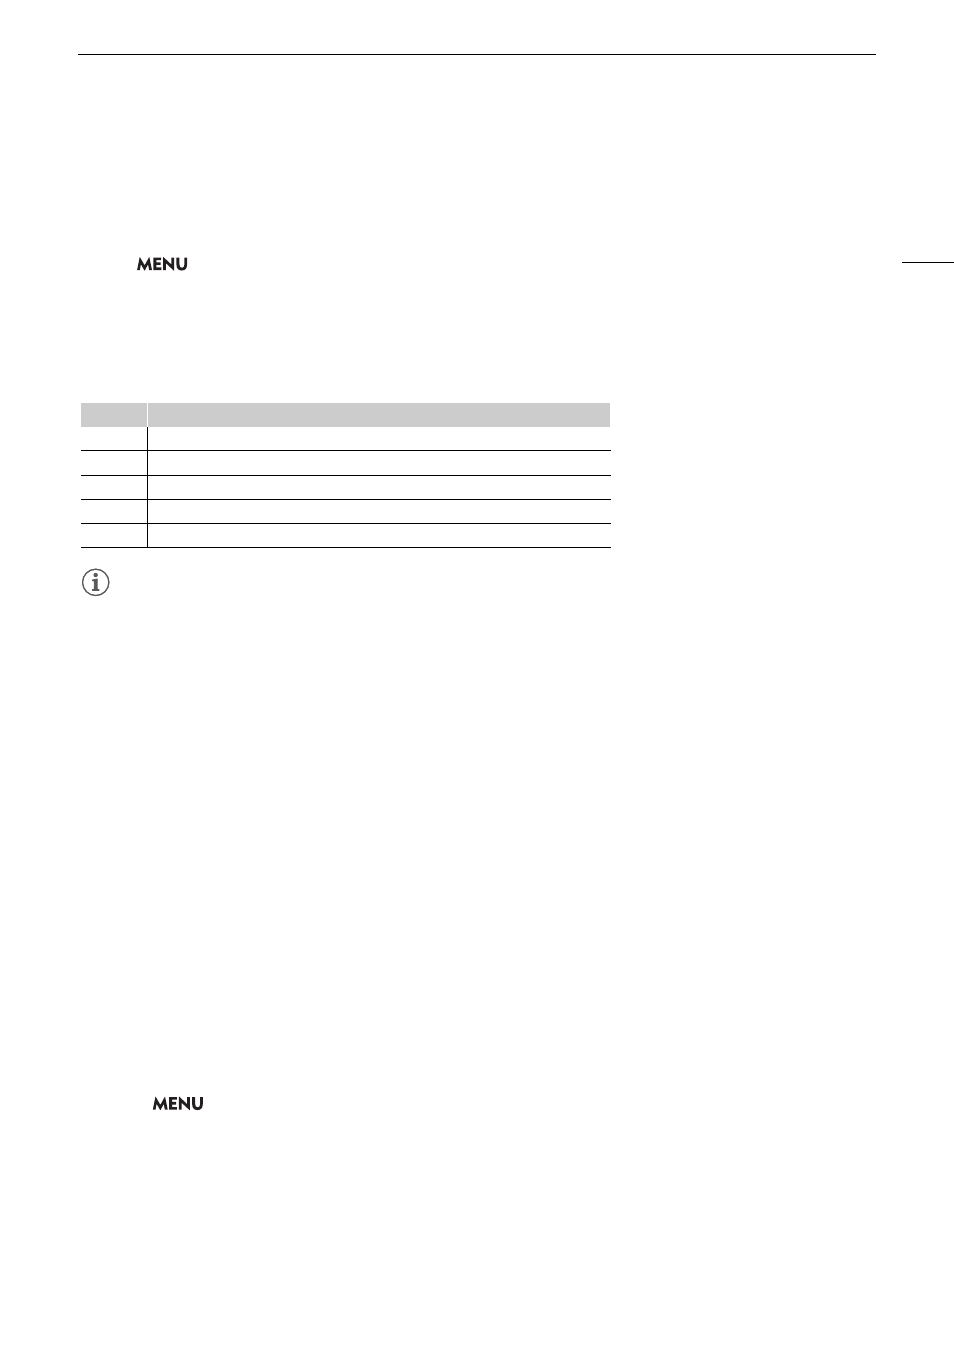
About the time code di
s
play
A letter may appear next to the time code depending on the setting/status. Refer to the following table.
NOTES
NOTES
• The frames value of the time code runs from 0 to 23 (frame rate set to 23.98P or 24.00P), from 0 to 24 (frame
rate set to 25.00P, 50.00i or 50.00P), or from 0 to 29 (all other frame rates).
• When slow & fast motion recording/frame recording/interval recording is activated, you cannot select the [Free
Run] running mode. Conversely, when pre-recording is activated, [Free Run] is set automatically and cannot be
changed.
• When slow & fast motion recording/frame recording/interval recording is activated, the time code signal will not
be output from any of the terminals.
• When you mix drop frame and non-drop frame time codes, there might be a discontinuity in the time code at
the point where the recording starts.
• When you are using the [Free Run] running mode, the time code will continue running as long as the built-in
backup battery has some charge left, even if you disconnect all other power sources.
• If you set an assignable button to [Time Code] (
A
121), you can press the button to open the
[
B
System Setup] menu page with the time code settings.
Setting the U
s
er Bit
You can set a user bit composed of the date or the time of recording or an identification code consisting of
8 characters in the hexadecimal system. There are sixteen possible characters: the numbers 0 to 9 and the
letters A to F.
The user bit is recorded with clips and can be output from the HDMI OUT terminal. It can be used freely to
categorize and manage recordings or to keep additional information about them.
1
S
elect
> [
B
S
y
s
tem
S
etup] > [U
s
er Bit Type] > [
S
etting], [Date] or [Time].
• If you select [Time] or [Date] the rest of the procedure is not necessary.
2
S
elect [Change].
• To reset the user bit to [00 00 00 00], select [Reset] instead.
3 Enter the u
s
er bit u
s
ing the data entry
s
creen (
A
Letter
Description
R
The time code mode is set to [Regen.].
P
The time code mode is set to [Preset] and the running mode is set to [Rec Run].
F
The time code mode is set to [Preset] and the running mode is set to [Free Run].
E
The time code signal is coming from an external source.
No letter
Time code during clip playback.