MacroSystem Bogart SE Ver.2 User manual User Manual
Page 21
19
Bogart SE 2 user manual
create new scenes . These new scenes use the current time
mode . The creation time can be found in the scene information
panel . Clicking on the button opens a window in which you
can choose the "Year" . Click onto the year, so that a window
is displayed in which you can select the year by moving the
slider . Afterwards confirm it with "Ok" .
By clicking onto "Month", a menu is displayed allowing you
to choose the current month . Afterwards, the dates which are
displayed underneath change, so that they correspond to the
weekdays of the selected month . Now choose the current
date . Then you can set the time by moving the sliders and
finally confirm your settings by clicking on "Ok" .
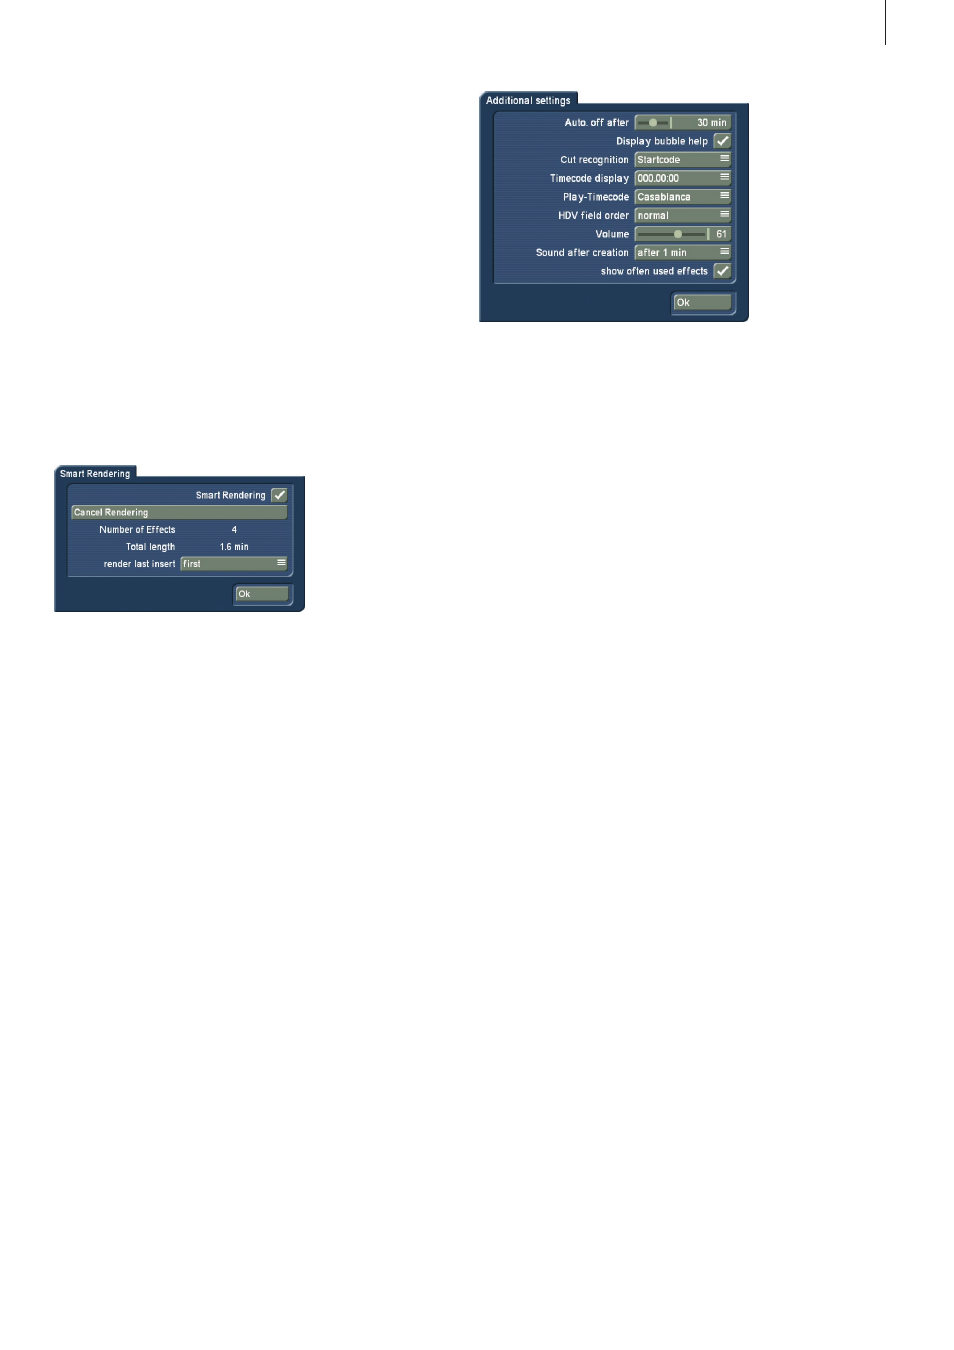
(6) After clicking on the button "Smart Rendering“ a window
appears, in which you can activate the background rendering
for the effects . Just checkmark the box (next to "Smart Ren-
dering") to do this .
Click on it again to deactivate the background rendering func-
tion . When you activate the `Smart Rendering´ function, most
effects are rendered in the background . In the meantime, you
can continue working in other menus .
Next, you can see the function "Cancel Rendering", which of-
fers the possibility to cancel the current rendering process .
Underneath, you can see the number of effects and their total
time .
In addition, you can decide how the current effect is to be ren-
dered . For the "last inserted" effect, you can choose between
"first" and "last" .
Confirm your settings and close the window with "Ok" .
While rendering in the background, you will see a small `k´
symbol in the top right corner of the effect menu . You can also
access the `Smart Rendering´ menu from the effect screen by
pressing the `k´ symbol .
(7) Here you can see the "Render Border" function that can
be activated by placing a mark next to it . This creates a black
border around the edges of the screen, covering any unwanted
disturbances during playback .
Please note that the affected border is so thin that is normally
not visible on a normal TV set . Usually, it is only possible to
see it during a presentation on a video beamer/projector for in-
stance . The size of the area is defined via the Project Settings
and the "Area" button .
(8) The “Additional Settings” button brings up a window that
allows you to make some basic settings .
You can set the amount of time after which the unit powers
down automatically . You can set it (in minutes) to stay on for
up to one hour (in the Main Menu) until it powers down or you
can deactivate the automatic power off procedure totally .
Here you can also see the function called “Display bubble
help” . This activates (checkmark in the box), or deactivates
(dash in the box) the Help Texts . Once activated, Help Texts
appear for the many user interface elements that are only rep-
resented by symbols . If you leave the screen pointer unattend-
ed for about one second, resting upon the function symbol,
the text will appear . This option is not available for separately
purchased add-on products .
The selector “Cut recognition” gives HDV videographers the
ability to recognize cut points automatically . Even if the HDV
signal was converted in the camera and sent to Bogart SE as a
DV signal . If the automatic split using the start code is not pos-
sible, the system is able to search for cut points via the “clock
time” . It is essential to switch to this mode before transfer-
ring the footage to Bogart SE . When done, the time code is
scanned for any time “jumps” and is split at those positions .
The “time code display” is used to select one of two possible
time displays for playback: You can choose from the formats
000 .00 .00 (mmm .ss .ff) or 00 .00 .00 .00 (hh .mm .ss .ff) .
The “Play-Timecode” determines if the time is displayed run-
ning from 0 to the end (Casablanca) or if the tape position (on
the DV tape) is shown . This tape position can of course only be
shown if the information was available when the footage was
loaded into Bogart SE .
The "HDV field order" button is usually set to "normal" .
However, there are some camera models that may require a
reversed order . In this case, set it to "reversed" if you find that
the footage seems faulty .
HDV render processes have to be repeated . For this, a small
Storyboard change may be required .
You can set up the volume for your connected monitor using
the volume control . This is particularly useful on notebooks .
Notebooks are also equipped with an external volume slider
for the headphone volume .
The `Sound after creation´ setting is used to set up a sound
after a rendering process . This is to let you know that the
process has ended . You can define when the sound is to be
played, from which point on – or if it not to be played at all .
Systems with a front display also have options called „respond
to IR remote control“ and „respond to IR keyboard“ .