8 finish – MacroSystem Bogart SE Ver.2 User manual User Manual
Page 38
36 Chapter 4
• Copy here: All marked scenes are moved to the position after
the currently selected scene . The original scenes remain at
their old positions .
• Mark Storyboard: This marks a scene in the Storyboard/
Timeline .
• Mark scene bin: Marks all of the scenes in the scene bin
at once . This is useful if you want to untag single scenes
afterwards .
• Remove all tags: This removes all marks/tags without any
further action .
• Cancel: This closes the action screen without any further
activity . The tags/marks remain .
Once you have tagged all scenes, the marks will remain until
you exit the Edit menu . Once you exit the menu, the tags/
marks will disappear .
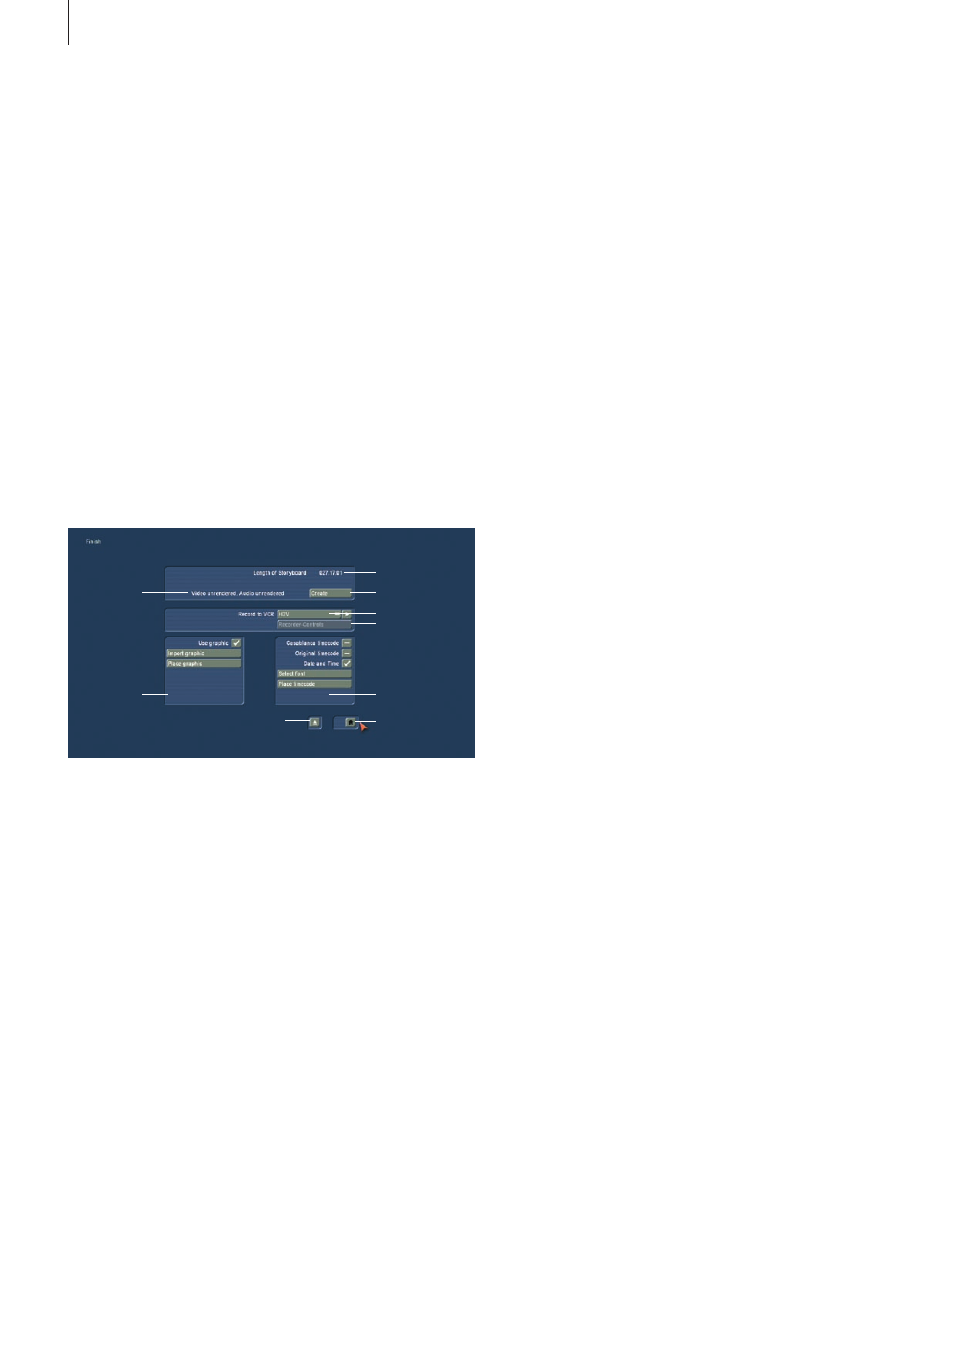
4.8 Finish
1
7
3
5
6
7
9
2
8
In the Finish menu a completely finished project is recorded
out to a DV-/HDV-device or video recorder . If your system is
provided with a DVD writer and the software "DVD-Arabesk",
you can record your finished video to DVD (to read more, go
to the related chapter in the manual or in the separate manual
that is included with "DVD-Arabesk" .)
You can finish creating all video and audio .
(1) The counter at the upper right displays the length of the
storyboard, which is the total length of your video project . The
total length includes not only the scenes you have taken from
the scene bin but also all additions such as color scenes, black
intro scenes, etc . You now know how much storage capacity
you will need for your output media (VHS, DV, etc .) .
(2) This field indicates whether the video footage, effects and
audio samples are "Created" or still "Unrendered" . Even if all
effects except one have been calculated, the display will show
"Unrendered" .
HD projects are treated in a special way . In an HD project,
both MPEG-2 (HDV) and MPEG-4 (AVCHD) output of each
single frame must be analyzed and changes in the next frame
must be stored in so-called GOP (Groups of Pictures) . The
smallest change in the Storyboard therefore requires a new
render process prior to output .
To avoid this when you mistakenly make some changes in the
Storyboard, this kind of `in-between´ save is stored in the cur-
rent project . If you make changes after HD has been rendered,
Bogart SE will inform you about this . You can always choose
to output the previous version . The last changes in the Story-
board will then be ignored .
(3) You can use the "Create" button to carry out pending cal-
culations in order automatically . (This is commonly referred to
as Batch-Rendering .)
A display tells you which effect of the total is currently being
created and the progress bar shows the progress of the entire
creation process . Please note that this is an approximation
because the calculation times for different effects may be dif-
ferent . Some effects (e .g . the 3D effects) need more calculation
time for every frame and this may lead to a certain imprecision
in the remaining time displayed .
Tip 1: When you activate the `Make sound after rendering´ (you
can find this in System Settings - Further Settings), you will
be treated to a acoustic signal once the rendering process if
completed. This is a good help if you wish to do other things in
the mean time.
Tip 2: If you turn off the machine while creation of an effect is
in progress, the calculation will be finished before the machine
actually powers down.
(4) Clicking on the "Choose Range" button brings up a menu in
which you can specify a segment of the storyboard (using the
"IN" and "OUT" buttons and the arrow buttons) to be recorded
out (currently not supported in HDV mode) .
Here you can also use the wave form (section 3 .2) to help you
in deciding on the segment .
To use the set up segment for finishing, exit this menu by
pressing the `tape´ button . The other button is used to exit
and cancel the settings made . This segment will only exit for
a short time . Each time you go back to the `Finish´ menu, the
range/segment will be full length . If you wish to set up a range
for a DVD, do this in this menu, exit with the `tape´ button and
then enter DVD Arabesk .
(5) The Record to VCR function serves to record your video
project out to another device .
If you want to record your material on a VCR, then select
Analog and then click on the Play button next to it . Your video
plays and is recorded out to the VCR .
If you want to record your material to DV, select the option
"DV" or "DV-Backup" and use the DV Controls (6) . The differ-
ences between DV and DV-Backup are explained in chapter
4 .2 under point (11) .
Of course you can record video material with the aid of suitable
software to your PC’s hard-drive and edit it there .
If you are editing an HDV project, you can now also output
your video in HDV .