MacroSystem Bogart SE Ver.2 User manual User Manual
Page 53
51
Bogart SE 2 user manual
It is also possible to move the text box using the cursor keys of
an external keyboard .
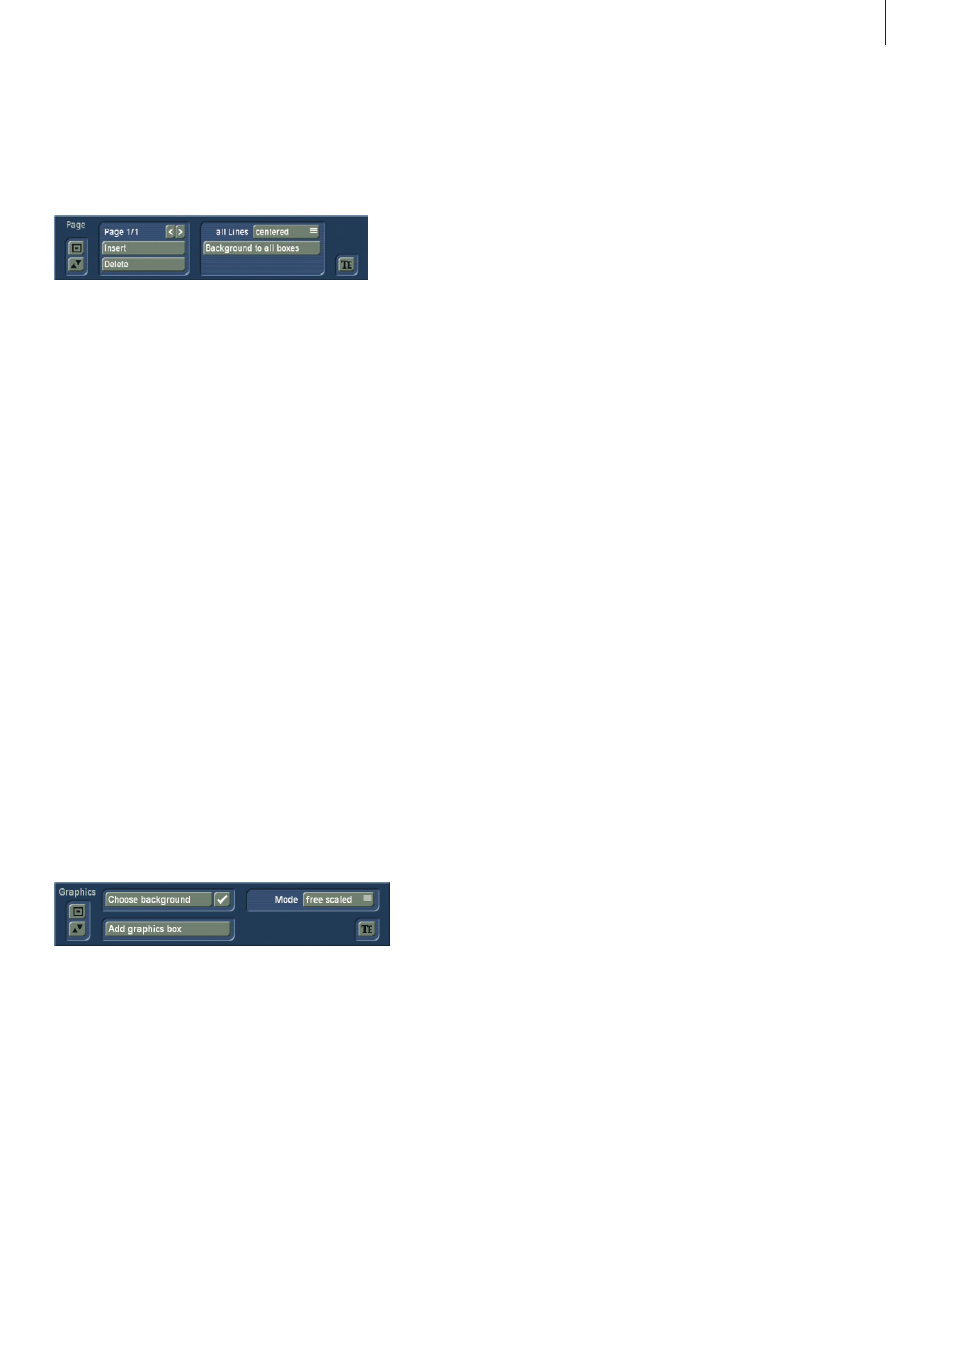
(4) After clicking on the button “Pages” a new task bar appears
in which you can create and edit pages .
• There you see at the above left (according to the effect) the
label “Page 1/1” . After you have added a page (see below)
you see the label “Page 1/2” . After an additionally added page
“Page 1/3” appears, etc .
With the help of the right arrow you can move forward through
the pages . The left arrow displays the previous page .
• By pressing the “Insert” button, you can insert a new text
page . Inserting a new page prompts Bogart SE to question
if the page is to be inserted before or after the current (first)
page . All pages will automatically be added after the chosen
page . A page can only be inserted (added) if it contains text .
• Pressing “Delete” deletes the current page and you will see
the next available page on the screen . If you have deleted the
last available page, the previous page will be seen .
• The selection button “All lines” offers three possibilities:
“Top”, “Centered” and “Bottom” . With these options, you can
select the vertical position of the text lines of all text panels on
the current page .
• The button “Background to all boxes” copies the back-
ground of the current box to all other panels on this page . The
button has no effect if you are working with just one box .
(5) Clicking on the button "Graphics" causes an additional task
bar to appear .
• At first you can decide whether your text box should be
provided with a background . Next to the function “Choose
background” there is a checkbox . If you see a checkmark in
the checkbox then the background for the active text box is
transparent . If you activate the checkbox so that a checkmark
appears, then the active text box is filled with a background .
• In order to specify the box background, click on the button
“Choose background“ . This opens the image pool .
There you can specify the desired pattern or color - also with
transparency percentage .
• A click on the button “Add graphics box” opens the image
pool, in which you can select a graphic (Product: Bogart SE,
Type: Images) . After clicking on “Ok” you can position the box
in the desired size on the screen .
• The selection button “Mode” provides you with several pos-
sibilities to render the box background and the graphic in the
text box .
The option “free scaled” means that the pattern/graphic is
adjusted to the size of the text box . Under some conditions the
proportions may be distorted .
The option “fix scaled” uses the original proportions of the
pattern/graphic, meaning that adjustment is made in reference
to one edge of the box . This may result in black streaks at the
edge of the text box . With the option “Original” you use the
pattern/graphic in original size . This means that for a small text
box only a part of the pattern can be seen . A large text box is
then not completely filled with the pattern .
The option “tile” fills the entire text box with the selected
graphic . If you have selected a normal large pattern, then you
will see no difference to the option “Original” . If the graphic is
smaller than the text box, then it it is set in original size tiled
behind each other, so that the entire box is filled with one and
the same graphic .
(6) The “Preview” button can be used to (if you have already
added a title effect to the storyboard) see a preview of the ef-
fect you have selected . If you have not yet added an effect, the
trackball pointer will display a little cross when trying to press
“Preview” .
(7) A click on "Archive" opens a field displaying four buttons:
"Load", "Save", "Delete", and "Cancel" .
Clicking on "Load" displays a list of the previously saved titles .
In this list you select a title, either directly or with the slider,
and confirm ("OK") . Clicking on "Save" displays the same list .
Now you have two possibilities:
1 . You can click the gray rectangle below the list so that the
keyboard is displayed and you can assign a name to the previ-
ously created title, followed by clicking on "OK" within the
keyboard and in the text archive field .
2 . You can select a title from the list and then click on the
gray line which now contains the name of the selected effect .
Within the keyboard field you now overwrite this name with
another of your choice . The difference to the first possibility
is that you overwrite not only the name, but also the archived
title, which is then irrevocably lost . Alternatively, you can select
a title without clicking on the yellow line . If you then confirm
with "OK", the selected title is replaced by the previously cre-
ated title, but retains its name . With the help of archiving you
can save your frequently used standard text independently of
projects and reuse them at any time .
If you click on "Delete", a list of saved titles is displayed in
which you can now select the title to be deleted and confirm
with "OK" .
A click on "Cancel" closes the menu without accepting any
settings .