13 audio-mix – MacroSystem Bogart SE Ver.2 User manual User Manual
Page 58
56 Chapter 4
You can make corrections to the volume with the aid of the
scrollbar below the volume display (1) while recording is
running .
(15) Click on the CD Recording button
(only on models
with integral DVD drive) to the left of Record/Stop/Play to call
up the CD Import .
Click on this open symbol
, to open the drive drawer in
which you can put an audio CD or CD with MP3 audio date .
Note: Importing MP3 audio data is possible from both data
CDs and data DVDs.
Then press the eject button of your system (or press against
the drawer) in order to close it again .
Now click on the Display CD contents button to read all avail-
able tracks on the audio CD inserted beforehand into the
DVD-RW drive . To sample your tracks, check the box next to
Play intro time in order to play the audio sample automatically
as soon as it is selected in the list . You can choose between
different playback times or you can switch off this function
altogether .
You can switch to a different track or start import with OK at
any time during play .
You have the following possibilities to enter titles: Note the box
above the vertical slider . It has three different modes that can
be changed by clicking into the box (see chapter 3 .2, Sliders) .
• If you wish to import merely one text, make sure to mark the box
with an X . Select the item in this fashion and confirm with "Ok" .
After entry the window "CD Import" closes automatically and
you see the title displayed in the list of sound clips .
• If you wish to import multiple texts from the CD, make sure
to activate the box by placing a checkmark) . Mark the desired
text items and start the import procedure by clicking onto
"Import active track" (the window will remain opened) or "Ok"
(window will close) .
The tracks read in beforehand are now displayed in the list of
audio samples .
• If you whish to import all titles from the CD, first mark all ti-
tles by activating the horizontal stripes in the box, or click onto
the button for `All´ . It is unimportant which title in the list has
already been selected . If you cancel the operation while the
titles are being read, then all titles that have been successfully
read are displayed in the list .
You then see the titles displayed in the list of sound clips .
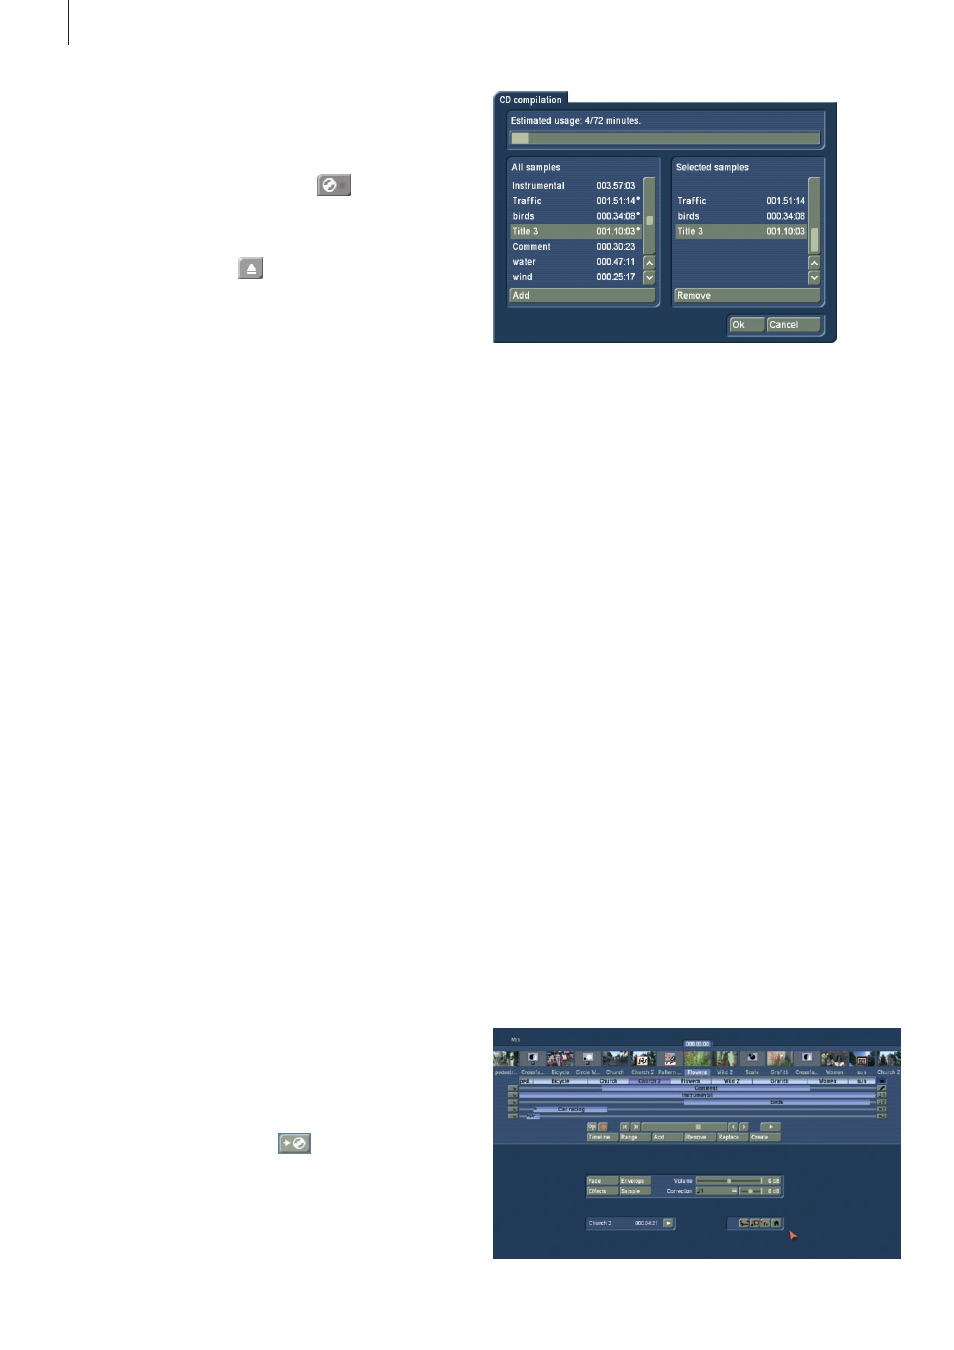
(16) Here, you can see a symbol
of an arrow pointing to a
CD . Click on this button and a screen called "CD compilation"
appears . This screen allows you to select samples for your
audio CD . You could burn your audio comments or extracted
original sounds to CD or even load a music CD and re-burn it
with a different track order .
On the left you can see a list with sound samples ("All sam-
ples") . Select the desired sample and press "Add" . The sample
should now appear in the right list ("Selected samples") . This
way, you can continue adding sounds to your CD . Any sam-
ples selected from the left list are highlighted with a little dot .
Take care not to overstep the maximum length of 72 minutes
for the CD . The "Estimated usage" of the CD can be monitored
on the top of the screen . Of course, you can remove any tracks
from the list again by simply pressing "Remove" .
Once you have finished assembling the list of tracks for your
CD, press "Ok" and insert an empty CD into the disc tray . A
CD-RW, the system can optionally delete the contents first,
before the tracks are burned . Please wait with removing the
CD until the system tells you the CD was burned successfully .
(17) Click on one of the menu symbols to access the menus
Edit, Audio-Mix and the main menu directly from this menu .
4.13 Audio-Mix
Use this function to arrange recorded commentaries and the
background sound in the storyboard, add audio effects, and
fine-tune the volume for the sound tracks . Audio mixing is
similar in principle to video editing .
The storyboard with the scenes and video effects which you
have added to it is visible at the top of the screen . Depending
on your editing method (Storyboard or Timeline), you will see a
different menu .