MacroSystem Bogart SE Ver.2 User manual User Manual
Page 42
40 Chapter 4
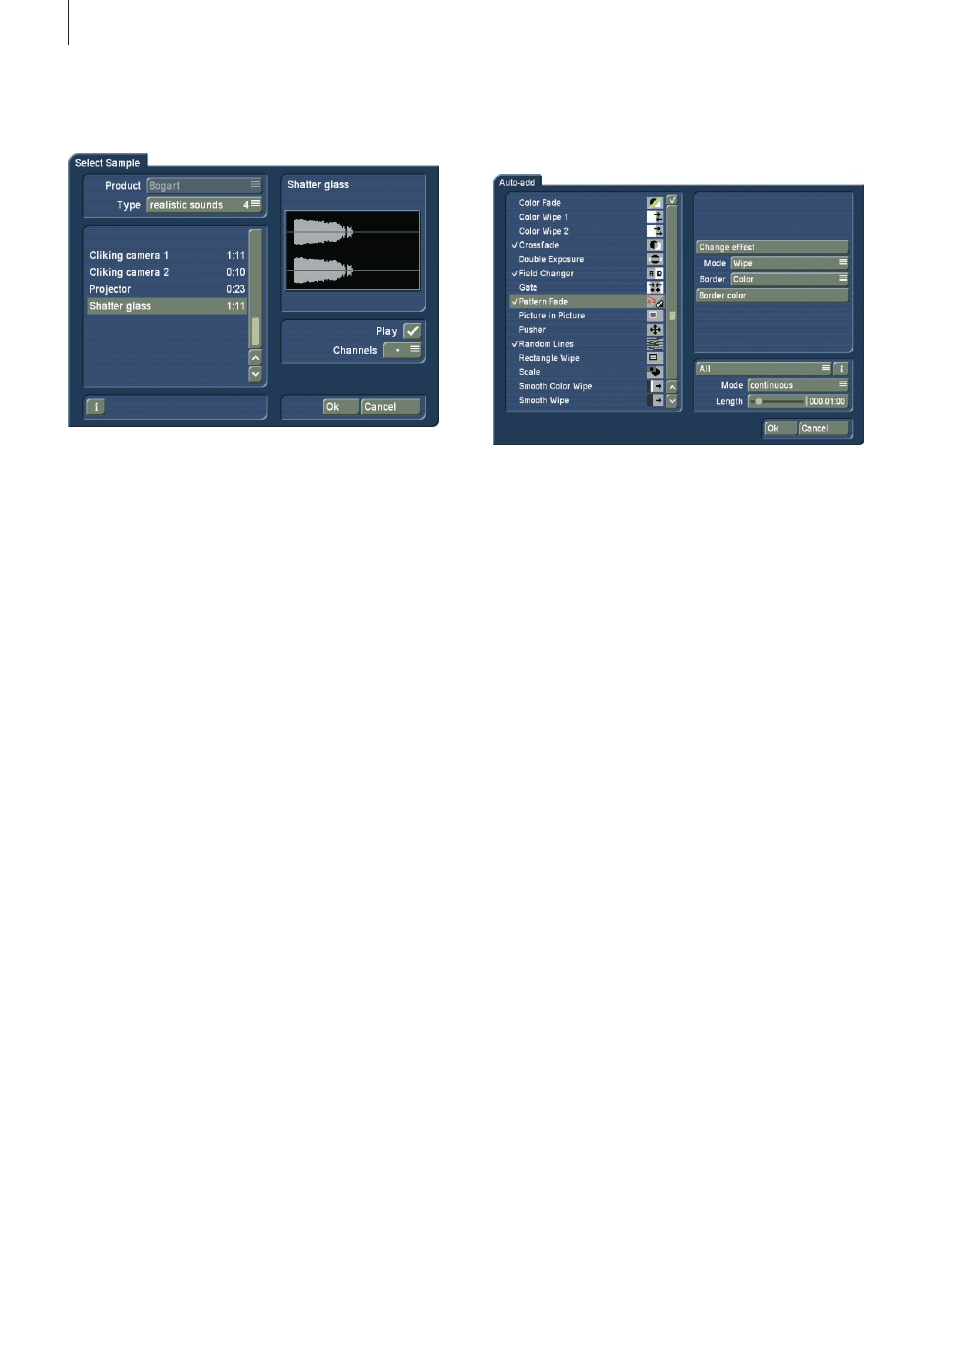
window opens up (the "Audio Pool"), containing a pre-selec-
tion of various effects on the left side .
On the right, you can see a graphical representation of the
effect . The button `Product´ shows you the available products
that contain sound effects . The button `Type´ shows you that
the sounds are split into three groups: You can choose be-
tween the groups: `Sounds for Fades´, `Realistic Sounds´ and
`Synthetic Sounds` .
The button `Play´ is used to play selected sound . The maximum
playback time is five seconds, just like the graphical display .
The button below, called `Channels´ allows you to swap the left
and right channels around by setting the direction symbol as
desired . This may be useful if for example, you wish to change
the direction of the wipe effect (e .g . the train the video scene
travels from left to right across the screen) .
Press `Ok´ after selecting to close the audio pool again .
You will then see a little sound effect symbol just underneath
the Transition Effect symbol in the Storyboard .
If you wish to play the effect in this screen before it has been
rendered, only the sound itself will play . Once the effect has
been rendered, all sounds at this position will be played back .
When you enter the “Audio Mix" menu, you will see the sound
effect in the first effect track of the Audio Mix menu . If this
track was already occupied, maybe partially, the sound will be
moved to another track . In this menu, you can additionally edit
the sound (move, trim, change volume) .
Please note that the sound effects are locked to the Transition
Effects . If you remove the Transition Effect, this will also delete
the sound effect .
Select the crossed out Note symbol found in the Transition
Effect menu and the sound effect shall be split and removed
from the Transition Effect .
(14) Clicking on the menu symbols brings you directly to the
Edit, Image Processing effects, Titling, and to the Main menu
screens .
Keep in mind: If you change a setting for an effect that has
already been created, change the duration, or even replace the
effect with another, the effect must then be created again . Be
careful!
(15) Click onto the button “Opt” . This first menu allows you to
either automatically apply or delete transitions from the current
Storyboard position on .
These functions are particularly interesting for slide shows or
still sequences , but they can also be used in normal video
projects . Select “Add automatically” to access the menu listing
your transition effects .
You will see that these are the standard user interface ele-
ments required to add effects to the Storyboard . There's the
effect list and the selection for effects shown . Also, there are
the effect settings if available for that effect and the effect
length . You can mark single effects with a tick or make a mul-
tiple selection . These effects are then later used in the Story-
board . Don't forget to apply any settings for your effects .
As you can select multiple effects, there's also an option for
choosing the mode for applying the effects . Choose “Cyclic” to
add the effects one after the other to the Storyboard . Once the
last Storyboard is added, the system begins adding the first
effect in the list once again . The “Random” mode on the other
hand, does what it implies: It adds random effects from your
selection to the Storyboard . Remember that in such a case,
sometimes the same effect may be used several times .
The effect length is set globally for all effects . You can not
enter a separate length for each effect . Therefore, all effects
added to the Storyboard in this fashion will have the same
length, unless the scene length itself prohibits this .
After you make the selection and make your settings, click
onto OK to confirm . You will be asked once more if you really
want to add these effects, as this will place all transitions in the
Storyboard from this position on . Any transitions already found
in the Storyboard shall be overwritten . Confirm with Yes to add
the effects .
Once you have applied effects to the Storyboard, it must be
possible to delete these effects in just as easily if you are
unhappy with your choice, This is why the menu following the
“Opt” click also contains a delete option . Click onto “Remove
automatically” and confirm with “Yes” .