2) operation panel, 2) operation panel -3 – TA Triumph-Adler DC 2062 User Manual
Page 16
Section 2 NAMES OF PARTS
2A080030A
KM-6230 (KME)
/ 131
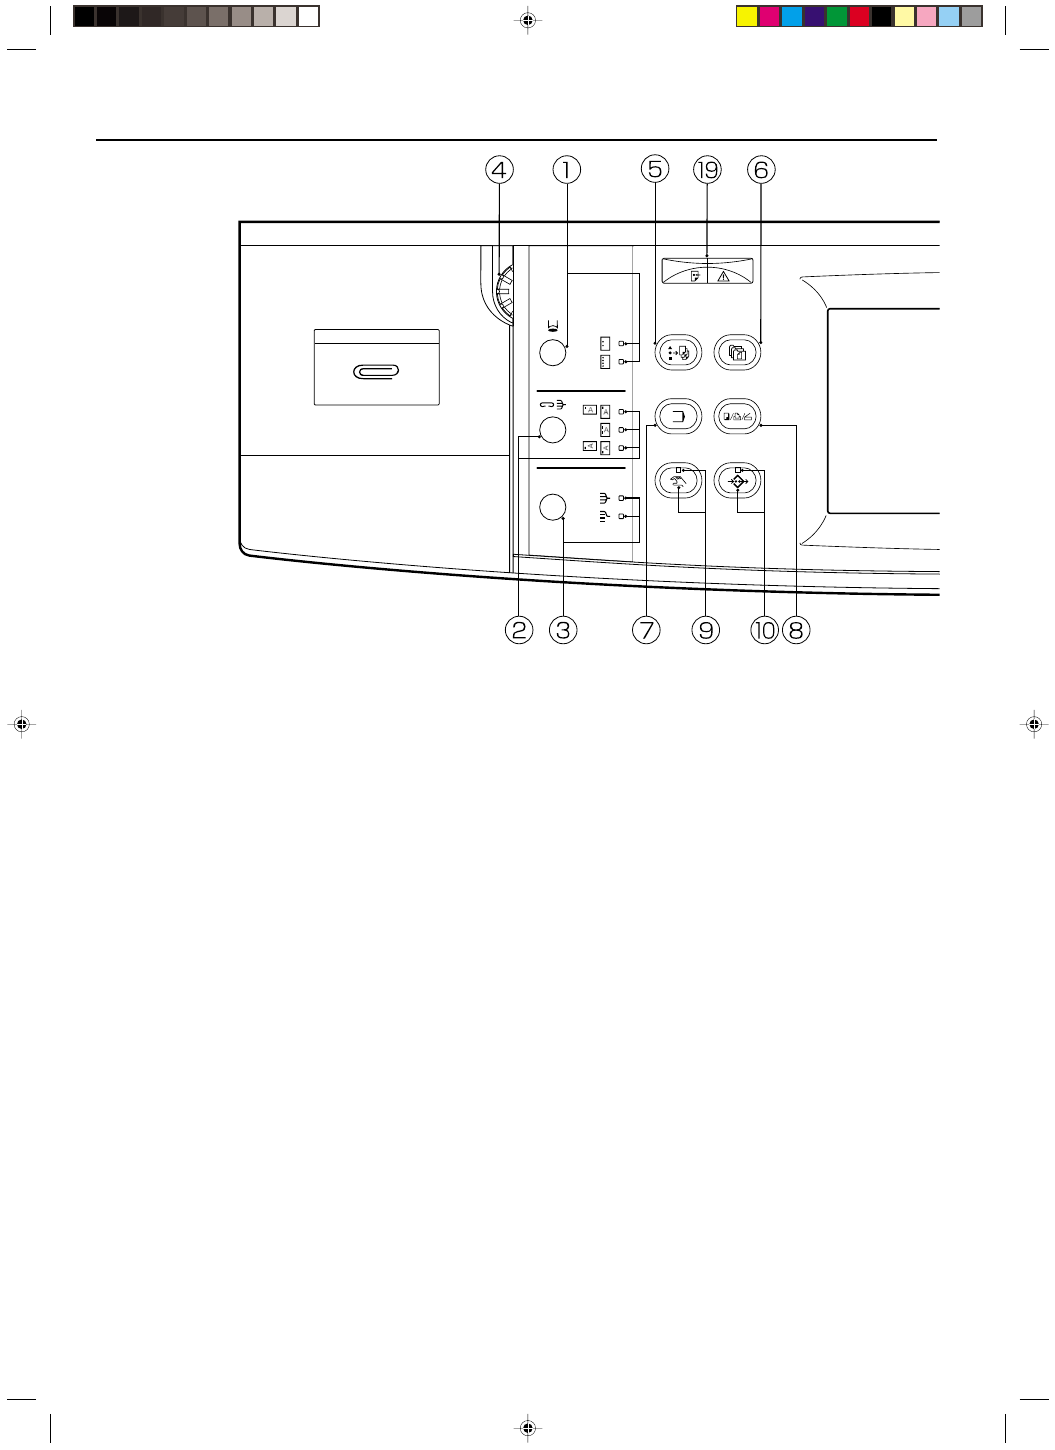
(2) Operation panel
1
Punch key / Punch mode indicators
(In order to punch holes in your copies with the optional Finisher, press
this key until the appropriate indicator [for either 2- or 3-hole punch] is
lit. See page 9-1.)
2
Staple Sort key / Staple Sort mode indicators
(In order to staple your copies with the optional Finisher, press this key
until the indicator that corresponds to the desired stapling style is lit.
See page 9-1.)
3
Sort-Group key / Sort and Group indicators
(In order to sort or group your copies, press this key until the indicator
that corresponds to the desired mode is lit. See pages 9-1 and 9-10.)
4
Brightness adjustment control dial
(Turn this dial when you want to adjust the brightness of the touch
panel [liquid crystal display].)
5
Job Build key
(Press this key when you want to access the job build functions of this
copier. See page 6-3.)
6
Doc. Mgmt. key
(Press this key when you want to access the document management
functions of this copier. See page 7-1.)
7
Program key
(Press this key when you want to register various copy settings as a
single program. See page 5-27.)
8
Copier/Printer/Scanner key
(Press this key when you want to use the optional printer or scanner
functions of this machine.)
9
Manual key and indicator
(Press this key to light the indicator when, rather than using the auto
paper selection mode or the auto magnification selection mode, you
want to manually select the size of the copy paper or the copy magni-
fication ratio.)
0
Add Job key and indicator
(Press this key to light the indicator when you want to access the job
reservation functions of this copier.)
!
Touch panel
(Displays such information as the number of copies, machine status,
operation procedures, etc. By gently touching the displayed keys, you
can select a desired item, setting, function, etc. Do not press on the
touch panel with wooden, metal or other hard objects, and do not prick
it with pointed objects. In this handbook, touch keys are indicated in
double quotation marks.)
@
Numeric keys
(Press these keys when you want to set the number of copies to be
made or to enter a desired value.)
#
Reset key (See “
●
Initial mode” at right.)
$
Stop/Clear key
(Press this key when you want to stop copying or want to change the
number of copies to be made.)
%
Start key and indicator
(Press this key when the indicator is lit green in order to start copying.)
^
Proof Copy key and indicator
(Press this key to light the indicator when you want to make a test
copy. See page 4-8.)
&
Energy Saver key and indicator
(Press this key to light the indicator when you want to use the energy-
saving auto preheat function. See page 4-10.)
*
Interrupt key and indicator
(Press this key to light the indicator when you want to use the interrupt
copying function. See page 4-7.)
(
Data / Error indicator
(This indicator will blink and then light continuously during reception of
data from your computer. It will blink and then light red when an error
has occurred during data verification, etc.)
●
Initial mode (at the end of warm-up or when the Reset key is pressed)
In the initial mode, the copying mode is automatically set to the “auto
paper selection mode” where copying is accomplished at 100% magni-
fication (same size) onto paper of the same size as the original, the
number of copies to be made is set to “1”, and the copy exposure is set
to the “manual exposure mode”.
* It is possible to change the default setting in the initial mode to the
“auto exposure mode”. (See “
1
Exposure mode” on page 8-15.)
* It is also possible to change the default setting so that you can manu-
ally select the size of paper that you will copy onto. (See “
8
Paper
selection” on page 8-16.)
●
Auto clear function
About 90 seconds after copying stops, the copier will automatically
return to the same settings as those after warm up. (However, the copy
exposure mode will not change.) Copying can be performed repeatedly
with the same copy mode, number of copies, and exposure settings as
long as copying is started before the auto clear function engages.
●
Automatic drawer switching function
If two drawers contain the same size of paper and one of the drawers
runs out of paper during copying, this function will automatically switch
to feeding paper from the other drawer.
* The automatic drawer switching function can be deactivated.
(See “
2
Automatic drawer switching” on page 8-11.)
2-3
E_Sec2_Name.PM6
10/13/00, 13:36
4