Border erase, Border erase -24 – Kyocera FAX System 12 User Manual
Page 69
3-24
Sending Faxes > Border Erase
Border Erase
Erases the black border that forms around the image. The following modes are available.
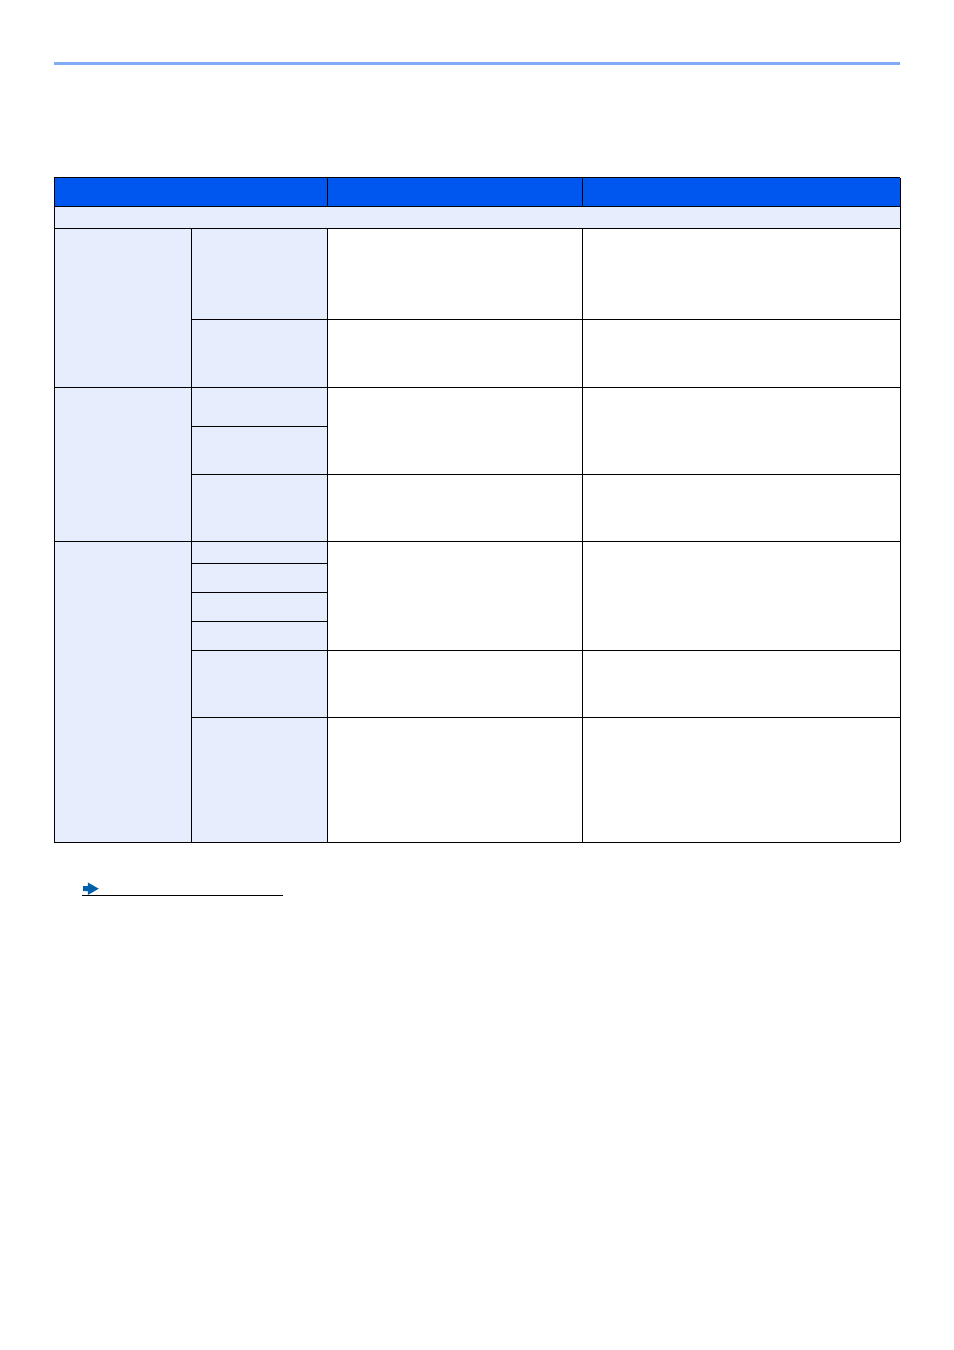
Item
Value
Description
Off
Border Erase
Sheet
Border
Metric: 0 mm to 50 mm
(in 1 mm increments)
Inch: 0.00 to 2.00"
(in 0.01" increments)
Set the border erase width.
*1
Set the value by selecting [+] or [-].
Select [# Keys] to use the numeric keys
for entry.
*1 The input units can be changed in System Menu.
Machine’s Operation Guide
Back Page
Same as Front Page, Do Not
Erase
For 2-sided originals, select [Back Page]
and then select [Same as Front Page] or
[Do Not Erase].
Border Erase
Book
Border
Metric: 0 mm to 50 mm
(in 1 mm increments)
Inch: 0.00 to 2.00" (in 0.01"
increments)
Set the border erase width.*
Set the value by selecting [+] or [-].
Select [# Keys] to use the numeric keys
for entry.
Gutter
Back Page
Same as Front Page, Do Not
Erase
For 2-sided originals, select [Back Page]
and then select [Same as Front Page] or
[Do Not Erase].
Individual Border
Erase
Top
Metric: 0 mm to 50 mm
(in 1 mm increments)
Inch: 0.00 to 2.00"
(in 0.01" increments)
Set the border erase width.*
Set the value by selecting [+] or [-].
Select [# Keys] to use the numeric keys
for entry.
Bottom
Left
Right
Back Page
Same as Front Page, Do Not
Erase
For 2-sided originals, select [Back Page]
and then select [Same as Front Page] or
[Do Not Erase].
Original
Orientation
Top Edge on Top, Top Edge on
Left
Select the orientation of the original
document top edge to scan correct
direction. Select [Original Orientation] to
choose orientation of the originals, either
[Top Edge on Top] or [Top Edge on Left].
Then select [OK].