Job box, Job box -24, Job retention – TA Triumph-Adler P-C4580DN User Manual
Page 106
Document Box
4-24
Job Box
Job Box is a print function that makes the Job Retention function possible. The settings are specified from the printer driver.
Refer to Printer driver print settings screen on page 3-3 or the Printing System Driver User Guide.
Job Retention
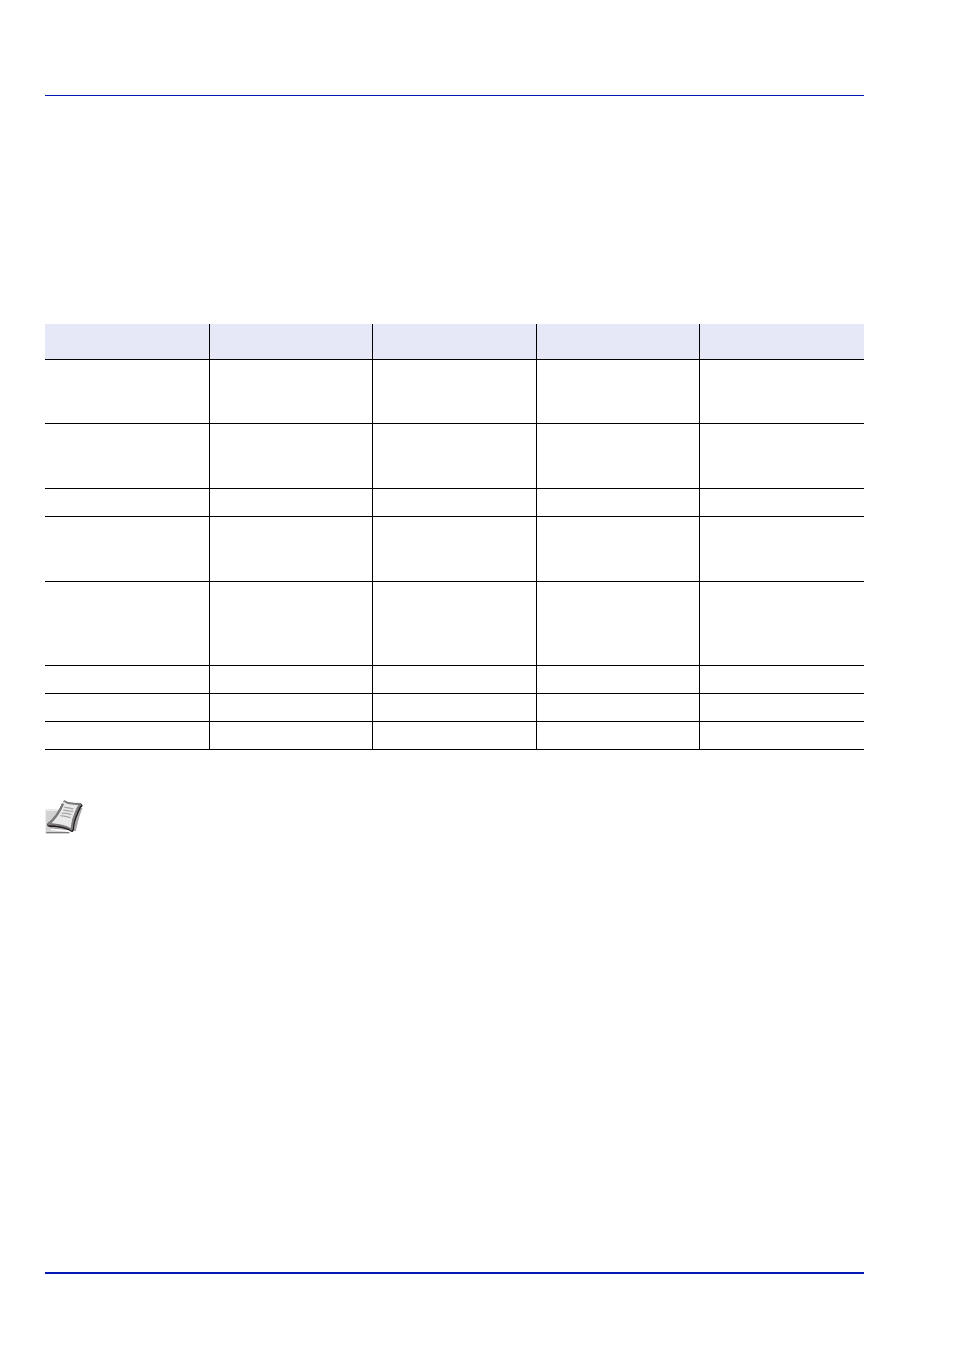
Job Retention has four modes as summarized below. These modes are selected from the printer driver through the
application software:
Quick Copy
Proof-and-Hold
Private Print
Stored Job
Primary function
To later print
additional copies
To proof the first copy
before printing
multiple copies
To hold the document
in printer to prevent
unauthorized access
To electronically store
documents such as
fax cover pages
On terminating print
setting from
application software
Prints simultaneously
Prints one copy
simultaneously
Does not print
Does not print
Retrieved by
Operation panel
Operation panel
Operation panel
Operation panel
Default number of
copies printed at
retrieval
Same as storing
(can be changed)
One less
(can be changed)
Same as storing
(can be changed)
One
(can be changed)
Maximum number of
jobs stored *
*
Jobs in excess will cause the earlier ones to be deleted.
32, expandable to 300 32, expandable to 300 Depends on the HDD
capacity (the job is
automatically deleted
after printing)
Depends on the HDD
capacity
PIN security
No
No
Yes
Yes (if necessary)
Data after printing
Stored
Stored
Deleted
Stored
Data at power off
Deleted
Deleted
Deleted
Stored
Note Refer to the Printing System Driver User Guide for the driver settings and print (save) procedures.
After pressing [Document Box], it is possible to display either the Job Box list screen or the Custom Box menu
screen or to set them. Refer to Def. Screen(Box) (Document Box default screen settings.) on page 6-60.
If the Custom Box menu screen is displayed, follow the procedure below to display the Job Box list screen.
1
Press [Back].
2
Press
or to select Job Box.
3
Press [OK]. Job Box list screen appears.