3 video settings – MacroSystem Bogart SE Ver.4 User manual User Manual
Page 27
27
Bogart SE 4 User manual
time . A click on the box next to the option activates or deacti-
vates that particular function .
If you choose all options, all data (video and audio, and all ef-
fects) within the currently active project are deleted . All project
settings can now be reset . Project settings are fixed only after
video recording or creation has begun .
The following are not deleted:
• Other edited projects
• Archived colors and titles
• Effect modules, including those that have been installed later
• Installed fonts
• Other supplementary programs
If you choose only one function, merely this part of the project
will be deleted .
Information: The ‘Information’ button gives information
on project name, storyboard length, scenes and effects
inserted into the storyboard, and on the total number of
existing scenes and samples.
Backup storyboard: The ‘Backup storyboard’ function al-
lows you to save the DV or HDV storyboard to an external
medium. This button is only available if there are scenes in the
Storyboard . Make sure to check what the mode of the button
next to it is this setting very much determines the type of stor-
age/backup . Click onto the ‘Backup Storyboard’ button . You
must then select the destination medium (CD/DVD, internal/
external hard-drives or Firewire hard-drive) . Then click on “OK”
and enter the name for the Storyboard you wish to save . You
will then be requested to insert or connect the medium . If you
are using the ‘HDV’ (in a HDV project) or ‘DV’ mode, the first
thing to happen is that the non-created effects are rendered .
If you are using the ‘DV-Backup’ mode, the footage is left
un-rendered (see mode) . If you are using an already burned
CD/DVD-RW BDRE, the system shall overwrite after you have
confirmed a warning . This means it is not possible to store
multiple backup sessions on one medium . Please remove the
destination medium only when you get a message that the
backup was successful and when any status lights on USB
devices stop blinking . To import the Storyboard again, read
the next section .
Restore storyboard: The function “Restore storyboard”
makes it possible to load the previously saved DV footage
Storyboard back into the system.
Insert the CD/DVD or connect the Firewire hard-drive and start
the process . Once the data has been loaded, the automatic
split functionality (see chapter 4 .7, item (21)) will kick in but
only if you selected the ‘DV-Backup’ mode . You will then be
asked if the recovered footage is to be added to the Story-
board or to the Scene bin . Inserting the scenes to the Story-
board will also add the saved effects in between them . If you
saved your work in ‘DV’ mode, the recovered material will be
added in the form of a normal scene . Make your selection and
confirm with “OK” to find out the number of scenes to be cre-
ated . Confirm again and enter the Edit menu to work with the
recovered data . If you restore a backed-up HD storyboard, the
scene can again be split into separate scenes .
Mode: The ‘Mode’ button has an ‘HDV’, ‘MTS’ (in the case
of an HDV Project), ‘DV’ and ‘DV-Backup’ setting. Before
saving your Storyboard, set the option for an ‘HDV’ or ‘DV’
project to save the entire material . Prior to saving, the all non-
rendered effects and audio is created . If you load the footage
back into the system with the ‘Restore Storyboard’ function,
you will see only one scene in the Edit menu (Scene Bin),
named ‘Storyboard’ .
If you use the Modus button to select the option “DV-backup”
before backing up the storyboard, the backup will not only
contain the footage of your DV project but also additional in-
formation . This will enable a Restore to reconstruct most of the
Storyboard: the different scenes will get their original names
again . The original sound will be restored, and the transition,
image processing and title effects will be restored with their
settings . Please note that inserts, the single audio tracks, title
texts and the settings of effects which have their own interface
can not be recovered (for example, PIP Studio) . The same
goes for Insert scenes that are coupled with effects .
In ‘HDV’ projects, you can also use the ‘MTS’ mode . This
stores projects in ‘MTS’ format for play back on other compat-
ible systems .
Delete backup: If you have saved your Storyboard to
an external Firewire hard-drive, you can use the button
‘Remove’ to remove all data of the Storyboard that was
archived.
This menu symbol returns you to the Main menu, the
same as clicking the right trackball button .
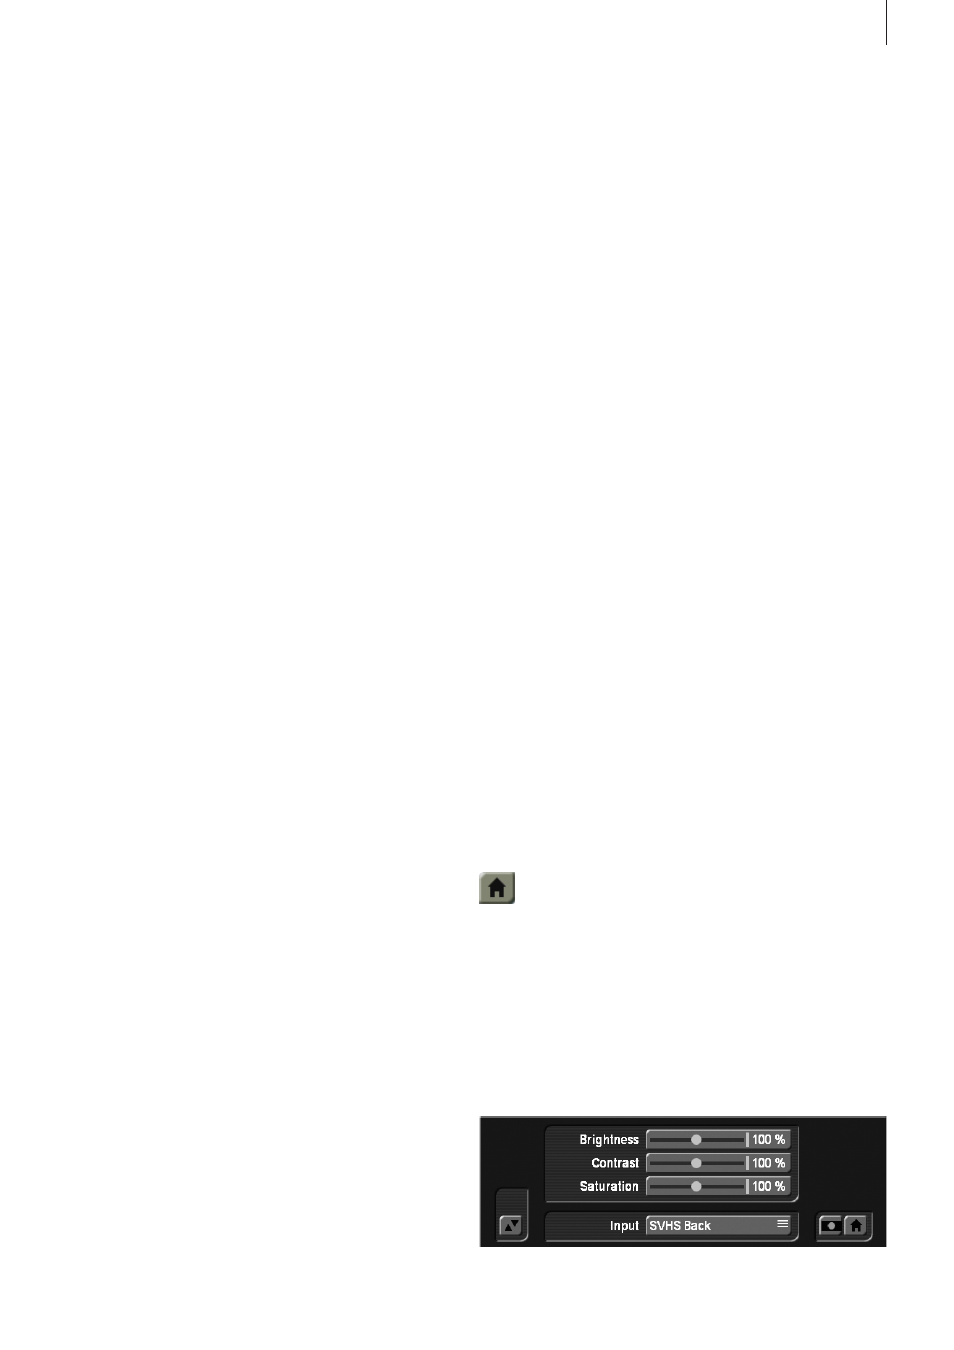
4.3 Video settings
This menu is not available when you have activated an HD
project or when you are using hardware that has no analog
inputs . This is where you can adjust the settings for an analog
video signal with respect to brightness, contrast and color
saturation, as well as the selected video input .