MacroSystem Bogart SE Ver.4 User manual User Manual
Page 34
34 Chapter 4
have a means of assessing the sound mix .
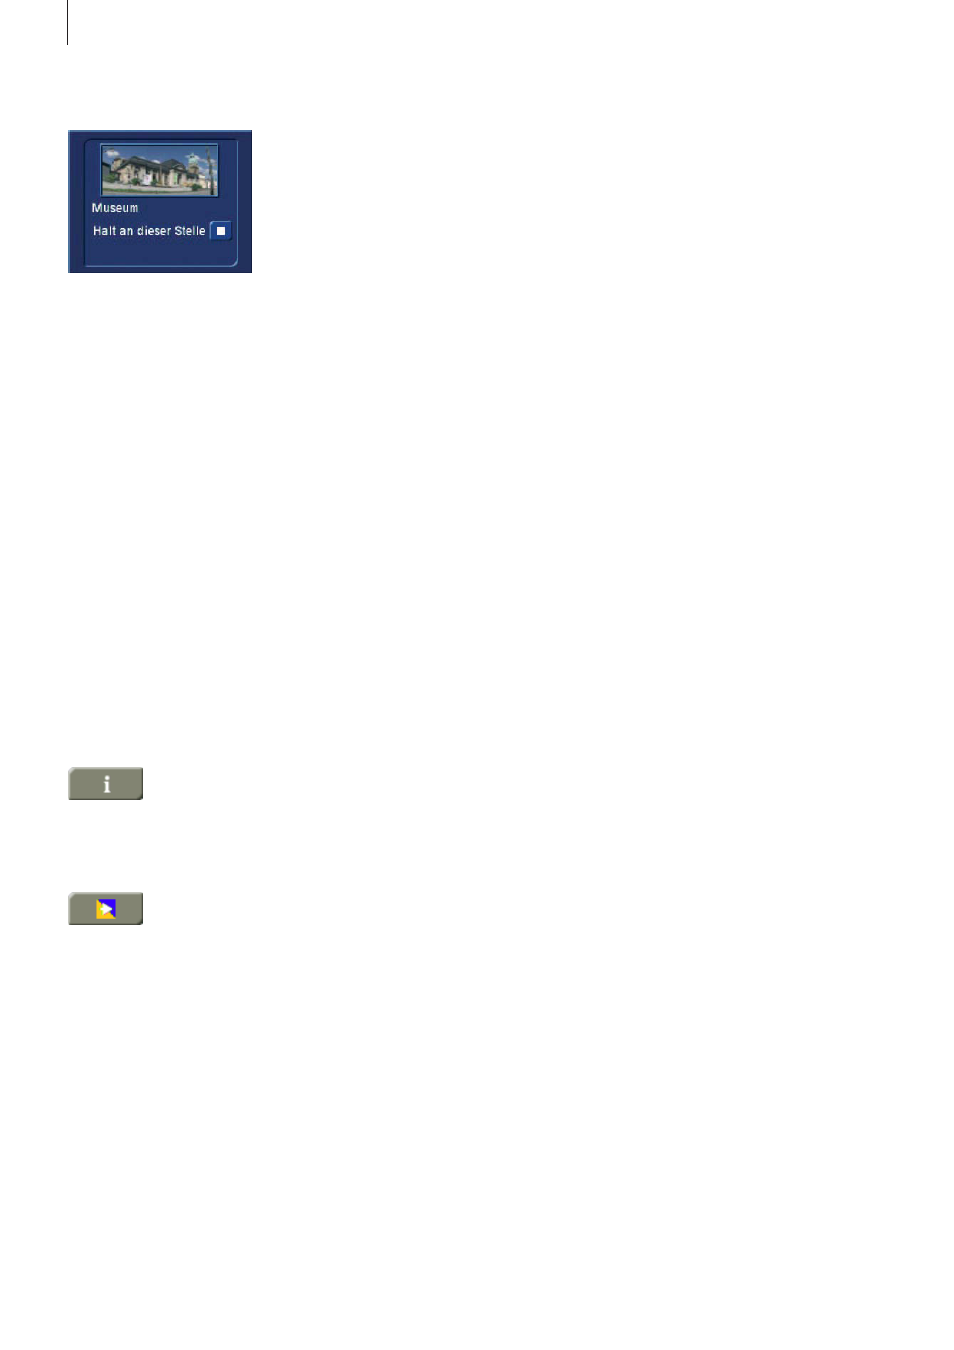
When the Storyboard is played, a window can be displayed
with information relevant to the scene that is being played .
The reference image from the storyboard and the name of the
scene are being displayed .
In addition, you have the ability to stop playing at the scene
that is being displayed, regardless of where play back was
started . This information window is quite large . It should there-
fore only be opened for information purposes and should not
usually remain open when everything is being played . If you
use your system in dual-monitor mode, this information will
automatically be displayed in the playback window on the VGA
monitor .
Note that the displays quality may be lower than the actual
output, depending on the screen-mode used (e .g . in single-
monitor VGA mode) . You also have a pause button which you
can use to stop play back until you press the pause button
again (or press the play button) . The last frame appearing be-
fore the pause button was pressed remains as a single picture
on the monitor until playback is resumed .
(6) Click on this button to display information
about the Storyboard . You’ll see the project name,
the current position of the Storyboard (the time is displayed),
the length of the whole Storyboard and the remaining length
(after the current position) .
(7) This button starts the Storyboard rendering
process . All effects found in the Storyboard are
rendered, as well as the audio . It has the same effect as the
render button in the ‘Finish’ menu, allowing you to render the
complete Storyboard in one go (if you want to avoid seeing
unrendered parts) .
(8) Recorded scenes appear automatically in the Scene bin in
the lower section of the screen . They are represented as small
thumbnails (the first frame of the video scene) . In video mode
(not VGA) up to eleven scenes can be viewed simultaneously
in the scene bin . For more than eleven, the slider (item (9)) is
then used to scroll to the desired scene . The edit menu display
resolution depends on the monitor mode used .
With resolutions higher than 1024 x 768, the scene bin will be
organized in multiple rows . Scenes from the scene bin that
have been inserted into the storyboard are indicated by a small
white triangle in the upper right corner of the scene, or they
can alternatively be hidden using the options . A scene in the
scene bin can be tagged with various symbols .
‘>’ = The scene is trimmed in the IN area
‘<’ = The scene is trimmed in the OUT area
‘x’ = The scene is rendered, is an empty scene, has been im-
ported or contains rendered parts
‘^’ = The scene is also used in the Storyboard
‘n’ = The scene is marked
‘p’ = This is the current scene
In the scene bin (right), you can see the project name you have
chosen . When using a higher resolution, you will see a larger
view of the currently selected scene on the right side .
(9) The slider below (right) the scene bin is used to select the
scenes to be displayed . The buttons next to the slider can also
be used to move through the Scene bin one scene at a time .
The buttons “|<” and “>|” are used to jump to the beginning or
the end of the scene bin . The “<” and “>” buttons will move
through the scene bin one scene at a time .
(10) The play back button is to the right of the Storyboard
slider . This button is used to play back the active scene dis-
played in the center of the scene bin . Stop and pause buttons
are also available .
(11) Clicking on the “i” button displays a window showing
information about the activated scene in the scene bin . In the
upper part of this window you’ll see the timecode, the record-
ing date, the recording time and the format . Further, you can
call up the keyboard by clicking on “Enter/ change comment”
in order to add your notes to this scene, which then will be dis-
played in the lower box . Clicking on “OK” confirms the notes,
so that it will be displayed in this information window when it is
called up again .
(12) In case you have not yet renamed the scenes in the
Record screen, you again have the chance here to give the
scenes your own names . Simply select the desired scene in
the scene bin and then click on the button below the large
preview image on the right of the scene bin to bring up the on-
screen keyboard . If you have the Power Key option, then you
can use this keyboard to clear the old name and enter a new
name .
(13) Many users require “overlapping” of certain video se-
quences with other scenes without changing the original audio .
Example: A music video must be created . A complete record-
ing of the singer is available . Certain portions of this recording
are to be substituted with other scenes, but the view of the
artist singing is to reappear several times . The movement of
the singer’s lips should always be synchronized with the mu-
sic . This means that the original audio does not change, even
though scenes are changed .