MacroSystem Bogart SE Ver.4 User manual User Manual
Page 48
48 Chapter 4
which you can play a small preview . This will give you the abil-
ity to see the effect of your settings, which you have had so far
to assess in a single image, in a real-time preview .
The settings made in this menu are confirmed with “OK” and
you are returned to the Effect menu . With “Cancel” you leave
the “Full Size” menu without saving any changes . The arrow
buttons serve to move the single-image menu to the top edge
of the screen .
(11) If the inserted effect shows a symbol outlined in red, then
it must be created . When you click on the “Create” button a
screen appears in which the course of the effect can be seen
as it is created . After the creation is completed, the symbol’s
outline is blue .
(12) If your system supports the function “scene” you can
make use of the multi-layer technique . If you want to overlap
several transition effects, you at first add one effect between
two scenes and create it . Then you create a single scene from
the two scenes and the inserted effect . To do this you click on
the “Scene” button so that a window appears in which you can
select the range for the new scene .
The name of the used transition effect appears next to “Name”
and is given as default name for the new scene . If desired, you
can enter another name by clicking and using the keyboard
that appears . You also see the three options “Effect”, “Effect +
scene(s)”, and “Range” . If you only want to convert the effect
with the previously set range into a new scene, then click on
“Effect” . Furthermore, you can choose if a new scene is added
to the Scene Bin and/or if it is to replace the Scene + Effect in
the Storyboard . Click on “OK” so that the effect is turned into
a scene and added as selected above . You can also let the
length of the new scene extend beyond the range of the two
previous scenes (with inserted effect) . In this case click onto
“Effect + scene(s)” and then (once you have selected where
it is to be added) on “OK” . Alternatively, you can create the
scene from the entire length of or from a portion of the story-
board . Click onto “Range”, select how it is to be added and
then confirm with “OK” . Use the IN and OUT points (in the now
familiar Range menu) to select the range of the new scene . The
wave form can be of help (chapter 3 .2 “Sound envelope and
audio scrubbing”) and can be toggled on/off with the loud-
speaker symbol .
Then click on “OK” in the Range menu and the scene is cre-
ated and stored in the Edit menu . Of course, you can also cre-
ate a separate scene from a portion of the storyboard in which
there is no effect . Simply select a point in the storyboard and
click on “Scene” . In the window that is displayed only the func-
tion “Range” is enabled . Specify a range and click on “OK” .
Then you can view the new scene in the Edit menu .
(13) Here, you can see two buttons that have an effect on
sound effects . Once you have added a transition effect be-
tween two scenes, you can click onto the Note symbol to add
a sound effect .
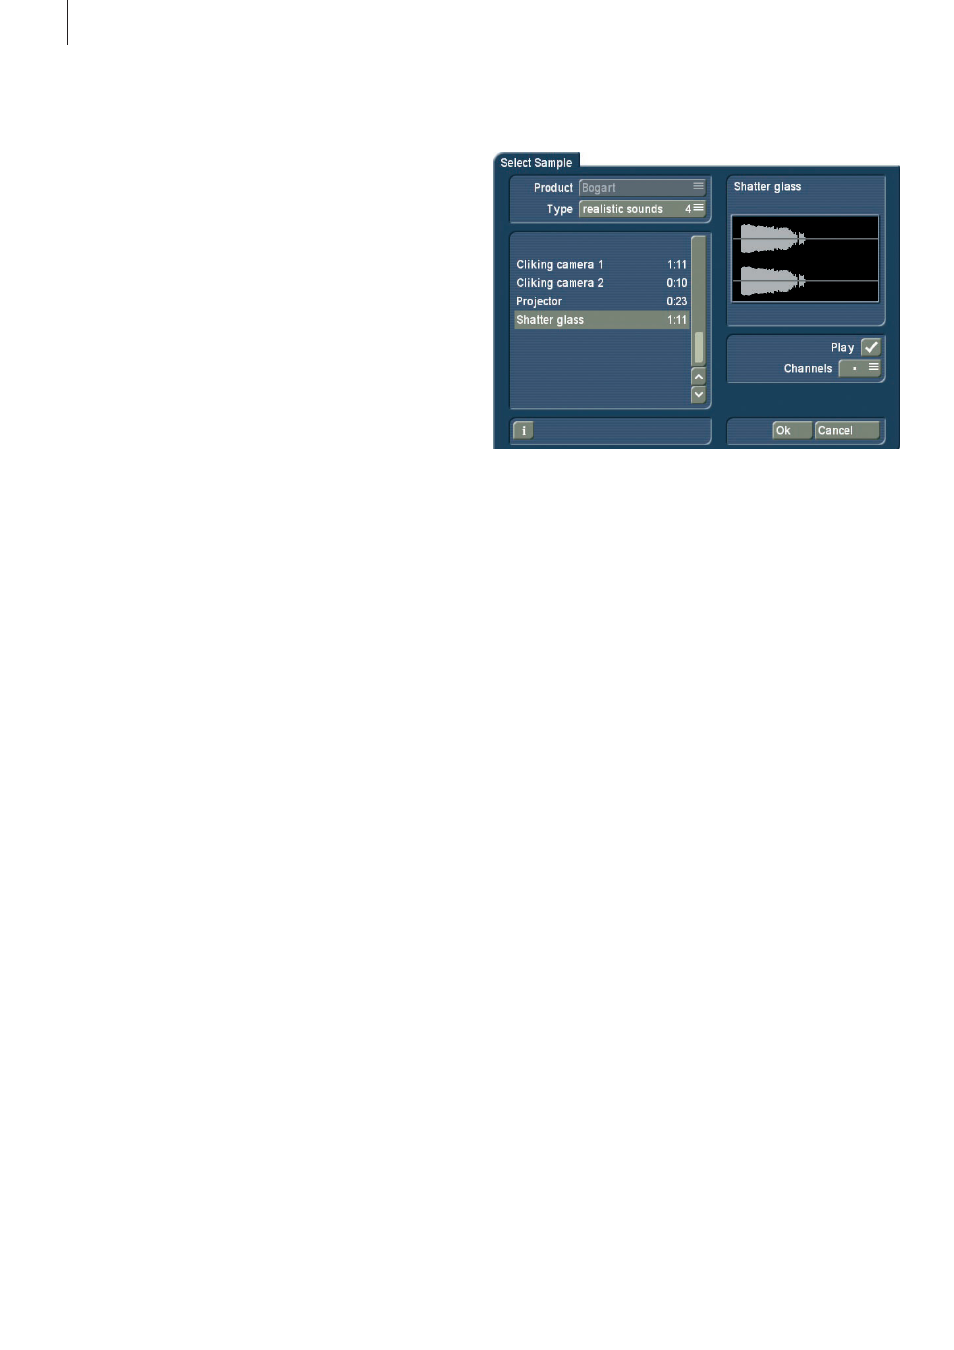
A window opens up (the “Audio Pool”), containing a pre-se-
lection of various effects on the left side, which you can select
with the help of the vertical slider . On the right, you can see
a graphic representation of the sound . The button ‘Product’
shows you the available products that contain sound effects .
The button ‘Type’ shows you that the sounds are split into
three groups:
You can choose between the groups: ‘Sounds for Fades’,
‘Realistic Sounds’ and ‘Synthetic Sounds’ . The button ‘Play’ is
used to play selected sound . The maximum playback time is
five seconds, just like the graphic display . The button below,
called ‘Channels’, allows you to swap the left and right chan-
nels around by setting the direction symbol as desired . This
may be useful if for example, you wish to change the direction
of the wipe effect (e .g . the train the video scene travels from
left to right across the screen) .
Click on “OK” after selecting to close the audio pool again .
You will then see a little sound effect symbol just underneath
the transition effect symbol in the storyboard .
If you wish to play the effect in this screen before it has been
rendered, only the sound itself will play . Once the effect has
been rendered, all sounds at this position will be played back .
When you enter the “Audio Mix” menu, you will see the sound
effect in the first effect track of the Audio Mix menu . If this
track was already occupied, maybe partially, the sound will be
moved to another track . In this menu, you can additionally edit
the sound (move, trim, change volume) . Please note that the
sound effects are locked to the transition effects . If you remove
the transition effect, this will also delete the sound effect . Se-
lect the crossed out Note symbol found in the transition effect
menu and the sound effect shall be split and removed from the
transition effect .
(14) Clicking on the menu symbols brings you directly to the
Edit, Image Processing effects, Titling, and to the Main menu