MacroSystem Bogart SE Ver.4 User manual User Manual
Page 42
42 Chapter 4
that there is no group affiliation . In video mode, this field is not
shown, because of lack of space . You can access the group
info by pressing either ‘Opt .’ or the info button ‘i’ . If you wish
to change the group affiliation, press the text field underneath
the active scene (VG/DVI only) . This will prompt a list of avail-
able, existing groups to select from . Working with groups is
described below .
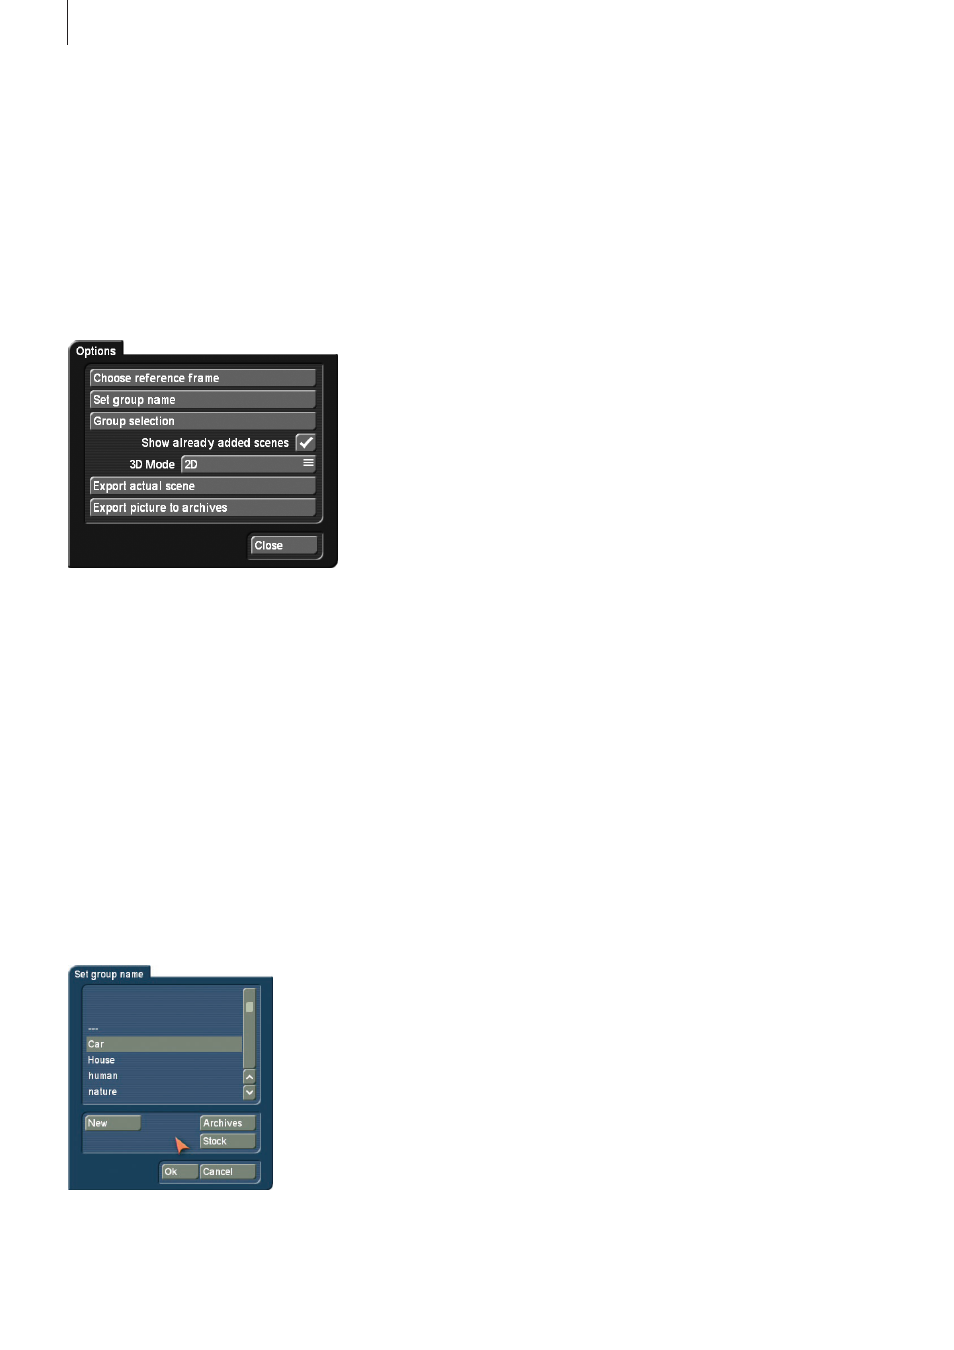
(28) The ‘Opt’ button gives you further options that can be
used to improve and optimize the scene arrangement in the
scene bin .
Choosing reference image In order to differentiate better be-
tween the various scenes, it may be necessary to change the
‘Reference frame’ which represents the entire scene . Even ef-
fects that are available in the scene bin could be easier to rec-
ognize thanks to an individual reference image . For example, if
you apply an image processing effect to a scene and create a
new scene from this, you could give the scene an expressive
reference image . To do this, go to the options ‘Opt’ and press
‘Select reference image’ . You will see a menu that allows you
to determine the image within the scene . Activate ‘Position’ to
scroll through the scene and to select a new image .
Note: Changes the reference image of a scene has no result
for scenes that have already been included in the Storyboard,
but only on the once in the scene bin.
Set group name
You can group scenes in Groups and hence make them easier
to find . For example, you can only show the scenes of a par-
ticular group . Activate the scene you want . The option “New”
allows you to enter a new group name . If you are working
using the video mode, press “Opt” to open the group options
and select “Assign group name” . If you wish to delete an group
name of a scene (un-assign), select the “---” name from the
group list . Select all scenes you want to group and then enter
a group name for one scene . You will be asked once more if
you really want to add these effects, as this will place all transi-
tions in the Storyboard from this position on .
Once you have a large number of group names, it may be ben-
eficial to reorder the groups that are being shown . This way,
you could create archives in which only specific group names
are visible . This way you can limit the choice of groups .
This way you have also made possible to select scenes in the
group selection .
With the Stock button, all the existing group names of the
project will be listed .
When you work with groups, you have several possibilities
to select scenes in the bin . If you wish to show only selected
scenes of a particular group or even several groups, press
“Opt” and then “Group selection” . This next list contains all
available groups for this project . Use the multiple selection
function to choose one or more groups by placing a tick next
to the groups . Press OK to show only the scenes that have
been assigned to those groups . The remaining scenes are not
deleted, merely “hidden” .
If you wish to delete the group name of a scene (un-assign),
select the “---” name from the group list . If you wish to see
all scenes, even those not assigned to any group, open the
group selection once more and confirm by pressing “All” .
You will now once again see all of your clips in the scene bin .
Whenever you are not displaying all scenes, the header of the
scene bin, on the right next to “Scene bin”, you’ll find the text
“Filter active” . Make sure to check for this if you feel that some
scenes are “missing” .
You can even improve the organization of the scene bin more
by hiding any scenes that you already added to the story-
board . Go to the options menu “Opt” . If the checkbox next to
“Show added scenes” is ticked, any added scenes (all scenes
marked with a small white dot above the stamp) will be shown
in the scene bin . An unticked box means that the function is
deactivated and that already added scenes are not shown in
the scene bin . Of course, “hiding” scenes in this fashion does
not mean that they are deleted, but merely not shown .
If you have activated the optional add-on product “3D Edit”,
this menu will also have a setting for the 3D mode of the
current scene (please refer to the product manual for more
information) .
The active scene can also be exported directly, and an image
from the scene can be copied to the picture archive .