Calibration – Super Systems 9130 Series User Manual
Page 48
Series 9130 Operations Manual Rev -
47
the “Value” is showing 1696.4 °F, then the “Offset” would be set to 3.6. If 1700 °F is being sourced, and the
“Value” is showing 1702.3 °F, then the “Offset” would be set to -2.3.
Click on the Calibrate button to begin the calibration.
Wait 120 seconds and verify with a source calibration device with the correct T/C type.
Note: During a
normal calibration procedure, the user should zero and span all of the inputs first and then perform a cold
junction calibration, if necessary
.
It is recommended after each Cold Junction calibration to source a value in and check what the displayed
temperature reading is.
Click on the Return button to return to the main menu screen.
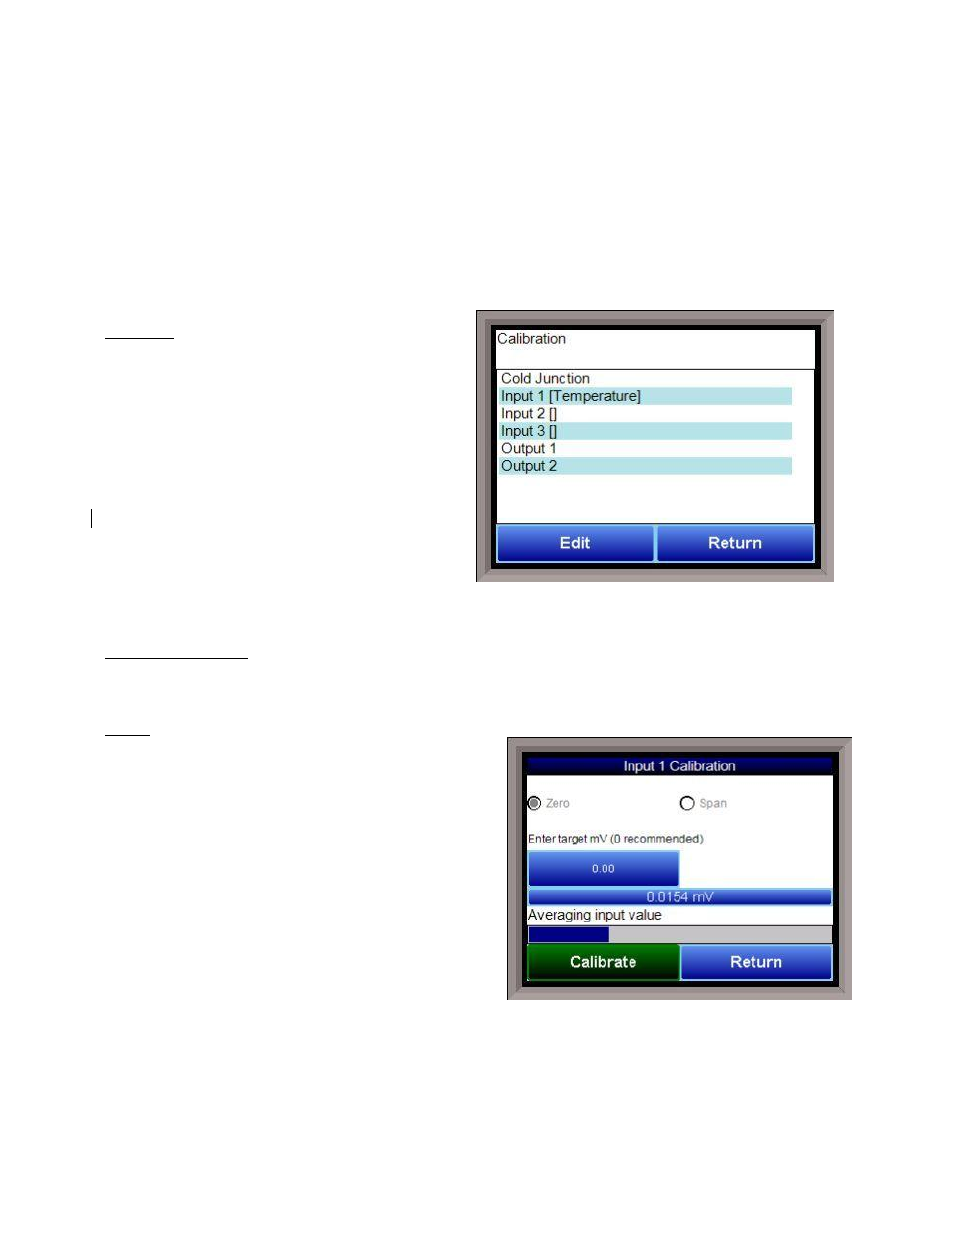
Calibration
Overview
The series 9130 can be calibrated using the
Touchscreen interface. Before performing this
procedure on a newly installed controller, the unit
needs to be powered on for at least 30 minutes for
a warm up period.
The series 9130 has three analog inputs. Each
range has a zero and span calibration value. A cold
junction trim value must be calibrated for
thermocouple inputs. There are two analog outputs
each with a zero and span value.
To calibrate an input or output, select the desired
option and continue.
Note – Even though the “Cold
Junction” option is listed first, the inputs and
outputs should have the zero and span calibration performed BEFORE performing a cold junction
calibration
.
Equipment needed
A certified calibrator(s) with the ability to input and read millivolts, milliamps and thermocouples is
required. The appropriate connection leads are also required. A 24VDC 75-watt power supply is required.
Notes
Input 1 – terminals 31 and 32
Input 2 – terminals 29 and 30
Input 3 – terminals 27 and 28
Output 1 – terminals 24 and 25
Output 2 – terminals 25 and 26
Zero Calibration - Inputs
To perform a zero calibration, click on the “Zero” option
- The circle will be filled in with a dot for the selected
option. For a zero calibration, the recommended value
to source is 0 mV.
Click on the Calibrate button to begin the calibration.
A progress bar will be displayed along the bottom of the
screen giving the progress of the calibration.
Span Calibration - Inputs
To perform a span calibration, click on the “Span” option - The circle will be filled in with a dot for the
selected option. For a span calibration, the recommended value is 90 % of the full range. For example, if
the range is 80 mV, then the span should be 72 mV. The recommended value can be changed by clicking on
the value, and entering the new value that way.