Super Systems 9130 Series User Manual
Page 83
Series 9130 Operations Manual Rev -
82
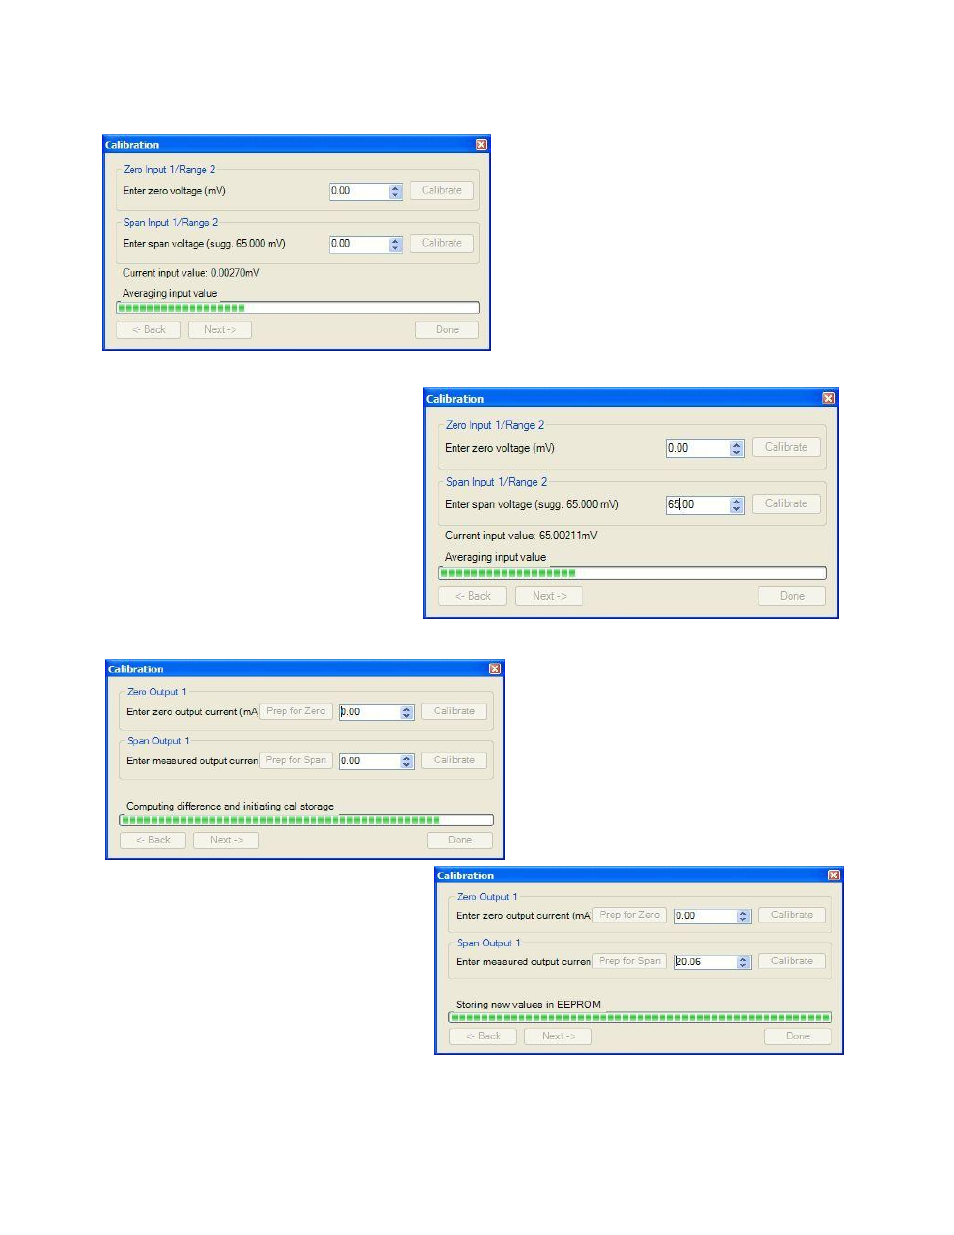
Step 1. Zero then Span Calibration.
The second screen (zero/span calibration), and
all of the subsequent screens, will allow the user
to zero and span the inputs and outputs for the
9130 vacuum controller (cold junction will be
completed as a final step).
For a zero calibration, a value of 0 mV will need to
be sourced to the input or inputs.
In the “Zero Input X/Range Y” section, enter the
zero voltage and click on the Calibrate button.
This will calibrate the zero range. The progress
of the calibration will be shown in the progress
bar at the bottom of the screen.
For a span calibration, a value of 90 % of the full range (or the adjusted value) will need to be sourced to the
input or inputs.
In the “Span Input X/Range Y” section, enter
the span voltage that you are sourcing in
and click on the Calibrate button. A
suggested value will be supplied. This will
calibrate the span range. The progress of
the calibration will be shown in the
progress bar at the bottom of the screen.
Repeat these steps for all of the inputs.
Clicking on the Next -> button will display
the next screen(s) for the user calibration.
Clicking on the <- Back button will display
the previous screen(s).
To calibrate the zero range for the outputs, you must first attach your measuring device.
In the “Zero Output X” section, click on the Prep
for Zero button. Let the unit output what it has
set for the zero measurement, then enter what
you are measuring coming out of the terminals.
Once entered, click on the Calibrate button and
let the procedure finish. The progress of the
calibration will be shown in the progress bar at
the bottom of the screen.
In the “Span Output X” section, click on the
Prep for Span button. Let the unit output
what it has set for the span measurement,
then enter what you are measuring coming
out of the terminals. Once entered, click on
the Calibrate button and let the procedure
finish. The progress of the calibration will be
shown in the progress bar at the bottom of
the screen. Repeat these steps for all of the
outputs.
Once all of the inputs and outputs have been calibrated, return to the first screen (Step 2) for cold junction
calibration, if necessary.