Network connection, Omnisport 2000 console setup, Pro swimming software setup (if used) – Daktronics OmniSport 2000 Timing Console User Manual
Page 264
OmniSport 2000, Pro Swimming, & Hy-Tek Software Quick Guide
4 of 6
ED-13876 Rev 5
19 August 2013
201 Daktronics Drive PO Box 5128, Brookings, SD 57006-5128
Tel: 1-800-DAKTRONICS (1-800-325-8766) Fax: 605-697-4746
Web: www.daktronics.com/support
MENU-NETWORK
NETWORK: ON *
MENU-NETWORK
NETWORK PRO:ON *
MENU-NETWORK
NETWORK MMR:ON *
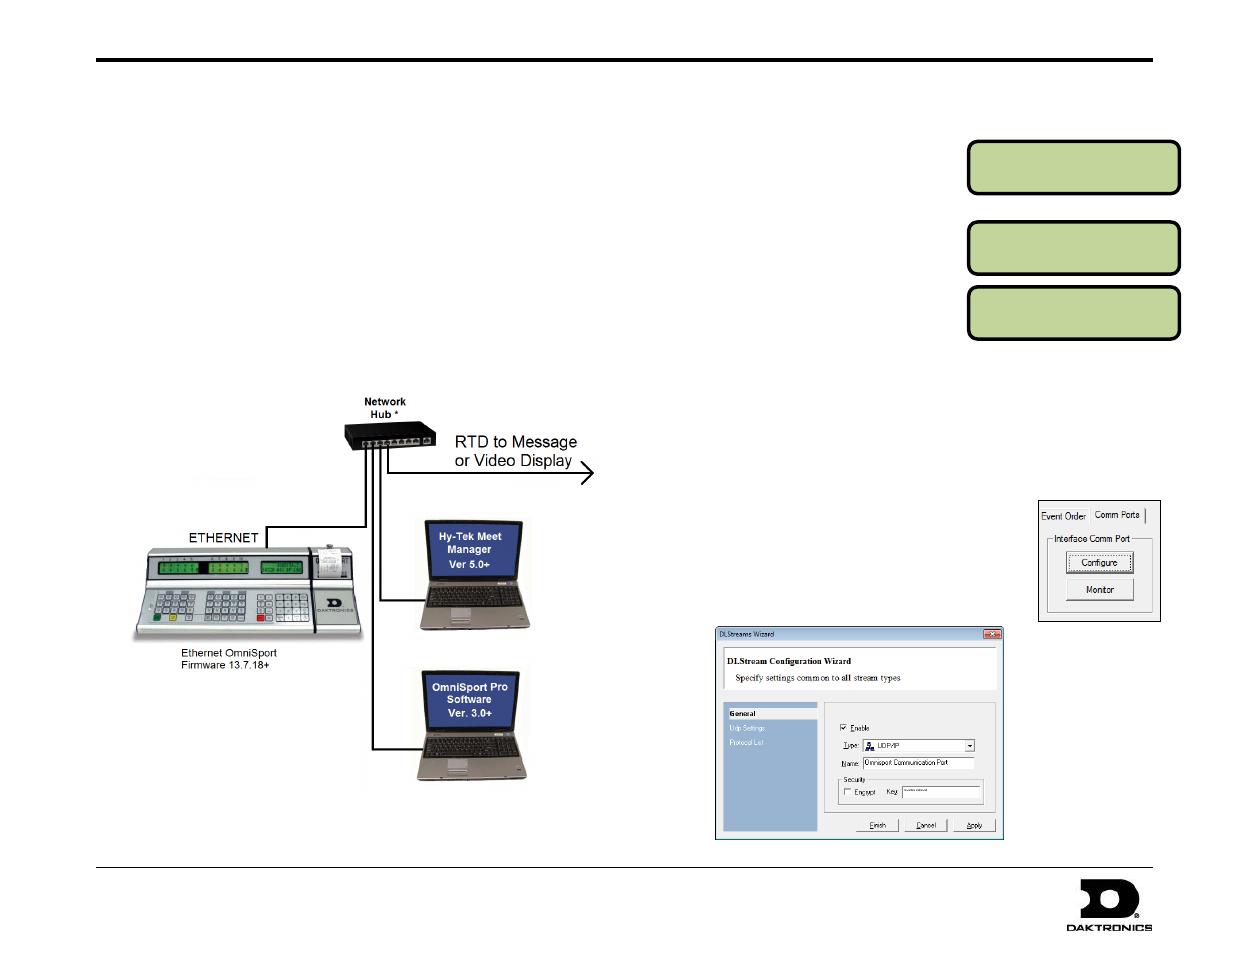
Network Connection
1. Connect a Cat5 Ethernet cable between the ETHERNET jack on
the OmniSport 2000 console and a network hub.
2. Connect a Cat5 Ethernet cable between the network hub and the
MEET MANAGER computer.
3. Connect a Cat5 Ethernet cable between the network hub and the
computer with the Daktronics Pro Swimming software.
4. When sending Real-Time Data (RTD) to Daktronics message
centers or video displays, another Cat5 Ethernet cable will be
connected from the network hub to the display control computer.
Refer to the documentation provided with the display system for
more information.
* For message centers or fixed-digit scoreboards, this will be a router.
For video display systems that already include a router, this will be a
network switch.
OmniSport 2000 Console Setup
1. Press [Menu]>[4]>[7]>[1] and
verify the right LCD displays
NETWORK: ON. If it does not,
press [→], then press [Enter].
2. Press [7] and verify the right
LCD displays NETWORK PRO:
ON. If it does not, press [→],
then press [Enter].
3. Verify the right LCD displays
NETWORK MMR: ON. If it
does not, press [→], then press [Enter].
Note: If NETWORK PRO or MMR is ON, the respective serial
output port (J4 or J6) will be disabled. For advanced network
setup, such as changing the console’s IP address, refer to the
Operation Manual.
Pro Swimming Software Setup (If Used)
1. Open the OmniSport 2000 Pro Swimming
software, and go to Options > Configure.
2. In the Configure window, select the Comm
Ports tab, and then click Configure.
3. Ensure the Type is set to UDP/IP and then
click Apply followed by Finish.
Note: The port # is set
automatically when
UDP/IP is selected.