Capturing a still image from input/output video, Outputting a loaded still image, Inserting a still image in the final output – Roland VR-120HD Direct Streaming AV Mixer User Manual
Page 28: Y as video (p. 28) or use it as a sour, Video operations
28
Video Operations
Capturing a Still Image from Input/Output Video
Here’s how to capture a still image from the input/output video.
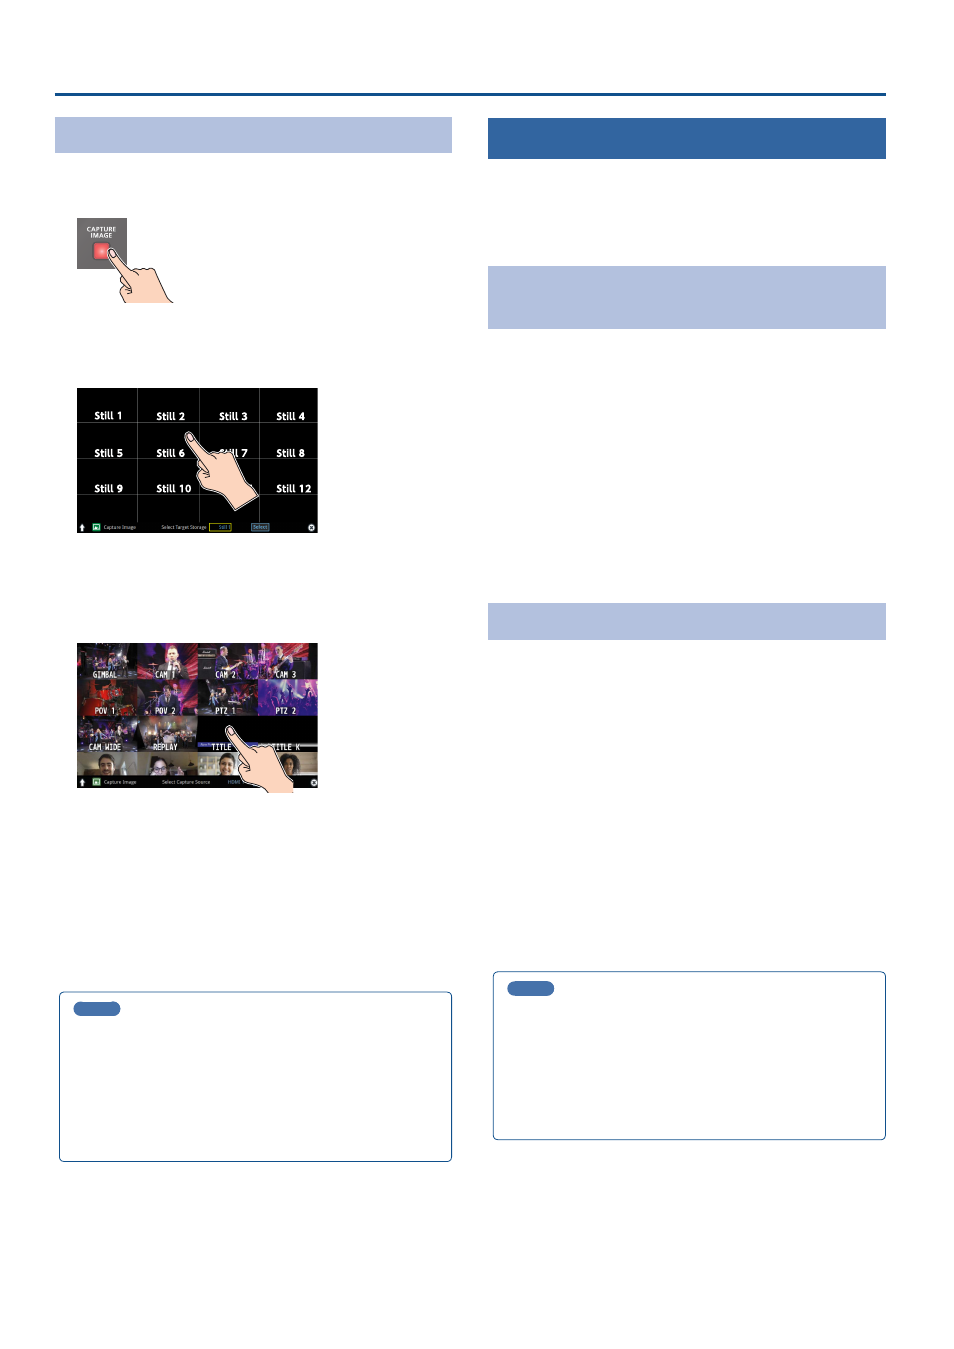
1 .
Press the [CAPTURE IMAGE] button to turn on (lit).
The Capture Image screen appears.
2 .
Touch the screen to select the save destination memory
(Still 1–16) for the still image.
* If you decide to cancel, press the [EXIT] button.
3 .
Touch <Select> at the bottom of the screen.
The input video screen appears.
4 .
Touch the screen to select the input video to capture.
* To capture the output video, set the Monitor setting to “Program” (by
pressing the [Program] button), or switch to multi-view (by pressing
the [Multi-View] button) to select an output video, or use Select
Capture Source to select the output video.
5 .
Touch <Exec> at the bottom of the screen.
The capture is executed. When the operation is finished, the message
“Completed” appears.
6 .
Press the [CAPTURE IMAGE] button to exit the operation.
MEMO
¹
You can set the method of saving still images to “temporarily save”.
When you turn off the power, the loaded still image is deleted.
From the [MENU] button
Ó
“Still Image”, set “Save To Internal
Storage” to “Disable”, and then load the still image.
¹
If you capture when HDCP (p. 18) is on, the still image that is
created is handled in the same way as HDCP-protected video.
It cannot be used if HDCP is off.
Outputting a Loaded Still Image
You can assign a still image to the VIDEO SWITCHER [1]–[8] buttons and
output it in the same way as with video, or momentarily stop the final
output to output the still image.
* When outputting a still image (.png) with an alpha channel, the alpha
channel (transparency) data is ignored.
Assigning a Still Image to the VIDEO SWITCHER
Buttons
A still image loaded into this unit can be assigned to the VIDEO SWITCHER
[1]–[8] buttons, and output in the same way as video.
1 .
Load a still image into this unit as described by the
following procedures.
Ø
“Loading a Still Image from a Storage” (p. 27)
Ø
“Capturing a Still Image from Input/Output Video” (p. 28)
2 .
Assign the still image to a VIDEO SWITCHER button by
following the steps in “Assigning Video Sources” (p. 16).
3 .
Follow the steps in “Switching the Video” (p. 20) to output
the still image.
Inserting a Still Image in the Final Output
You can pause the final output, and output a still image of your choice as
a cut.
Still images can be directly output without being assigned to the VIDEO
SWITCHER [1]–[8] buttons.
* The same still image as the final output is also output to the preview.
Use the following methods to output still images.
Using the USER buttons
Ø
“Assigning Functions to the USER Buttons” (p. 90)
Using a footswitch
Ø
Using an expression pedal
Ø
“Using an Expression Pedal” (p. 94)
Inputting an external control signal (GPI)
Ø
“Inputting a Control Signal” (p. 95)
MEMO
Outputting a still image with a fade-in effect
Use the [OUTPUT FADE] button to add a fade-in effect and output the
still image.
Assign a still image to the AUX bus (p. 148) and edit the function for
the [OUTPUT FADE] button as shown below.
Use the [MENU] button
Ó
“System”
Ó
and set Output Fade Assign
“Video Fade” to “AUX”.