Remotely controlling a ptz camera, Network settings on the camera, Registering camera settings in a preset – Roland VR-120HD Direct Streaming AV Mixer User Manual
Page 91: Other functions
91
Other Functions
Remotely Controlling a PTZ Camera
You can connect up to twelve cameras via the DIRECT STREAM port and remotely control them from the VR-120HD.
This allows you to control cameras made by JVC, Panasonic, Canon, PTZOptics, and Avonic, and cameras that support VISCA over IP (such as Sony).
* Refer also to the owner’s manual of your camera.
Network Settings on the Camera
In order to control a camera from the VR-120HD, you need to make
network settings on the camera. You can register up to twelve cameras.
Assigning a USER button
To use the camera control function, you must assign the camera control
function to a USER button.
1 .
Assign the “Camera Control” function to a USER button by
following the steps in “Assigning Functions to the USER
Network settings for the camera
2 .
Press the USER [SETUP] button.
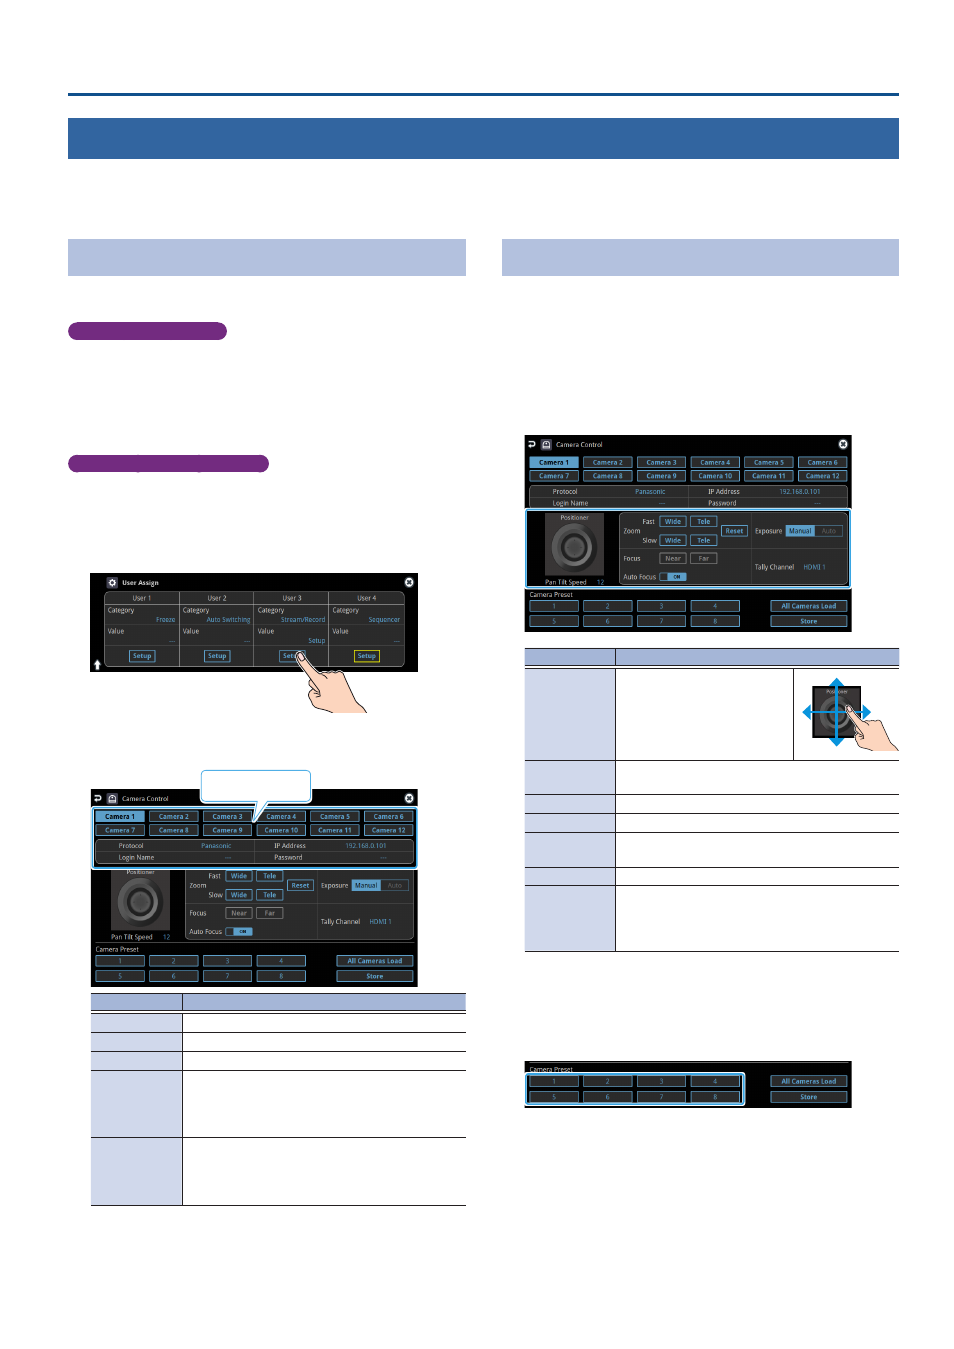
The User Assign screen appears.
3 .
Touch <Setup> for the USER button to which you assigned
the camera control function.
The camera control setup screen appears.
4 .
Touch the screen to configure the camera’s network settings.
Camera ID
Menu item
Explanation
Camera ID
Selects the camera to be controlled.
Protocol
Specifies the camera’s protocol.
IP Address
Input the camera’s IP address.
Login Name
When “Protocol” is “JVC”
Touch <Login Name> to bring up the software
keyboard for input, and enter the log-in name
needed to connect with the camera.
Password
When “Protocol” is “JVC”
Touch <Password> to bring up the software
keyboard for input, and enter the password needed
to connect with the camera.
5 .
Press the lit [SETUP] button to close the setup screen.
Registering Camera Settings in a Preset
Up to 8 sets of settings such as camera position and focus can be
registered as presets.
A registered preset can be recalled when needed.
* Presets are saved in the camera itself.
1 .
In step 2 of “Network Settings on the Camera”, bring up the
camera control setup screen.
2 .
Touch the screen to operate the camera settings.
Menu item
Explanation
Positioner
Adjusts the horizontal/ vertical
position.
Drag on the screen to operate
the camera.
Pan Tilt Speed
Adjusts the speed at which the camera changes
direction.
Zoom
Adjusts the zoom position. (*1)
Focus
Adjusts the focal point. (*1)
Auto Focus
When this is “ON”, the focal point is set
automatically.
Exposure
Specifies the exposure mode.
Tally Channel
Specifies the connector from which the camera
video is input. When the camera video from the
VR-120HD is the final output, the camera’s tally light
is lit.
(*1) You can operate the camera while touching the screen.
3 .
Touch <Store>.
4 .
Touch the preset number (Camera Preset 1–8) area where
you want to register the settings.
5 .
Press the lit [SETUP] button to close the setup screen.