Streaming/capturing video directly, Network requirements, Points to be aware of when livestreaming – Roland VR-120HD Direct Streaming AV Mixer User Manual
Page 64: Turning the livestream on/off, Turning video and audio recording on/off, Live streaming
64
Live Streaming
Streaming/Capturing Video Directly
Network Requirements
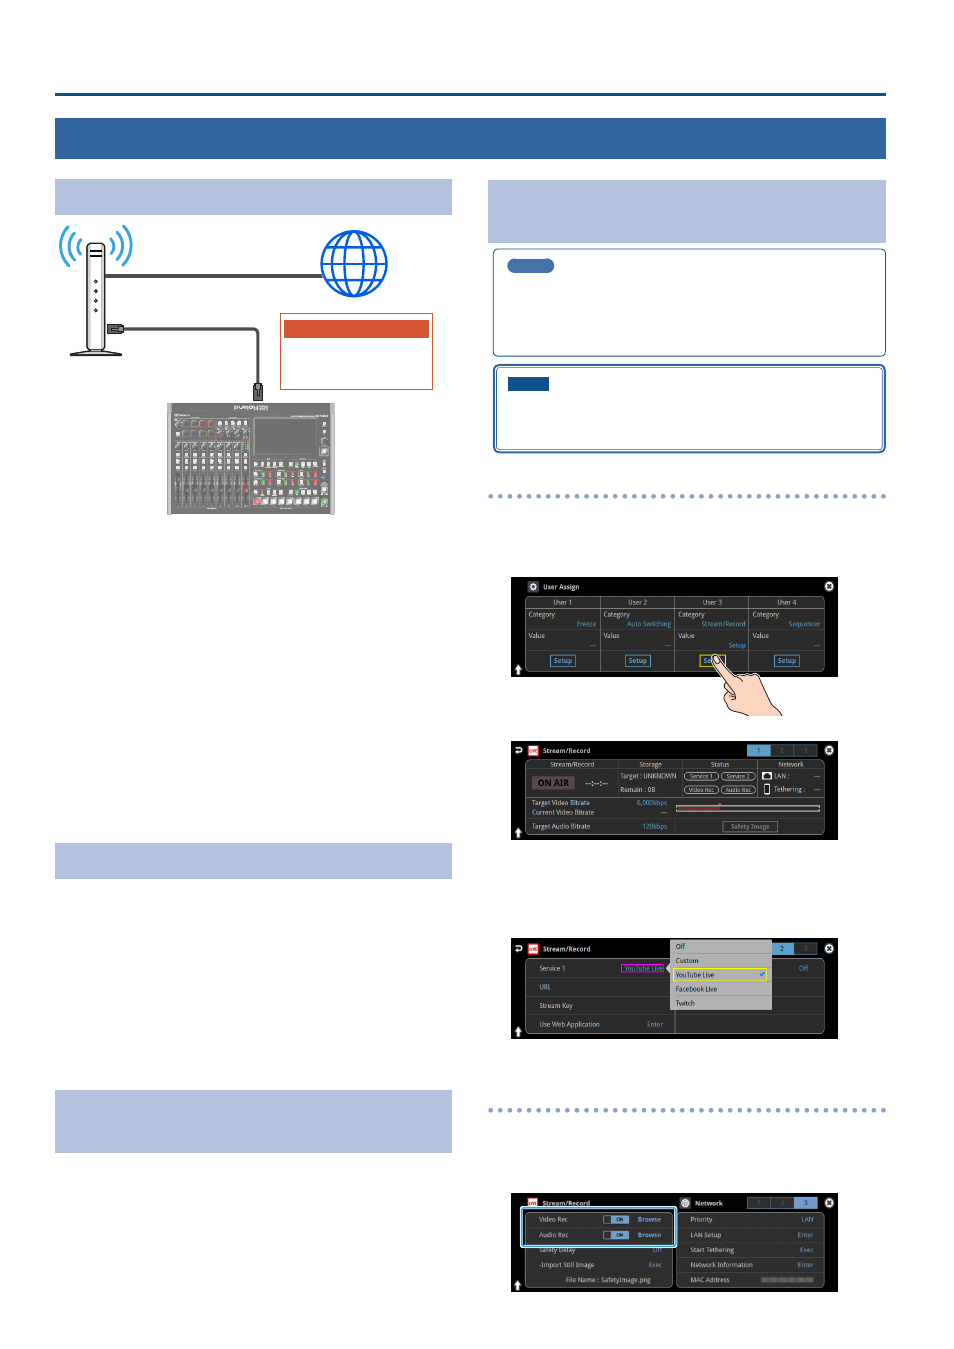
Router
Internet
Platform
YouTube live
Facebook Live
Twitch
LAN
(DIRECT STREAM)
Internet connection, including DNS server settings
¹
To access the Internet, the IP address, subnet mask and default gateway
must be configured.
¹
To access the server hosting the streaming service, you must connect
to the DNS (Domain Name System) server, which converts the server’s
domain name and IP address.
* The above settings are usually retrieved from the DHCP server and
assigned.
Continuous TCP communications
To broadcast the livestream via the RTMP or RTMPS protocol over
TCP, continuous communication without interruptions or restrictions
between devices is required.
HTTPS connection to an Internet server
To configure the livestream for a Web app, you must have an HTTPS
connection to an Internet server.
Points to Be Aware of When Livestreaming
Set the appropriate Video Bitrate (p. 137) to match the speed of your
Internet connection.
Press the [MENU] button
Ó
“Stream/Record”
Ó
“Target Bitrate”
Ó
select
“Video”.
The video bit rate is a target bit rate that’s used when compressing
(encoding) video.
For complex video sequences and the like, the video may be livestreamed
at a bit rate of up to around 1.5 times the value that’s set.
We recommend that you test the speed of your Internet connection
to ensure that a bandwidth of around twice the Video Bitrate value is
available before beginning the livestream.
Starting/Stopping the Livestream, Audio or
Video Recording
The livestream, audio recording and video recording on the VR-120HD
start and stop all at the same time, and cannot be started or stopped
separately.
* You can separately set whether to livestream, record audio or video.
Turning Livestreaming, Audio and Video
Recording ON/OFF
MEMO
When the streaming/recording function is assigned to a USER
button, you can set this from the setup screen.
* The streaming/recording setup screen function is assigned to the
USER [3] button by factory default.
NOTE
If the bitrate setting for Streaming and Recording and the bitrate of
the file played on Video Player exceeds 20,000 kbps, Streaming and
Recording and Video player cannot be used simultaneously.
Turning the livestream on/off
1 .
Press the USER [SETUP] button.
The User Assign screen appears.
2 .
Touch User 3 <Setup>.
The Record/Stream setup screen appears.
3 .
Touch the page tab at the top right-hand part of the screen
to select page 2.
4 .
Touch either Service 1 or Service 2 to select the platform for
streaming.
Select “Off” when you’re not streaming.
Turning video and audio recording on/off
5 .
Touch the page tab at the top right-hand part of the screen
to select page 3.
6 .
Touch “Video Rec” and “Audio Rec” to turn them on/off.