Creating a new project, 4–basic operation – Teac HS-2 User Manual
Page 31
TASCAM HS-2
31
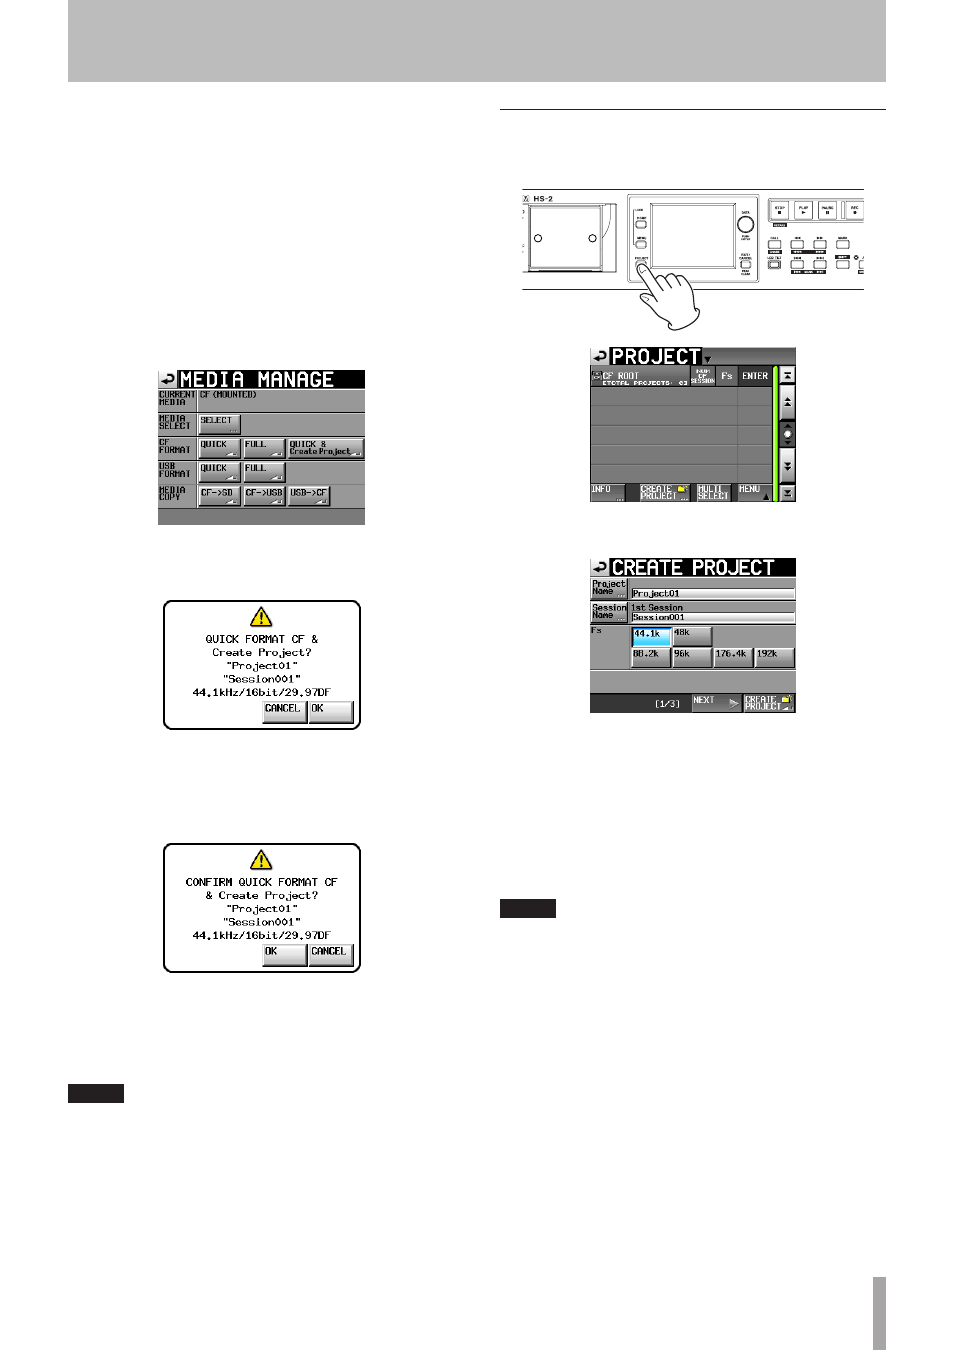
Creating a projec t automatically af ter quick
formatting
If you touch the
QUICK & Create Project
button
instead of the
QUICK
button next to the
FORMAT
item,
a new project will be created after the card is quick-
formatted.
When doing this, however, you cannot change the project
settings. The new project will be created with the same
settings as the current project.
1 Press the MENU key on the front panel to open the
MENU
screen. Then, touch the
MEDIA MANAGE
but-
ton on the
MENU
screen to open the
MEDIA MANAGE
screen.
2 Touch the
Quick & Create Project
button next
to the
FORMAT
item. The following pop-up window
message appears.
This window shows the project name, session name,
sampling frequency, bit rate and frame type in the
project to be created.
3 Touch the
OK
button in the pop-up window.
Another pop-up window appears to reconfirm.
4 Touch the
OK
button in the pop-up window to start
quick formatting.
After quick formatting completes, a new project is
created automatically.
After the project is created, the Home Screen reopens.
NOTE
Touch the
CANCEL
button in the pop-up window to cancel
formatting and return to the
MEDIA MANAGE
screen.
Creating a new project
1 Press the PROJECT key on the front panel to open
the
PROJECT
screen.
2 Touch the
CREATE PROJECT
button to open the
CREATE PROJECT
screen.
The
CREATE PROJECT
screen has 3 pages.
On the first page, you can set the project name, the
name of the first created session, and the sampling
frequency.
For details about each item, see “Creating new
projects” on page 37.
3 Touch the
NEXT
button to open the next page.
On this page, you can set the frame type and bit
length.
NOTE
Instead of touching the
NEXT
button, you can touch the
CREATE PROJECT
button on
CREATE PROJECT
screen
page one (
1/3
at the bottom of the page) to create a
project with the current settings without adjusting them
on the following screens. Touching the
CREATE PROJECT
button on
CREATE PROJECT
page two (
2/3
at the
bottom of the page) has the same effect. In either case,
continue the procedures from step 6.
4 Touch the
NEXT
button again to open the third
page where you can set the starting time in time-
line mode, for example.
For details about each item, see “Creating new
projects” on page 37.
5 After you complete making settings touch the
CREATE PROJECT
button.
4–Basic operation