8 update, 9 highlight, On 21.8.9 – LSC Lighting CLARITY LX Series v.1 User Manual
Page 158: N 21.8.8
Programmer
Clarity
Operator Manual
Page 148
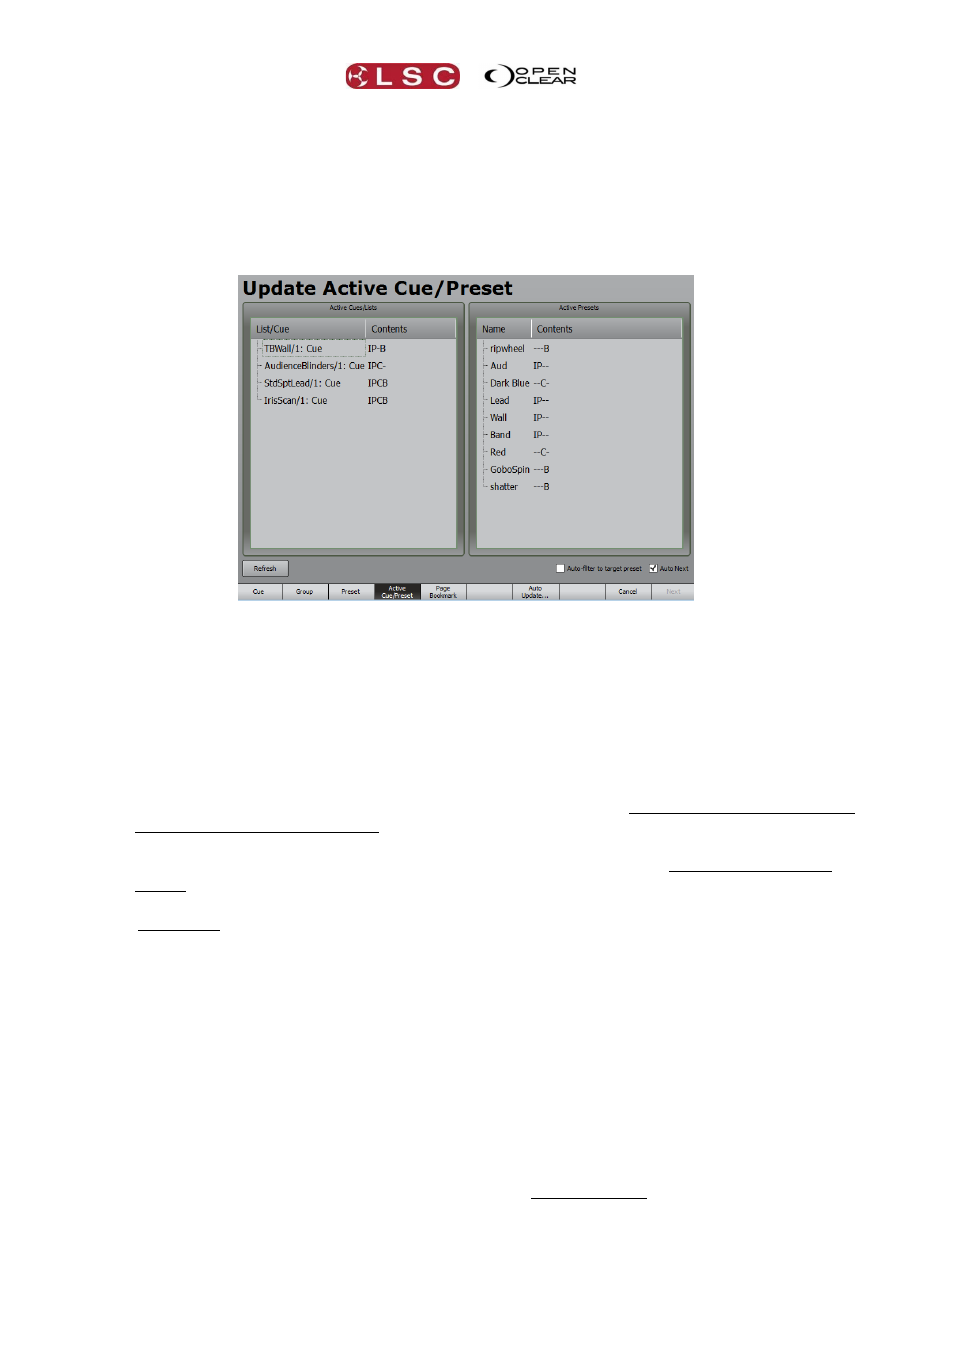
21.8.8 Update
The preferred method of adding new information into an existing cue is to create the new attribute
values in the programmer, then “merge” those values into the cue. Update does the merge
automatically for you.
When you have played some cues and you then make some changes to the look on stage using
the Programmer, pressing Update opens the “Update Active Cue/Preset” dialogue box.
The currently active cues are listed on the left in chronological order of playback activity with the
latest cue at the top. Active Presets are listed on the right.
If you select a cue from the list on the left, Clarity will update that cue by merging the
current programmer values into that cue.
If you select a Preset from the list on the right, Clarity will update the preset using the
current programmer values.
Select the cue or preset you wish to update with the current programmer values.
When you have made your selection press Next.
If a cue is selected it opens the “Record” dialog box with the selected cuelist/cue and the
merge option already selected. Press Update (or Record) to update the cue.
If a Preset is selected it opens the “Update Preset” dialog box with the Preset already
selected. Press Update (or Record) to update the Preset. If the “Auto-filter to target
preset” box is ticked, the “Update Preset” dialog box will automatically select the filter(s)
for the parameter group(s) that exist in the selected preset.
If the “Auto Next” box is ticked, you do not need to press Next as selecting a cue or preset
automatically opens the appropriate cue or preset dialog box.
On LX consoles you can quickly update the active cue on a playback by pressing Update, Select
(the select button of the playback containing the cue to be updated) then Update (or Record).
The original “Auto Update” function is still available via a button at the bottom of the new “Update
Active Cue/Preset” dialog box and also in the “Tools” menu of the Programmer window.
See also “Auto Update” in section 26.2.2.
21.8.9 Highlight
Clicking Highlight toggles the highlight function on or off. There is also a Highlight button on
the command centre. When more than one fixture is selected, clicking Next or Prev cycles
through the currently selected fixtures one at a time. If Highlight is on, the single fixture that is
selected by Next or Prev is set to the highlight settings and the remainder of the selection is set
to the lowlight settings.
The default highlight setting is an open clear beam at 100% intensity.