LSC Lighting CLARITY LX Series v.1 User Manual
Page 34
Desktop Clarity
Clarity
Operator Manual
Page 24
A VX 10 wing has 2 groups of playbacks, 1 to 5 and 6 to 10.
A VX 20 wing has 4 groups of playbacks, 1 to 5, 6 to 10, 11 to 15 and 16 to 20.
If a cue-list is loaded on a playback and there are un-used (clear) playbacks to the right of the
loaded playback in the same group of 5, then the unused playbacks can now be linked to the
loaded playback to provide greater live control. The previously unused playback’s buttons and
faders can now be used for live control of Chase Rate, Playback Rate, FX Rate and FX
Amplitude.
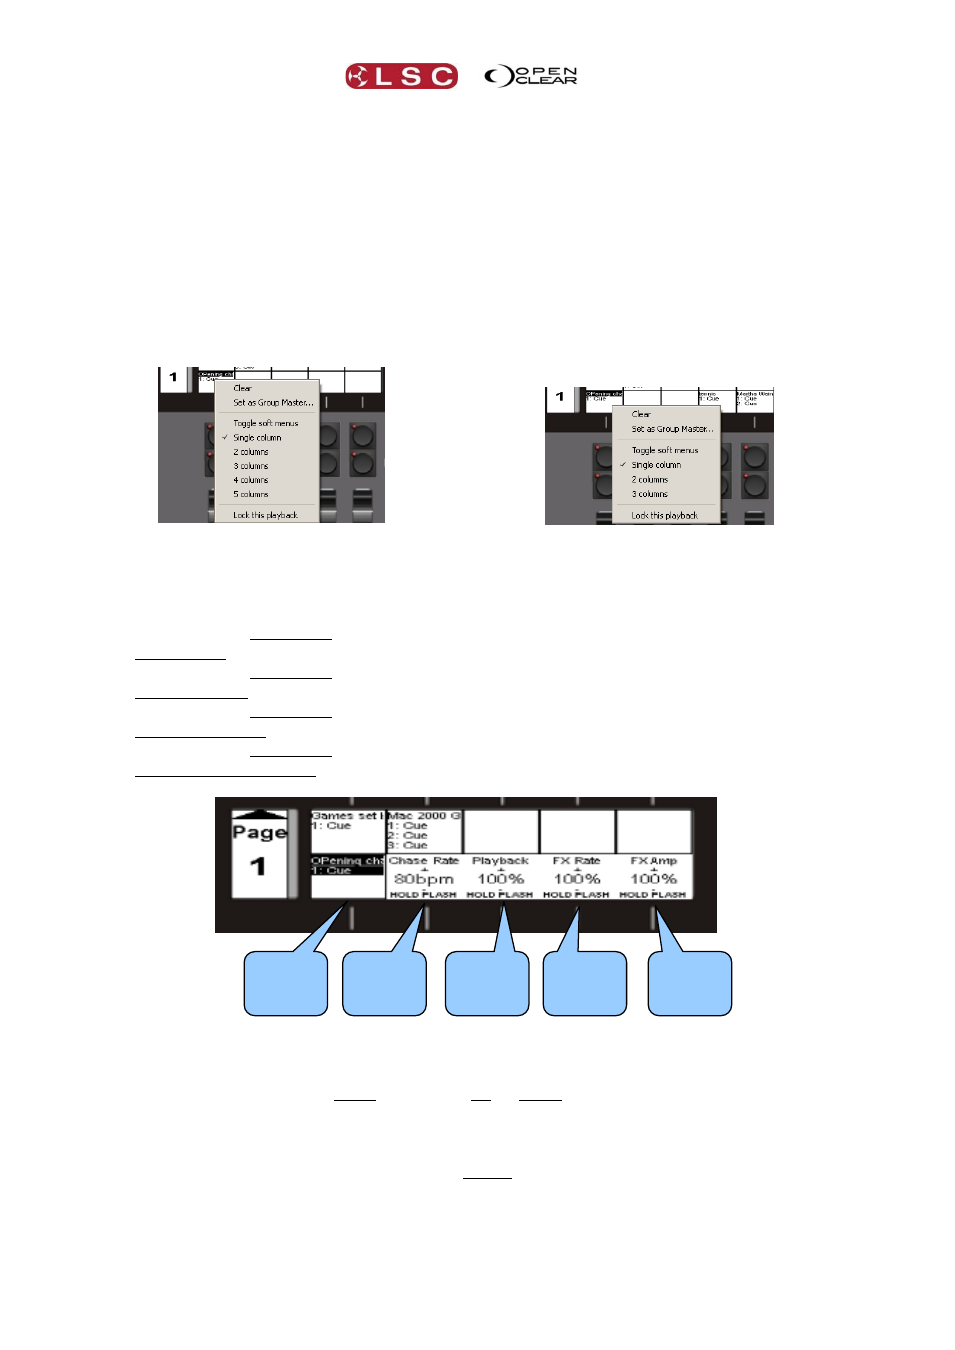
To create extended controls on a wing, in the Control Booth window, Right click on the loaded
playback’s LCD window of the virtual wing playback and choose either single, 2, 3, 4 or 5
columns. The number of columns that are available depends upon the number of clear
playbacks to the right and in the same group of five playbacks.
The 4 playbacks to the right are clear so up
to 5 columns can be selected.
The 2 playbacks to the right are clear so up
to 3 columns can be selected.
Each column represents a playback on the wing:
The first (single) column is the playback loaded with the cue-list.
If you choose 2 columns then the playback to its right controls that cue-lists
Chase Rate.
If you choose 3 columns then the next playback to the right controls that cue-lists
Playback Rate.
If you choose 4 columns then the next playback to the right controls that cue-lists
FX (Effects)Rate.
If you choose 5 columns then the next playback to the right controls that cue-lists
FX (Effects) Amplitude.
The buttons and fader on each of these playbacks (columns), now perform the following
functions:
Pressing Play or Pause steps the values up or down respectively. If you hold the button
it will auto-repeat after a delay.
Holding the Flash button when pressing Play or Pause makes them step in larger
increments.
Pressing both Play and Pause together resets to the default value.
Holding the Flash button allows you to use the fader to make fine adjustments to the
value. If you reach a fader end-stop but you need to more range, you can release the
flash button and move the fader to the opposite end, then hold flash and move fader to
continue adjusting the value. This is known as “scooting” the fader. The user preference
Cue-list
being
controlled
Controls
Chase
Rate
Controls
Playback
Rate
Controls
Effects
Rate
Controls
Effects
Amplitude