Adobe Illustrator CC 2015 User Manual
Page 224
219
Painting
Last updated 6/5/2015
Gradient colors are defined by a series of stops along the gradient slider. A stop marks the point at which a gradient
changes from one color to the next, and is identified by a square below the gradient slider. The squares display the color
currently assigned to each gradient stop. With a radial gradient, the leftmost gradient stop defines the center point’s
color fill, which radiates outward to the color of the rightmost gradient stop.
Using the options in the Gradient panel or with the Gradient tool, you can specify the number and location of stops,
angle in which the colors display, aspect ratio of an elliptical gradient, and the opacity of each color.
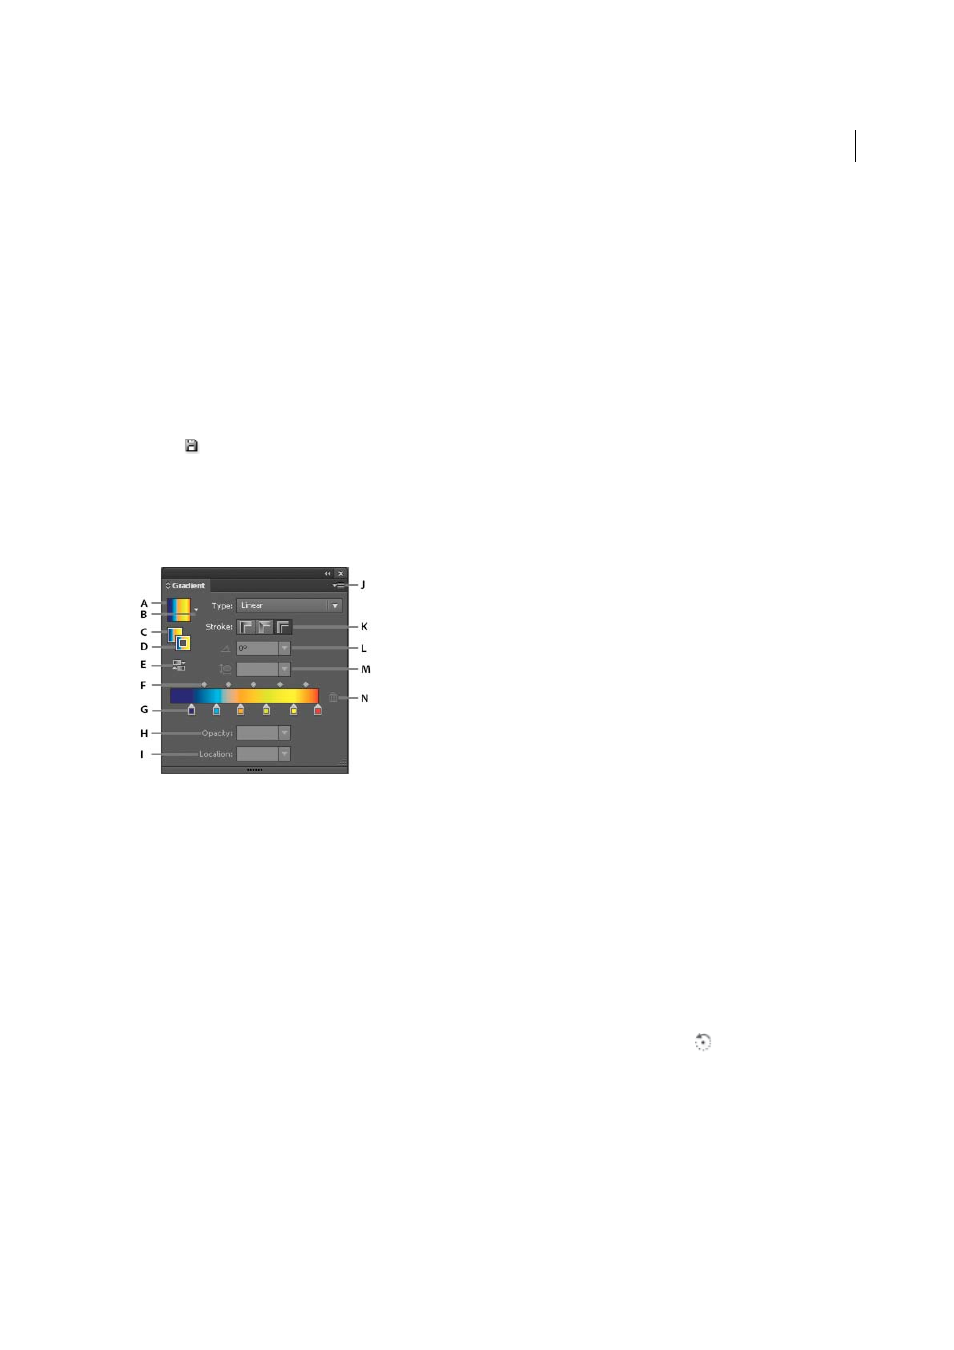
Gradient panel
In the Gradient panel, the Gradient Fill box displays the current gradient colors and gradient type. When you click the
Gradient Fill box, the selected object is filled with the gradient. Directly to the right of this box is the Gradient menu
that lists all the default and presaved gradients from which you can choose. At the bottom of the list is a Save Gradient
button
that you can click to save the current gradient settings as a swatch.
By default, the panel includes a start and end color box, but you can add more color boxes by clicking anywhere along
the gradient slider. Double-clicking a gradient stop opens the gradient stop color panel where you can choose a color
from the Color panel or Swatches panel.
It’s helpful to show all options when working with the panel (choose Show Options from the panel menu).
A Gradient Fill box B Gradient menu C Fill Gradient D Stroke Gradient E Reverse Gradient F Midpoints G Color Stop H Opacity I Location
J Panel Menu K Stroke Gradient Type L Angle M Aspect Ratio N Delete Stop
Gradient tool
You use the Gradient tool to add or edit gradients. When you click the Gradient tool in an unselected, nongradient filled
object it fills the object with the last used gradient. The Gradient tool also provides most of the same features as the
Gradient panel. When you select a gradient filled object and select the Gradient tool, a gradient annotator appears in
the object. You can use the gradient annotator to modify the angle, location, and spread of a linear gradient or the focal
point, origin, and spread of a radial gradient. If you position the tool directly over the gradient annotator, it becomes a
slider (same as in the Gradient panel) with gradient stops and location indicators. You can click the gradient annotator
to add new gradient stops, double-click individual gradient stops to specify new colors and opacity settings, or drag
gradient stops to new locations.
When you position the pointer over the gradient annotator and the rotation cursor appears
you can drag to
reposition the angle of the gradient. Dragging the circular end of the gradient slider repositions the origin of the
gradient, and dragging the arrow end increases or decreases the range of the gradient.
To hide or show the gradient annotator, choose View > Hide Gradient Annotator or View > Show Gradient Annotator.