Animate motion in the program monitor – Adobe Premiere Pro CC v.7.xx User Manual
Page 432
Note:
3. Click OK.
Animate motion in the Program Monitor
You can create animations, insets, and split screens by manipulating a clip directly in the Program Monitor and setting keyframes for the Motion
effect. By adjusting a clip’s position and scale in the Program Monitor, you reveal clips in the tracks below it and can create interesting
compositions.
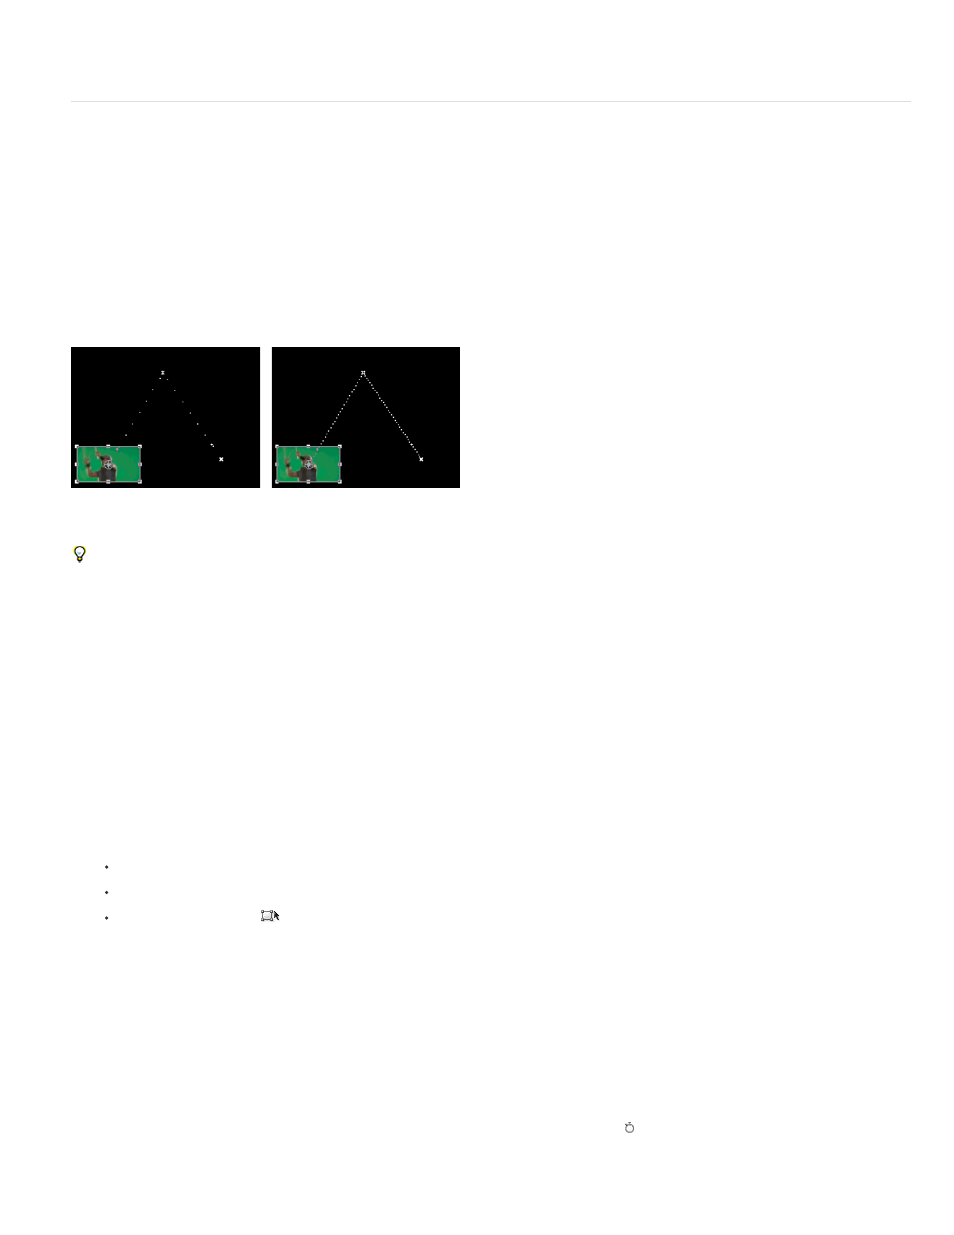
When you animate a clip’s position, the clip’s motion is represented by a motion path in the Program Monitor. Small white Xs represent keyframed
positions, dotted lines represent positions at interpolated frames, and the circular clip anchor point symbol represents a spot in the clip, its center
by default, at the current frame. The spacing between dots indicates the speed between keyframes: wide spacing shows fast motion, while tightly
spaced dots show slower motion.
For more information about adding motion to clips in Premiere Pro,
by Learn by Video and Video2Brain by Jan Ozer.
Clip in Program Monitor showing a motion path with fast motion (left) compared to slow motion (right)
To quickly apply Motion effect changes to a sequence clip, you can click the image in the Program Monitor and begin manipulation (without first
clicking the Transform icon next to the Motion effect in the Effect Controls panel). If you adjust the position of the image, you can further refine
its movement by using the Bezier keyframes.
Animate a clip in the Program Monitor
When the Motion effect is selected in the Effect Controls panel, you can manipulate a clip in the Program Monitor. Create an animation by setting
keyframes for one or more of the Motion effect’s properties (for example, Position).
1. Select a clip in a Timeline panel.
2. Do one of the following:
Select the Motion effect in the Effect Controls panel.
Click the image in the Program Monitor.
Click the Transform icon
next to Motion in the Effect Controls panel.
Handles appear around the clip’s perimeter in the Program Monitor.
If you don’t see the clip handles, change the Zoom Level in the Program Monitor to a smaller percentage so that the gray work area
around the video frame appears.
3. Move the current-time indicator to the frame where you want to start the animation—any frame between the clip’s current In point to its Out
point.
4. In the Effect Controls panel, expand the Motion effect and click the Toggle Animation button next to each property you want to define at
that point in time. A Keyframe icon appears at the current-time indicator for that property.
435