Set up a color correction workspace – Adobe Premiere Pro CC v.7.xx User Manual
Page 484
Note:
Note:
Note:
Vectorscope
You apply the Color Correction effects to a clip the same way you apply all Standard effects. The effect properties are adjusted in the Effect
Controls panel. The Color Correction effects and other color effects are clip-based. However, you can apply them to multiple clips by nesting
sequences. For information about nesting sequences, see
Jeff Sengstack explains how to analyze clips for tonality issues
-- Premiere Pro: Color Correction and Enhancement.
For more information, see
.
You can use the Broadcast Colors effect to adjust a clip’s colors to broadcast standards.
When correcting color, it’s useful to use the Vectorscope or waveform scopes (YC Waveform, RGB Parade, and YCbCr Parade) to help you
analyze the chroma and luminance in a clip. You can view a scope in a separate Reference Monitor that’s ganged to the Program Monitor so that
you can check your video levels as you make adjustments.
For information about scopes, see
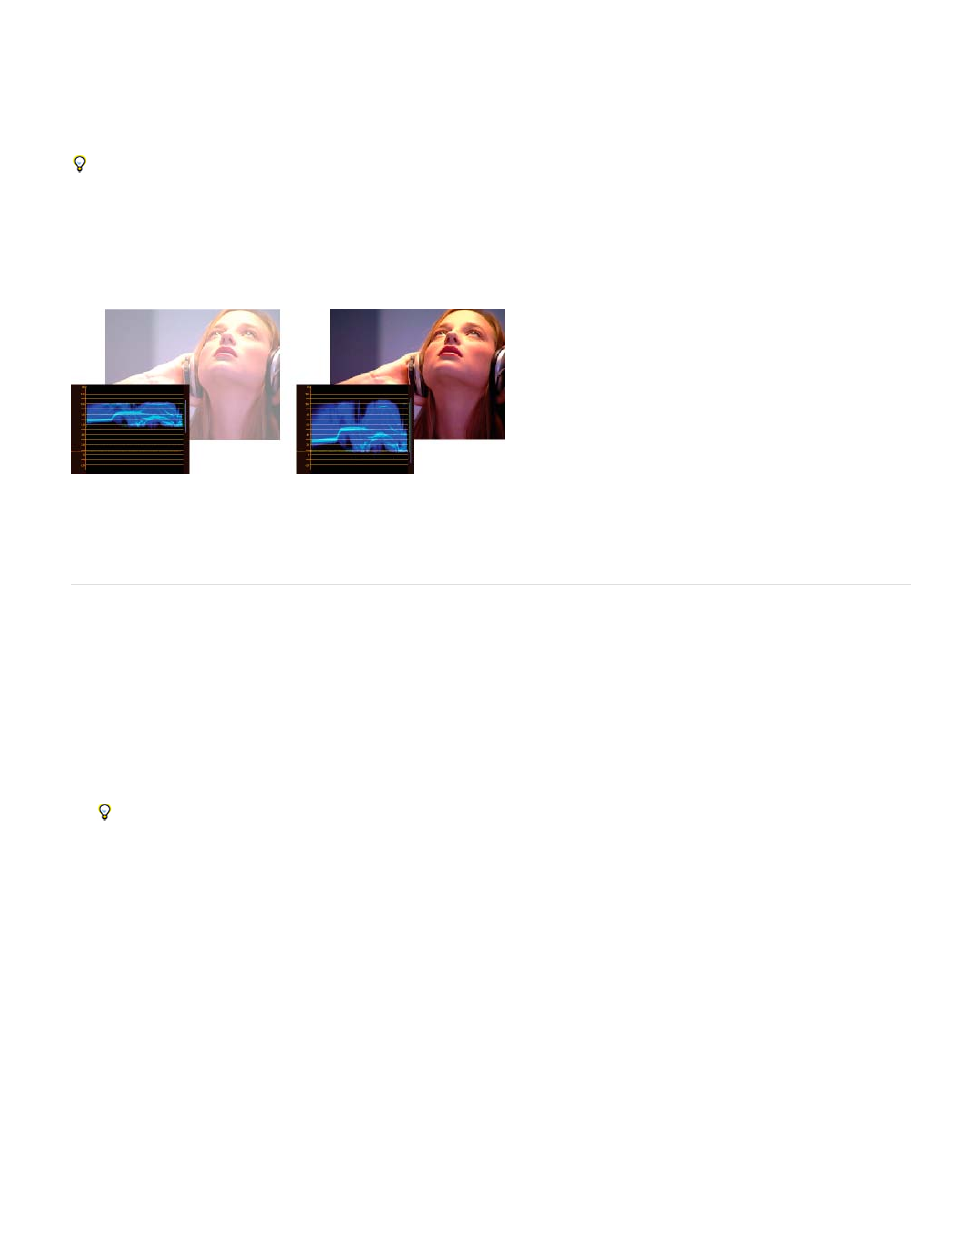
Correcting exposure: Overexposed image with the waveform in the upper limits of the IRE scale (left) and corrected image with the waveform
within 7.5 to 100 IRE (right)
Set up a Color Correction workspace
The following is a suggested procedure for setting up your color correction workspace. It’s meant only as a starting point so you can configure the
workspace to suit your style of working.
1. (Optional) Connect a calibrated NTSC or PAL monitor to your computer. If you’re creating video for broadcast, viewing the video on an
NTSC or PAL monitor is essential for the most accurate preview.
2. Choose Window > Workspace > Color Correction.
To see a before and after comparison of your color correction, you can either display the master clip in the Source Monitor for
comparison with the Program Monitor, or you can select the Split Screen Preview option in the Color Correction effects.
3. Make sure that the Draft Quality is not chosen in the Program Monitor menu. If possible, choose Highest Quality.
4. (Optional) Choose Reference Monitor from the Window menu. Move the Reference Monitor where you can see it and the Program Monitor
easily.
By default, the Gang To Program Monitor option is enabled in the Reference Monitor menu.
5. Choose any of the following scopes from the Reference Monitor menu:
You can also display a scope in the Program Monitor instead of the Reference Monitor.
Displays a circular chart, similar to a color wheel, that shows the video’s chrominance information. The Vectorscope is very
useful when making color adjustments.
487