Trendlog.exe program, Running the program – WattMaster WM-WCC3-TGD-01B User Manual
Page 446
8-6
8. TRENDLOG.EXE PROGRAM
WCC III Technical Guide
Filename:
The Filename is the actual fi le name on the end user’s computer
that the end user or contractor has selected for the data storage of
the trend log data for this particular User programmed trend log.
The WCC3Trendlog.exe program will automatically select a fi le
name for this fi eld if the end user or contractor has not selected a
fi le name.
NOTE:
This fi le will have a .set fi le extension.
Save Interval:______Days______Hours______Minutes
There are three “Save Interval” selection boxes: Days, Hours, and
Minutes. These three boxes will determine when the user-selected
trend log data will be saved to the end user’s computer hard drive.
You can enter any value in these “Save Interval” selection boxes
with the following limits: 0 to 99 Days, 0 to 99 hours, 0 to 999
minutes.
Examples: If you wish to trend log 1 value every 15 minutes, you
would enter 15 into the “Minutes” selection box. If you wish to
trend log 1 value every 2 hours, you would enter 2 into the “Hours”
selection box. If you wish to trend log 1 value every week, you
would enter 7 into the “Days” selection box.
NOTE:
The default setting for the save interval is a timed
interval trend log of 1 day.
Please note that there is not a set “starting time”. The “starting
time” is determined at the exact moment you have successfully
fi lled out enough information on this screen to enable the trend
logging to occur.
By toggling the
<Timed Trend / Disable / Manual Trend>
button,
you can later change this “starting time” if you are there at the
exact time you wish to set the starting time of the trend log. Each
time you click on this button, it will toggle to the state.
Time Column:
The
<Time Column>
button allows you assign a “name” to the
Time Column. It also allows you to set the pen width, pen color,
and pen style for this column.
The Trend Log Columns: New Column
In the large box below “Trend Log Columns” is a listing of
user-generated and user-programmed trend log programs. With
the
<New Column>
button, you can create new or add more
columns to the user-created trend log program. This allows for a
full implementation of a spreadsheet type format for your WCC3
trend log database.
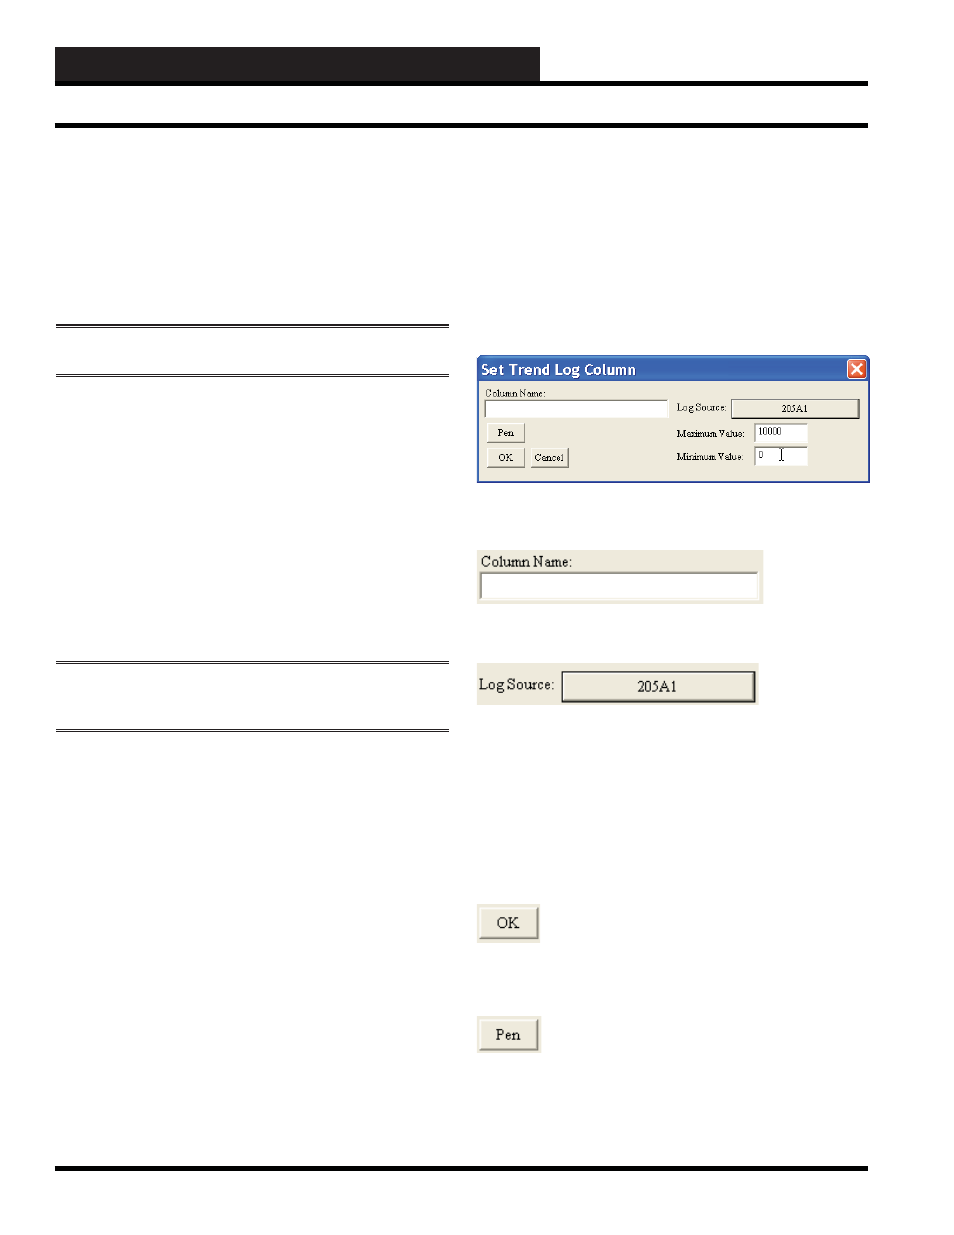
Set Trend Log Column:
The Set Trend Log Column Dialog Box allows you to create new or
add more columns to the user-created trend log program.
This column name selection box is the name that will appear at the
top of the data column that you are trend logging.
The
<Log Source
> button allows the user to select any WCC3
satellite or system point address for logging into the user-created
trend log program. When selecting the
<Log Source
> button, a new
Logic Address Dialog Box will appear. This Logic Address Dialog
Box will allow the end user to select the exact WCC3 satellite or
system point they wish to log. Also, this
<Log Source
> button has
a quick view that is overlaid on top of the button. This overlaid text
is the address point currently selected for trend logging.
Example: 205A1 is Satellite address # 205 – Analog Input # 1.
After selecting the WCC3 satellite or system point that you wish to
trend log, you now must click
<OK>
to fi nish your selection of the
WCC3 system point you wish to trend log.
The
<Pen>
button will allow you to set the pen width, pen color,
and pen style for this column.
Running the Program