Cg border settings – Sony GP-X1EM Grip Extension User Manual
Page 136
136
2
In the M/E-1 >Key1 >Resizer >Border/Crop menu
(1115.1), press [Border], turning it on.
3
In the device control block, press the [BDR/CROP]
button, turning it on amber.
4
Adjust the border width using the trackball or Z-ring.
• Trackball (horizontal rotation): Adjusts the border
width in the X-axis direction (left/right edges).
• Trackball (vertical rotation): Adjusts the border
width in the Y-axis direction (top/bottom edges).
• Z-ring: Adjusts the border width simultaneously in
the X-axis and Y-axis directions.
The target bank and resizer, and the current parameter
and its value, are displayed in the display of the device
control block.
For details about parameter operations, see “Three-
Dimensional Parameter Entry” (page 229).
• Pressing the [FINE] button, turning it on, enables
fine adjustment of setting values (fine mode).
• Pressing the [X], [Y], or [Z] button, turning it on,
restricts operation to the selected axis.
• For borders, the number of significant digits of the
parameter after the decimal point is two.
CG Border Settings
The resizers of two keys are used for CG border settings.
The combination of key pairs used is fixed (keys 1 and 2,
keys 3 and 4, keys 5 and 6, keys 7 and 8). The setting
operations are performed using keys 1, 3, 5, and 7 only.
You can also change the position and size of the image
embedded in the border.
This section describes making settings using key 1 and key
2 as an example.
• This setting is available only when the signal format is
3840×2160P, 1080i.
• To change the position and size of the image embedded in
the border, clean mode must be enabled on the target key.
Enabling the CG border settings using key 1 automatically
enables clean mode on both key 1 and key 2.
• Inserting key 1 also inserts key 2 in unison. Selecting/
releasing key 1 in a next transition also selects/releases
key 2 in unison. Inserting/removing key 2 only and
transition operations using key 2 only are not possible.
• When a CG border is set, key 1 has the following
limitations.
- Dual resizer effects are not supported.
- Resizer border and crop settings are disabled.
- The target of resizer mosaic and defocus settings is
fixed to the video signal only.
• A CG border cannot be set using key 1 if the state of key
2 is any of the following.
- If key 2 is currently inserted or used in a transition.
- When key 2 is selected in a next transition.
- When the resizer of key 2 is enabled.
- When DME wipe is selected for the transition type for
key 2.
• The CG border settings are saved separately in key 1 and
key 2 key snapshots. When recalling, it is necessary to
recall the two key snapshots at the same time.
Four signals are required for a CG border.
The image to embed in the border and the key signal for
keying the image must be selected using key 1 in advance.
The border image and the key signal for the image must be
selected using key 2.
For details about signals used in a CG border, see “CG
Border Settings” (page 232).
1
In the M/E-1 >Key1 >Resizer menu (1115), press
[Resizer], turning it on.
2
In the <Resizer Effect/Rotation> group, press [Border/
Crop].
The Border/Crop menu (1115.1) appears.
3
In the <CG Border> group, press [CG Border], turning
it on.
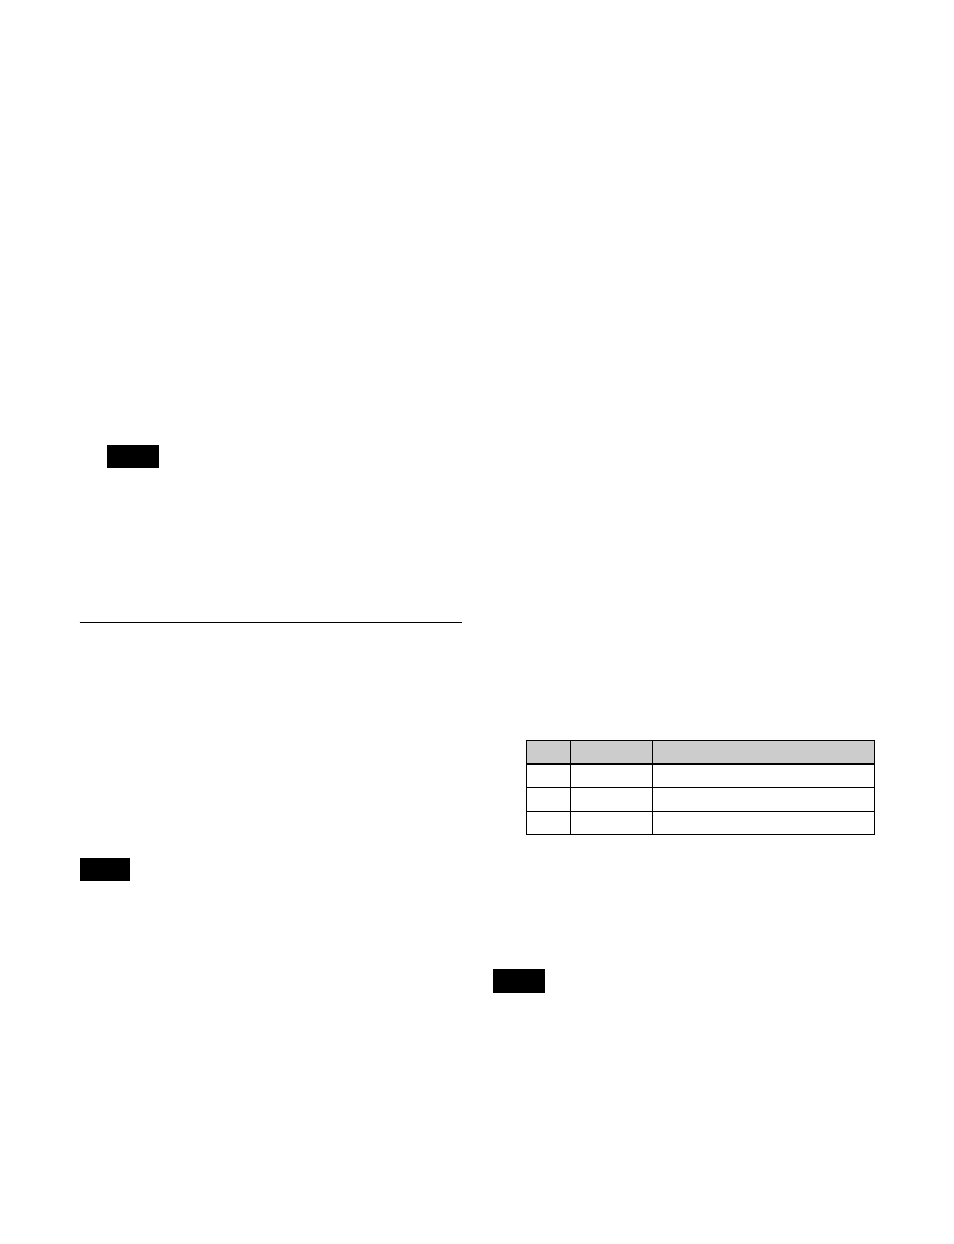
4
Set the position and size of the image to embed in the
border using the following parameters.
To lock the border setting
You can lock the position and size of the border image of
the CG border.
In the <CG Border> group, press [Frame Pos Lock] to lock
the border.
Locking the border returns all resizer parameters to their
default values, and the settings cannot be changed.
Notes
Notes
No.
Parameter
Adjustment
1
Location X
Horizontal position
2
Location Y
Vertical position
3
Size
Size
Note