Dme wipe pattern variation and, Modifiers, Dme wipe pattern variation and modifiers – Sony GP-X1EM Grip Extension User Manual
Page 159
159
DME Wipe Pattern Variation and
Modifiers
You can apply the following changes and modifiers to the
selected DME wipe pattern in the same way as for an
ordinary wipe pattern.
For details about the method of operation, see “Setting
DME Wipe Modifiers” (page 162) and “Setting
Independent Key Transition DME Wipe Modifiers”
(page 166).
Direction:
You can set the DME wipe direction to normal,
reverse, or alternating normal/reverse
However, this can be specified for a key transition only
when the following patterns are selected.
• 1204, 1207, 1221 to 1224, 7204, 7207, 7221 to 7224
When pattern numbers 1201, 1202, 1203, 1205, 1206,
1208, 1209, 1225, 1251, 1701, and 1702 are selected,
Direction cannot be used.
Edge:
You can apply a border or soft border
In the case of user programmable DME patterns for
keys in which an edge has already been applied to the
effect, the behavior is as follows.
• When the DME wipe edge is enabled, only part of
the edge applied in the effect is enabled, and that
portion can be adjusted.
• When the DME wipe edge setting is disabled, the
edge applied in the effect is applied as-is.
When pattern numbers 1011, 1012, 1013, 1701, and
1702 are selected, Edge cannot be used.
Positioner:
You can move the DME wipe pattern or center
of the effect to an arbitrary position
.
Using the position select function, you can also
instantaneously move the pattern
.
This can only be used when one of the following
pattern numbers is selected.
• 1031, 7031
As the transition progresses, the pattern center
automatically moves initially from the set position
toward the center of the screen. In other words, the
effect obtained is the same as in a normal wipe with
the positioner set to [Auto Center].
• 1032, 1033
You can set the position of the pattern at the start of
the transition. As the transition, which starts after the
dead band, progresses, the pattern automatically
moves from the initial position toward the center of
the screen.
• 1201 to 1209, 1221 to 1225, 1251, 7201 to 7208,
7221 to 7224
You can set the pattern position when the first
transition completes.
• 1381, 1391, 1393, 1394, 1396
You can set the center of the transition effect.
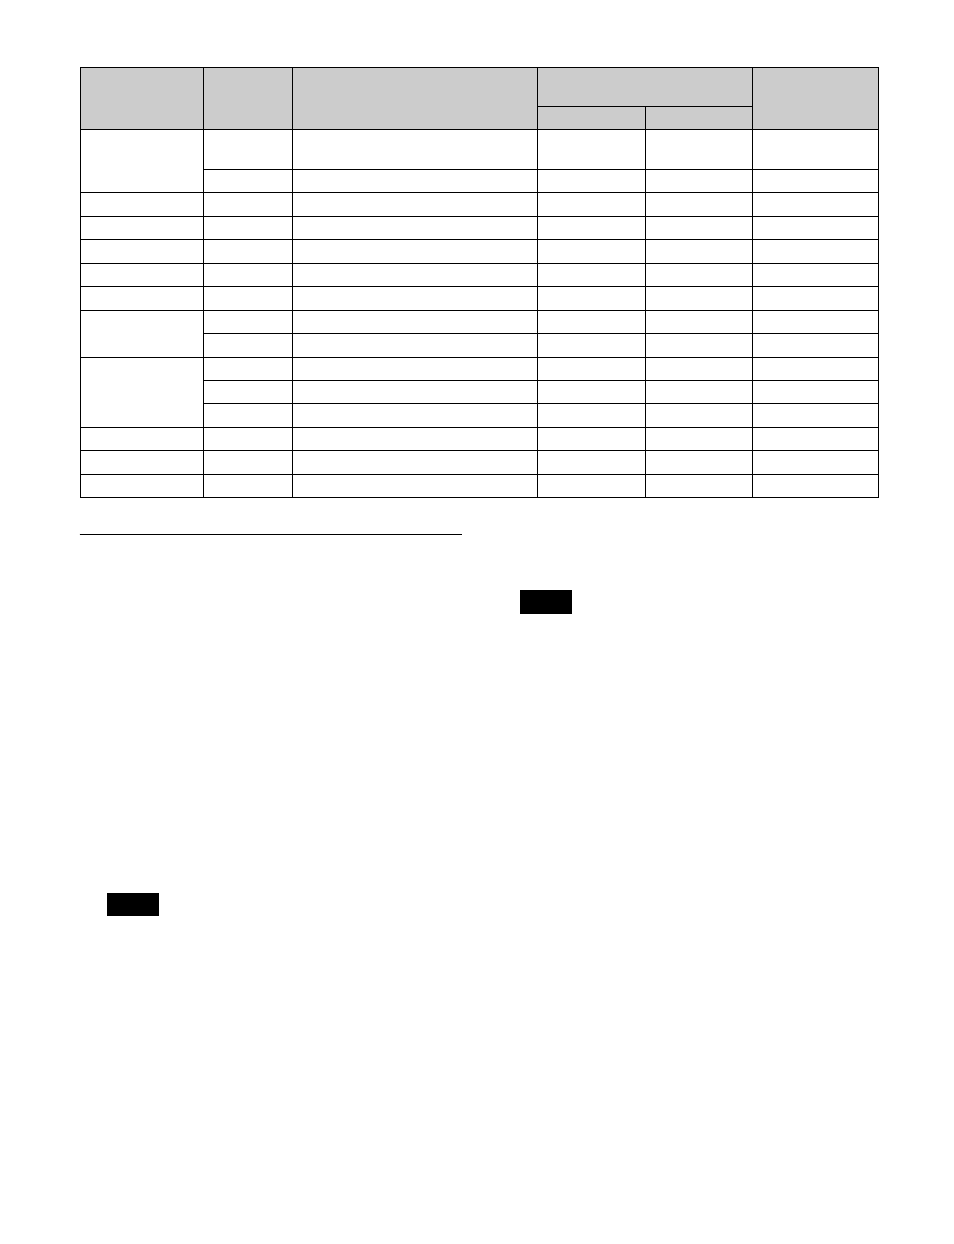
3D Trans
1ch
1071, 1072, 1074, 1076, 1077, 1088,
1091 to 1094
Yes
Yes
Yes
2ch
2631 to 2634, 2642, 2644
Yes
No
No
Sparkle
1ch
1391, 1393, 1394, 1396, 1398, 1399
Yes
Yes
Yes
Split Slide
1ch
1384 to 1389
Yes
Yes
Yes
Mosaic
1ch
1701
Yes
No
No
Defocus
1ch
1702
Yes
No
No
Crop Slide
2ch
2661, 2662
Yes
No
No
Brick
2ch
2801 to 2804, 2811 to 2814
Yes
No
No
3ch
3601
Yes
No
No
User Program
1ch
1901 to 1999
Yes
Yes
Yes
2ch
2901 to 2999
Yes
No
No
3ch
3901 to 3999
Yes
No
No
Resizer Slide
1ch
7001 to 7008
No
Yes
Yes
Resizer Squeeze
1ch
7021 to 7031
No
Yes
Yes
Resizer Frame I/O 1ch
7201 to 7208, 7221 to 7224
No
Yes
Yes
Pattern group
Execution
mode
Pattern number
DME wipes for common
transitions
DME wipes for
independent key
transitions
Background
Key
Note
Note