Inhibiting operation of cross-point, Buttons, Signal name display – Sony GP-X1EM Grip Extension User Manual
Page 82: Inhibiting operation of cross-point buttons

82
For details, see “Setting the AUX Bus Operation Mode”
(page 419) and “Setting the [SHIFT] button operation
mode” (page 416).
When the [2ND DELG] button is not lit
The bus selected by the delegation buttons in the 1st row
or 2nd row is assigned to the 3rd row and 4th row.
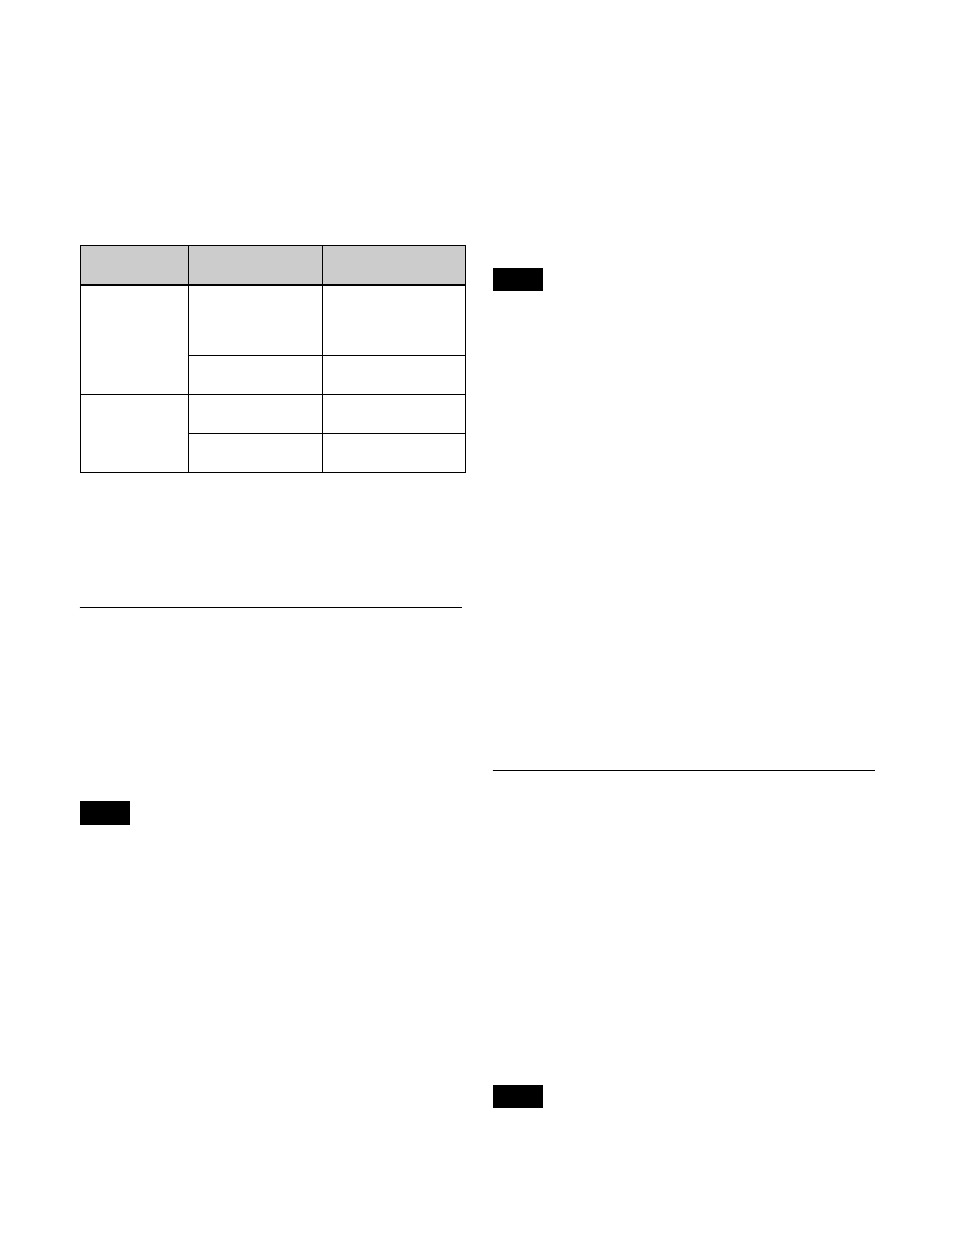
In the case of a 36-button layout, the button numbers are as
follows.
The [SHIFT] buttons in the 1st row and 3rd row operate in
hold mode, and you can select a signal on the shifted state
of a button while pressing the [SHIFT] button.
The [SHIFT] buttons on the 2nd row and 4th row are
always lit, and have no effect when pressed.
Inhibiting Operation of Cross-point
Buttons
Inhibiting operation of each cross-point
button
For each cross-point button, you can temporarily inhibit
operations.
This setting is cleared when you reset the control panel.
To enable inhibit setting operation, assignment to the
[XPT INHBT SET] button and [XPT INHBT ALLCLR]
button in the cross-point pad is required in the Setup menu.
For details, see “Assigning a function to a cross-point pad
button” (page 435).
Buses for which operations can be inhibited
You can specify the cross-point button rows in the cross-
point control block.
For example, if you inhibit one cross-point button in the
cross-point control block, this inhibits operation of all
cross-point buttons with the same number in the following
buses.
• Background A and background B buses
• Key 1 bus to key 8 bus
• Utility 1 bus and utility 2 bus
• DME utility 1 bus and DME utility 2 bus
• DME external video bus
Setting inhibit for a cross-point button
Press and hold the [XPT INHBT SET] button, and press
the target cross-point button to inhibit.
While the [XPT INHBT SET] button is pressed, the
inhibited buttons flash amber.
• Nothing is displayed on inhibited cross-point buttons.
• Even when you inhibit operation of a cross-point button,
macro attachment settings are still possible.
Releasing inhibit mode for a cross-point button
Press and hold the [XPT INHBT SET] button, and press
the target cross-point button to release.
Releasing inhibit mode for all buttons
Press and hold the [XPT INHBT SET] button, and press
the [XPT INHBT ALLCLR] button.
Inhibiting (protect) operation of each
cross-point button row
For each cross-point button row on the cross-point control
block, you can temporarily inhibit button operations.
The [ROW-1 PROT] to [ROW-4 PROT] buttons used for
protecting rows are assigned to the cross-point pad in the
Setup menu
.
Press the [ROW-1 PROT] to [ROW-4 PROT] buttons,
turning them on, to inhibit button operation in the target
cross-point button rows (1st row to 4th row).
Signal Name Display
You can attach a name (source name) to the signal
assigned to a cross-point button, with a maximum of 16
characters.
The specified source name appears on the display of the
cross-point control block or AUX bus control block (AUX
bus operation mode).
There are six display modes, depending on the information
to display and format, switched using the display mode
buttons on the cross-point pad.
For details about the display, see “Cross-Point Control
Block” (page 22) and “AUX Bus Control Block”
(page 46).
When a signal on the shifted state of a cross-point button
is selected, the shifted signal name is displayed.
Button row
Button
Button number/
[SHIFT] button
1st row, 3rd row From left side to
35th
1 to 35
While the [SHIFT]
button is held down:
36 to 70
36th
[SHIFT] button (hold
mode)
2nd row, 4th
row
From left side to
35th
36 to 70
36th
[SHIFT] button
(always lit)
Note
Notes
Note