Table 13-61. x81 time delay settings -38 – Basler Electric BE1-700 User Manual
Page 334
Step 7: Repeat Step 5 for the 181 (OUT2) and 81 (OUT1) functions.
Step 8: Repeat Step 4.
Step 9: Slowly increase the frequency of the applied voltage until OUT4 (381) closes. Pickup should
occur within
±0.01 hertz of the pickup setting. Slowly decrease the frequency until OUT4 opens.
Dropout should occur at 0.02 hertz above or below the pickup setting.
Step 10: Repeat Step 5 for the 481 (OUT5) and 581 (OUT1) functions.
Step 11: In Table 13-59, change SL-81 through 581 = 2,0 and transmit to the relay.
Step 12: Connect and apply, 120 Vac, 60Hz voltage source to Vx Input C17 and C18.
Step 13: Repeat Steps 5 through 9.
Step 14: (Optional.) Repeat Steps 1 through 11 for Setting Group 1.
Time Delay Verification
Step 1: Prepare the x81 functions for time delay testing by transmitting the commands in Table 13-59 to
the relay. Next, transmit the commands in the first column (2 second TD) of Table 13-61 to the
relay. Commands entered in Table 13-60 should be retained for this test.
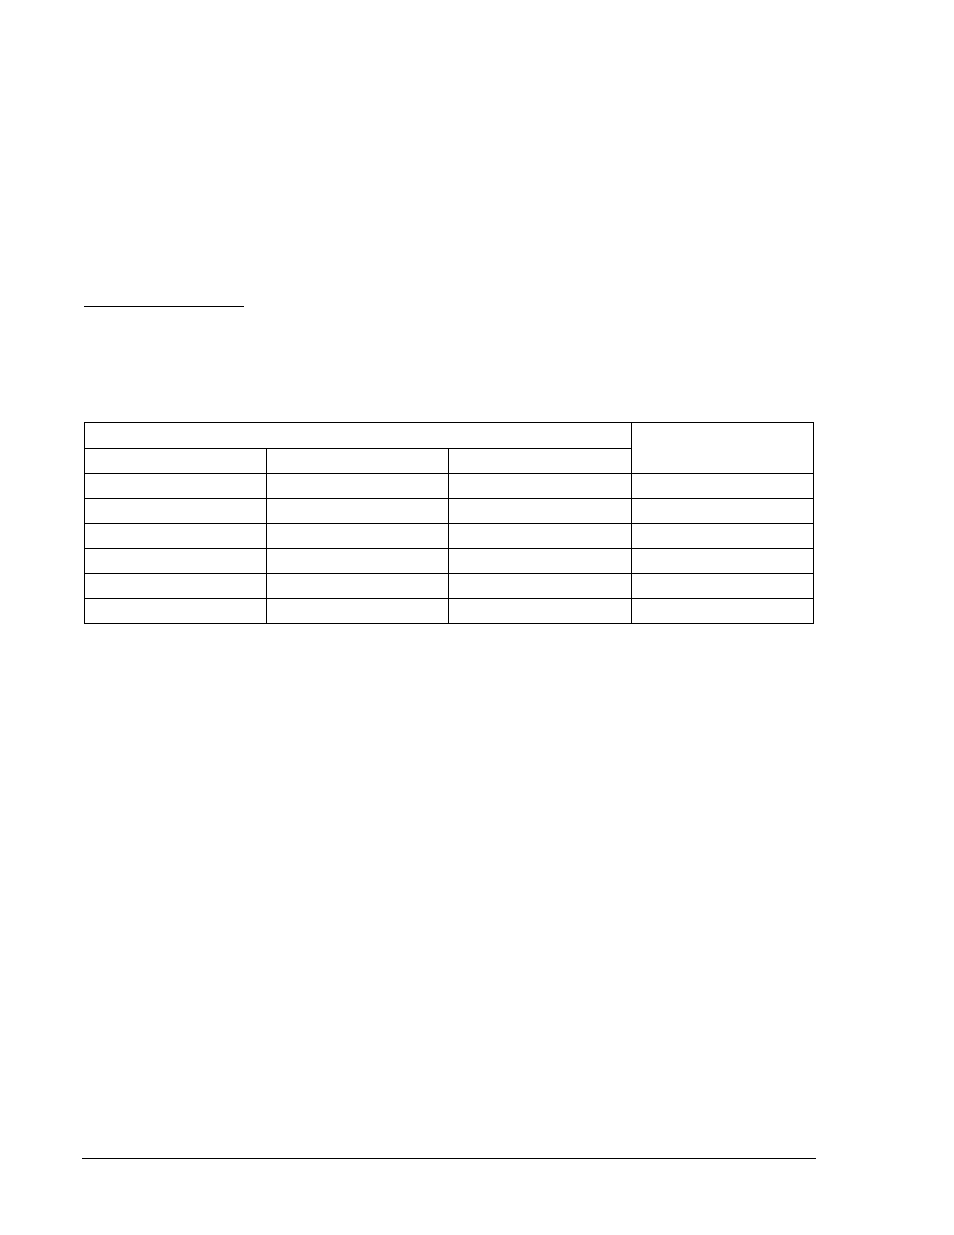
Table 13-61. x81 Time Delay Settings
Pickup and Time Delay Settings
Purpose
2 Second TD
5 Second TD
10 Second TD
S0-81=,2S
S0-81=,5S
S0-81=,10S
Sets 81 TD.
S0-181=,2S
S0-181=,5S
S0-181=,10S
Sets 181 TD.
S0-281=,2S
S0-281=,5S
S0-281=,10S
Sets 281 TD.
S0-381=,2S
S0-381=,5S
S0-381=,10S
Sets 381 TD.
S0-481=,2S
S0-481=,5S
S0-481=,10S
Sets 481 TD.
S0-581=,2S
S0-581=,5S
S0-581=,10S
Sets 581 TD.
Step 2: Prepare to monitor the x81 timings. Timing accuracy is verified by measuring the elapsed time
between a frequency change and programmed output closing.
Step 3: Connect and apply a 120 Vac, 60-hertz voltage source to Terminals C13 (A-phase) and C16
(neutral).
Step 4: Step the frequency of the applied voltage down from 60 hertz to a value below the 281
underfrequency setting. Measure the time delay and verify the accuracy of the 281 time delay
setting. Timing accuracy is
±0.5 percent or ±1 cycle (plus 3 cycle recognition time) of the time
delay setting.
Step 5: Repeat Step 4 for the 181 (OUT2) and 81 (OUT1) elements.
Step 6: Step the frequency of the applied voltage up from 60 hertz to a value above the 381
overfrequency setting. Measure the time delay and verify the accuracy of the 281 time delay
setting. Timing accuracy is
±0.5% or ±1 cycle (plus 3 cycle recognition time) of the time delay
setting.
Step 7: Repeat Step 6 for the 481 (OUT5) and 581 (OUT1) elements.
Step 8: Transmit the commands in the second column (5 second TD) of Table 13-61 to the relay.
Step 9: Repeat Steps 2 through 7 with a time delay setting of 5 seconds.
Step 10: Transmit the commands in the third column (10 second TD) of Table 13-61 to the relay.
Step 11: Repeat Steps 2 through 7 with a time delay setting of 10 seconds.
Step 12: Repeat Steps 4 through 11 for Vx Inputs C17 and C18 (change SL command to 2,0).
Step 13: (Optional.) Repeat Steps 1 through 11 for Setting Group 1.
13-38
BE1-700 Testing and Maintenance
9376700990 Rev M